

Leatherwork in an Apartment: Beginner Tools and a First Project
An apartment can be a practical place to learn leatherwork. If you're wondering whether you can do leatherwork in an apartment, the answer is yes: start with hand tools, a firm work surface, and projects sized for your space. The main considerations are managing noise, protecting your table, and keeping scraps and tools organised.
Leathercraft may bring to mind a workshop, with hammering, bulky equipment, or piles of materials. But a small setup can handle simple projects without taking over your home. Choosing tools for one project at a time keeps the work focused and your workspace manageable.
This guide explains which beginner tools suit apartment work, how to set up a stable surface, and what to consider when cutting, stitching, and using noisy tools. You’ll also find a practical way to choose a first project that fits your space, setup, and interests.
Key Takeaways
- You can begin with a firm table and project-specific hand tools instead of a dedicated workbench or stitching pony.
- Plan noisy tasks such as stamping around your neighbors, and consider quieter methods when hammering would carry through the building.
- Choose materials and finishes with their odors in mind, and use dyes, adhesives, and solvents thoughtfully in a compact space.
- Keep scraps and dust contained with a defined work area and a protective surface beneath your tools.
- Start with a small project that fits your workspace, then choose only the tools and materials it calls for.
Can you do leatherwork in an apartment without a leather stitching pony or workbench?
You can do leatherwork in an apartment without a dedicated workbench or stitching pony. A stable table, cutting surface, and project-specific tools can handle beginner tasks. A small card sleeve, for example, needs far less space than a large bag. Keep the setup portable: clear the table before working, then store your tools and leather together afterward.
A sturdy desk or kitchen table can serve as your work surface if it stays steady during cutting or stitching. Put a cutting mat or poundo board under the leather to protect the tabletop and support clean cuts. A stitching pony holds leather steady while you sew, but you can begin by clamping the work between your knees or using clips on a small piece. Choose a method that keeps the leather secure and lets you work comfortably.
For a first project, gather only the tools its steps require. A sharp utility knife cuts leather cleanly; a dull knife may need extra force and slip. Use a metal ruler to guide straight cuts, a scratch awl to mark stitch lines, and stitching chisels to make evenly spaced holes. Needles and waxed thread join the pieces. Add a mallet and firm striking surface only if the project calls for punching or setting hardware.
- For cutting: Use a sharp utility knife, metal ruler, and cutting mat.
- For hand stitching: Use a scratch awl, stitching chisels, needles, and waxed thread.
- For hardware: Use the setter and firm surface required by the chosen hardware.
Apartment furniture can affect the work. Cover slatted storage beneath a leatherwork table with wood or cardboard to help prevent settling marks on stored leather. One leatherworker planned to buy wider shelves measuring 31 ½ by 11 ¾ inches. If setting grommets, placing the table legs directly over floor joists can reduce floor bounce. A press may also suit hardware tasks where repeated hammering would shake a lightweight table.
Keep your first project compact and the work surface uncluttered. Store leather flat rather than leaving it across open slats, and return blades and chisels to a container after each session. A good starter setup isn’t a full workshop: it’s a stable surface, a protected cutting area, and a short tool list matched to the project.
Noise deserves consideration alongside the physical setup. A leatherworker suggested using music to help mask some hammering noise, without playing it too loudly. Keep the volume restrained, so the sound remains a background choice rather than another disturbance. If hammering is part of the task, consider how much of it the project actually requires before bringing out the mallet, and reserve that step for when it is needed.
That approach suits a compact apartment routine: choose a small task, prepare the surface, and do louder steps deliberately rather than letting them dominate the session. Music may soften the experience, but it doesn’t remove the need to be considerate of others nearby. If the sound feels intrusive, pause and consider a quieter method or another point in the session. Keeping noise in mind helps make your workspace practical as well as tidy.
How noisy is leatherworking, and which tasks may disturb neighbors?
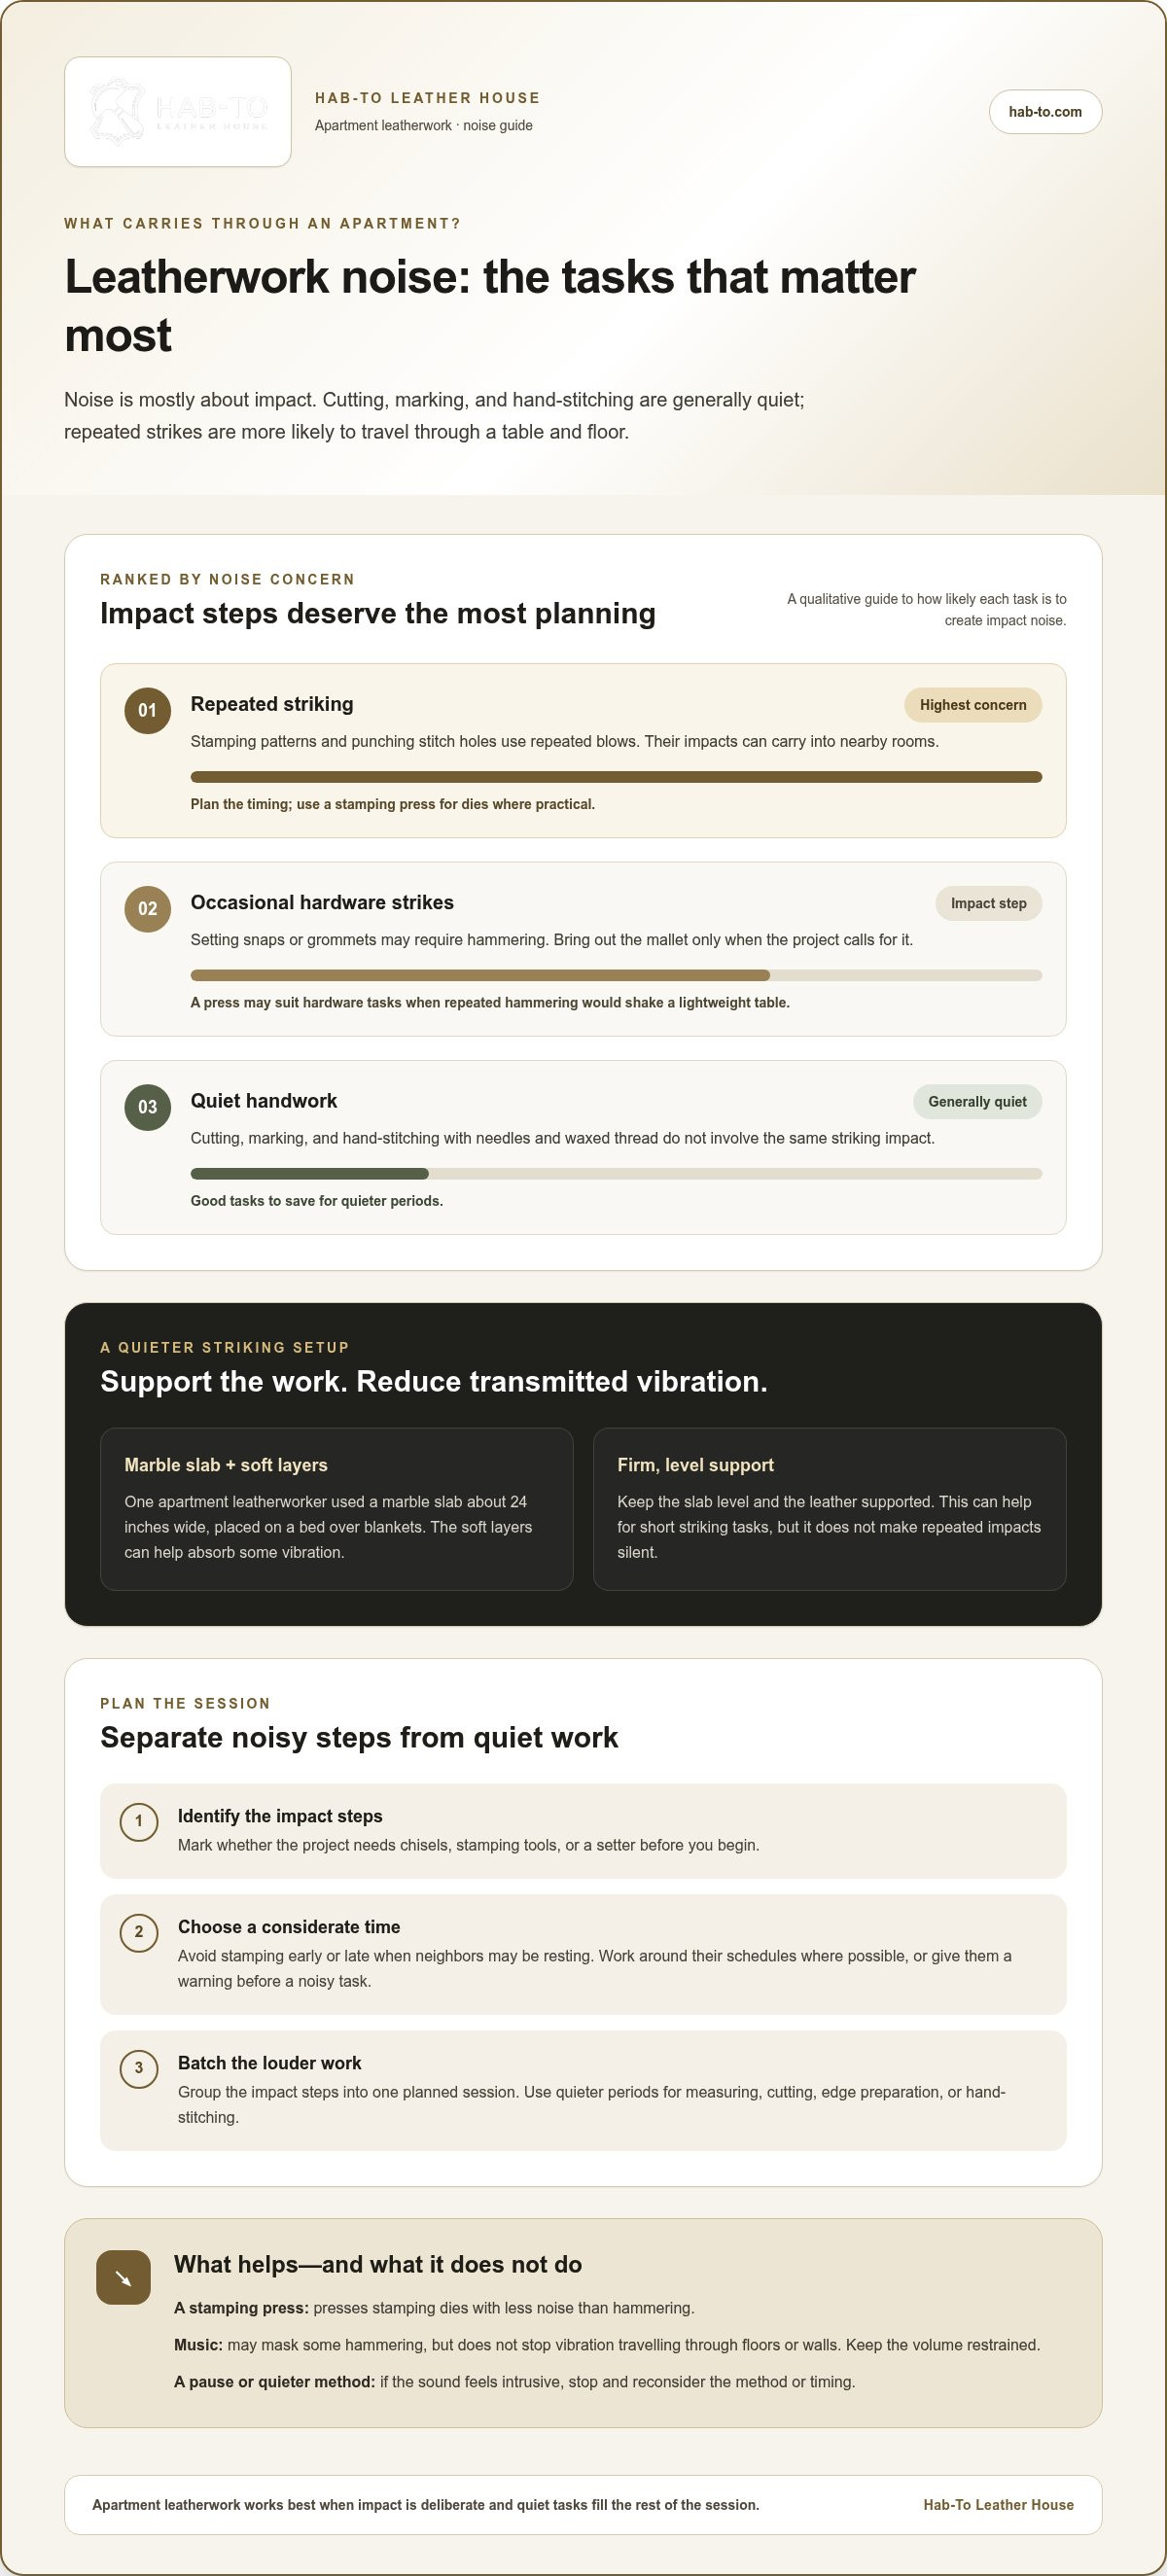
Cutting, marking, and hand-stitching are generally quiet. Noise rises when a tool strikes the leather or a hard work surface. Repeated impacts can travel through a table and floor, so stamping, punching stitch holes, and setting hardware are the tasks most likely to carry into nearby rooms. A short cutting session with a utility knife sounds different from repeated mallet blows. Plan around these separate stages instead of treating every leatherwork task as equally noisy.
Identify which steps need impact. Stitching chisels make holes when struck with a mallet, while stamping tools impress patterns through repeated blows. A setter may also require hammering to attach snaps or grommets. Hand-stitching with needles and waxed thread needs no striking, so you can continue that part without the same impact noise. If your project includes decorative stamping, save it for a neighbor-friendly time rather than doing it automatically at the start.
One apartment leatherworker used a marble slab about 24 inches wide, placed on a bed over blankets, to reduce noise. The soft layers beneath the slab help absorb some vibration from hammering. Keep the slab level and the leather supported while working. This setup suits short striking tasks, such as punching a few holes or setting hardware. It doesn’t make repeated impacts silent, so use it alongside sensible timing.
- Stitching chisels: Create evenly spaced stitch holes, but each strike adds impact noise.
- Leather mallet: Drives chisels and stamping tools; use controlled, deliberate blows.
- Stamping press: Presses stamping dies with less noise than hammering.
- Marble slab: Provides a firm striking surface; blankets underneath can help reduce transmitted noise.
Timing matters. Avoid stamping early or late, when neighbors may be resting. Work around their schedules where possible, or give them a warning before a noisy task. You can batch loud steps into one planned session, then use quieter periods for measuring, cutting, edge preparation, or hand-stitching. A simple task list helps prevent reaching for the mallet unexpectedly during a quiet activity.
Music may mask some hammering, but keep the volume considerate. It might make a few controlled strikes less noticeable in your room, but it won’t stop vibration travelling through floors or walls. If a project requires frequent stamping, use a press for the dies where practical. For a small cardholder, a few punched holes may be the only impact work required. Match the method and timing to the task, then use quiet hand tools for the rest.
These choices can make impact-heavy work easier to fit into apartment life. One leatherworker suggested working around neighbors’ schedules or warning them before starting noisy work. They also recommended avoiding stamping early or late and suggested a press for stamping dies as a quieter alternative to hammering. Choose the approach that best suits the task and household.
What leatherworking materials and finishes produce strong odors or fumes?
Odour often comes from materials applied during a project, not from cutting and stitching. Leather dye, contact adhesive, edge paint, and some surface finishes can have noticeable smells. The exact odour depends on the formulation, so don’t assume products with similar names behave alike. For example, two leather dyes may differ in smell and application instructions. Read each product label before opening it, and keep the original packaging available while you work.
Adhesives deserve particular attention in a small room. Leather glue may have a noticeable odour during application, and the smell can linger around an open container or freshly glued piece. Dye and finish products may also smell during application or drying. Water-based products can still have an odour, so check the label rather than relying on a broad product category. Before starting, list your materials and decide which need opening and where to place them between steps.
Leather itself can have a distinct smell, especially when you first unwrap it. That differs from a strong odour coming from a dye bottle or adhesive container. Keep untreated leather separate from freshly finished work, and close containers promptly after use. A small tray can hold applicators and stop a dye dauber or glue brush touching the table. If you decant a small amount into a glass jar, keep the source container’s label nearby so you can identify the product.
- Dye dauber: Applies dye in a controlled area; use a separate applicator for each color.
- Small brush: Spreads edge paint or finish along a cut edge.
- Tray or work mat: Catches drips and keeps wet pieces away from other materials.
- Seal-tight container: Limits exposure to open product between steps; retain the original label.
Before using a new finish, test it on a leather offcut. Apply a small amount, then note the smell during application and as the sample dries. This lets you assess the product without coating a finished wallet or key fob. Keep the sample and product label together, and follow the label’s directions for use, storage, and disposal. If an odour becomes bothersome, stop using the product and move away from the work area rather than trying to cover it with fragrance.
For apartment projects, decide where you’ll apply and store a finish before choosing one. A compact cardholder may need no dye or finish, while a dyed key fob adds another product to manage. Limiting the materials on your table makes it easier to close containers, separate wet work, and follow each product’s instructions.
How can you safely use leather dyes, adhesives, and solvents in a small apartment
Set up a dedicated work area before opening dye, adhesive, or solvent. Clear away food, drinks, and unrelated household items. Put a washable work mat or shallow tray beneath the leather to catch drips. Read the product label first, including its directions for use, ventilation, protective equipment, storage, and disposal. If your apartment workspace can’t meet the conditions on the label, choose another product or postpone that step.
Prepare each material separately. Keep dye, glue, and solvent in their original, labelled containers so you can identify them throughout the project. Use a dedicated dauber for dye, a small brush or applicator for adhesive, and a separate cloth for solvent. Don’t reuse an applicator between products. For example, a glue brush with dye residue could transfer colour or contaminate a join. Close each container immediately after dispensing what you need.
Work with small, controlled amounts. Pouring product into a shallow dish can make application easier, but keep the labelled source container nearby. A dropper or small spatula helps transfer only what the task requires. Test dye on an offcut before colouring a finished panel. Spread adhesive only over the surfaces being joined, and keep solvent on its own cloth rather than soaking the leather. These steps limit spills and make it easier to track which material is in use.
- Washable mat: Protects the table from dye and glue drips.
- Dedicated dauber: Applies leather dye to a panel or offcut.
- Small brush or spatula: Places adhesive along a seam or join.
- Separate cloth: Keeps solvent application apart from dyeing and gluing.
- Protective equipment: Use the type specified on the product label.
Keep the work area organised while products are open. Replace caps between steps, keep wet leather on the mat, and move used cloths away from clean tools. Don’t combine products or transfer them into an unmarked container. If a spill occurs, follow the product’s label rather than improvising a cleanup method. Keep children and pets out of the work area until containers are closed and materials are stored as directed.
Finish with a clear cleanup routine. Follow the label’s storage and disposal directions for leftover dye, adhesive, solvent, and used applicators. Clean the mat using the method specified for the product, then store materials in their original containers. A small project such as a dyed key fob can be split into dyeing, drying, and assembly sessions, keeping open products and tools contained at each stage.
How do you control leather scraps, dust, and mess in an apartment
Set aside a place for each kind of waste before cutting. Put a shallow tray beside your cutting mat for punched circles, thread ends, and narrow offcuts. Store larger usable pieces in a separate box so they stay clean for later projects. Keep a lidded bin within reach for scraps that can’t be reused. Sorting as you work prevents small pieces from spreading across the table or falling onto the floor.
For floor protection, one leatherworker recommended placing a foam and rubber interlocking mat beneath a solid desk, poundo board, and granite. This layered setup defines the work zone and supports a striking surface. After punching, use a hand broom and dustpan to gather small debris from the mat and floor. Put it in the scrap bin instead of brushing it under furniture, where it’s harder to collect.
What you will need
Gather a few simple tools before the session. A cutting mat protects the tabletop and keeps knife work within a defined area. A shallow tray catches punch-outs and thread ends, while a bench brush and dustpan collect fine debris. Use separate storage for clean offcuts and waste. For project-specific tools, browse leatherworking tools and select only what your pattern calls for.
- Cutting mat: Defines the cutting area and shields the table.
- Shallow tray: Holds punch-outs, thread ends, and small offcuts.
- Bench brush and dustpan: Gather particles from the desk and floor.
- Scrap box and lidded bin: Separate reusable leather from waste.
Reset the surface between stages. After cutting a wallet panel, put away the template and larger offcuts before punching holes. After stitching, collect clipped thread ends before handling the finished piece. This order keeps scraps away from wet finishes and reduces the chance of debris sticking to an edge. A clear surface also makes a misplaced needle easier to spot.
Before packing up, check beneath the desk and chair for small pieces. Sweep visible debris, close the scrap container, and return reusable leather to its box. Keep sharp offcuts apart from soft scraps for easier handling. A compact collection of trays and storage makes cleanup straightforward; leathercraft bundles can help you organise the materials and tools for a project.
Hab-To Leather House: Vegetable Tanned Leather
Hab-To Leather House helps apartment makers source materials and tools for a focused first project. Choose vegetable-tanned leather for your build, then select just the tools and hardware its design needs.
For an apartment-sized project: Browse leather bundles, starter bundles, and leatherworking tools to find materials and supplies suited to your next make.
Related reading: Explore the leathercraft masterclasses for learning resources, or browse the leathercraft FAQ for practical answers. Visit hab-to.com to explore materials for your project.
Choose a first project and make it your own
Yes, you can do leatherwork in an apartment. Let your first project guide what you gather next. A small cardholder, key fob, or simple sleeve gives you a clear goal and a chance to learn each step before taking on a larger build. Keep a note of the tools you use. That list will guide your next project more reliably than buying a full workshop at once.
Hab-To Leather House offers vegetable-tanned leather, hardware, and leatherworking tools to help you bring a project together. Choose materials for the item you want to make, then add only the hardware and tools its construction calls for. With no minimum order requirement, you can start with what your project needs and expand your setup at your own pace.
Pick a project that fits your space, clear a place to work, and enjoy the process. Every carefully cut panel and hand-sewn seam brings you closer to making something distinctly yours.
Frequently Asked Questions
What leatherworking projects are suitable for an apartment?
Small, hand-stitched accessories are a good fit, such as a bookmark, luggage tag, cable wrap, or glasses sleeve. These projects need little table space and can be completed in stages, making it easier to pack materials away between sessions. Choose a design with straightforward shapes and few hardware pieces. A paper template lets you check the layout and fit before cutting your leather.
What tools are needed for beginner leatherworking, and which are quiet and compact?
For quiet beginner work, use a measuring tape, wing divider, stitching needles, waxed thread, and a compact cutting mat. A wing divider marks consistent margins without striking the leather, while needles and thread let you stitch by hand. Keep small items in a tool roll or divided case for easy storage. Add project-specific tools only when a step requires them, such as a setter for snaps.
What are the fire and injury risks of apartment leatherworking, and how can you reduce them?
A dull knife can slip when extra force is needed, so use a sharp utility knife for cleaner, safer cuts, with the leather on a cutting mat or poundo board. The material gives no specific fire-risk guidance.
Disclaimer
All our blog articles are made for information purposes only we dont take responsability for any content from third parties.