


Leatherworking Tools for Beginners: A Project-First Guide for 2026
Hi, I'm Mike. Does the world of leathercraft feel like a maze? You see a beautiful handmade wallet and think, "I could do that," but then you're hit with endless online lists, each one longer and more confusing than the last. It's enough to make you give up before you even start. You're paralyzed by the fear of wasting money on the wrong equipment or low-quality items. Forget that noise. The truth is, the best set of leatherworking tools for beginners isn't the biggest one-it's the one that gets you making something tangible, right away.
This guide is different. No fluff, no endless options. I'm going to give you the exact, hand-selected list of just 7 essential tools you need to complete your very first project: a classic, functional cardholder. By the time you're done reading, you'll have a clear, concise shopping list and the confidence to start crafting this weekend. Let's trade that confusion for creation and get to work.
Key Takeaways
- Simplify your learning by understanding the four fundamental actions-cutting, marking, stitching, and finishing-that form the basis of every leather project.
- Discover the curated list of 7 essential leatherworking tools for beginners, specifically chosen to help you complete your first cardholder with confidence.
- Get an expert's take on the big debate: should you buy a cheap, all-in-one starter kit or invest in individual, quality tools from day one?
- Learn which 5 "nice-to-have" tools are the smartest investment after mastering the basics to elevate your craftsmanship and achieve a professional finish.
Before the Tools: Understanding the 4 Core Leatherworking Steps
Hi, I'm Mike. When you're just starting out, the sheer number of available tools can feel overwhelming. But here’s a secret from someone who’s been around leather his whole life: every single project, from a simple wallet to a complex bag, boils down to just four basic actions. Understanding these core leatherworking steps first will help you choose the right tools and build a solid foundation for real craftsmanship.
To get a quick visual overview of some of the tools we'll be discussing, this video is a great starting point:
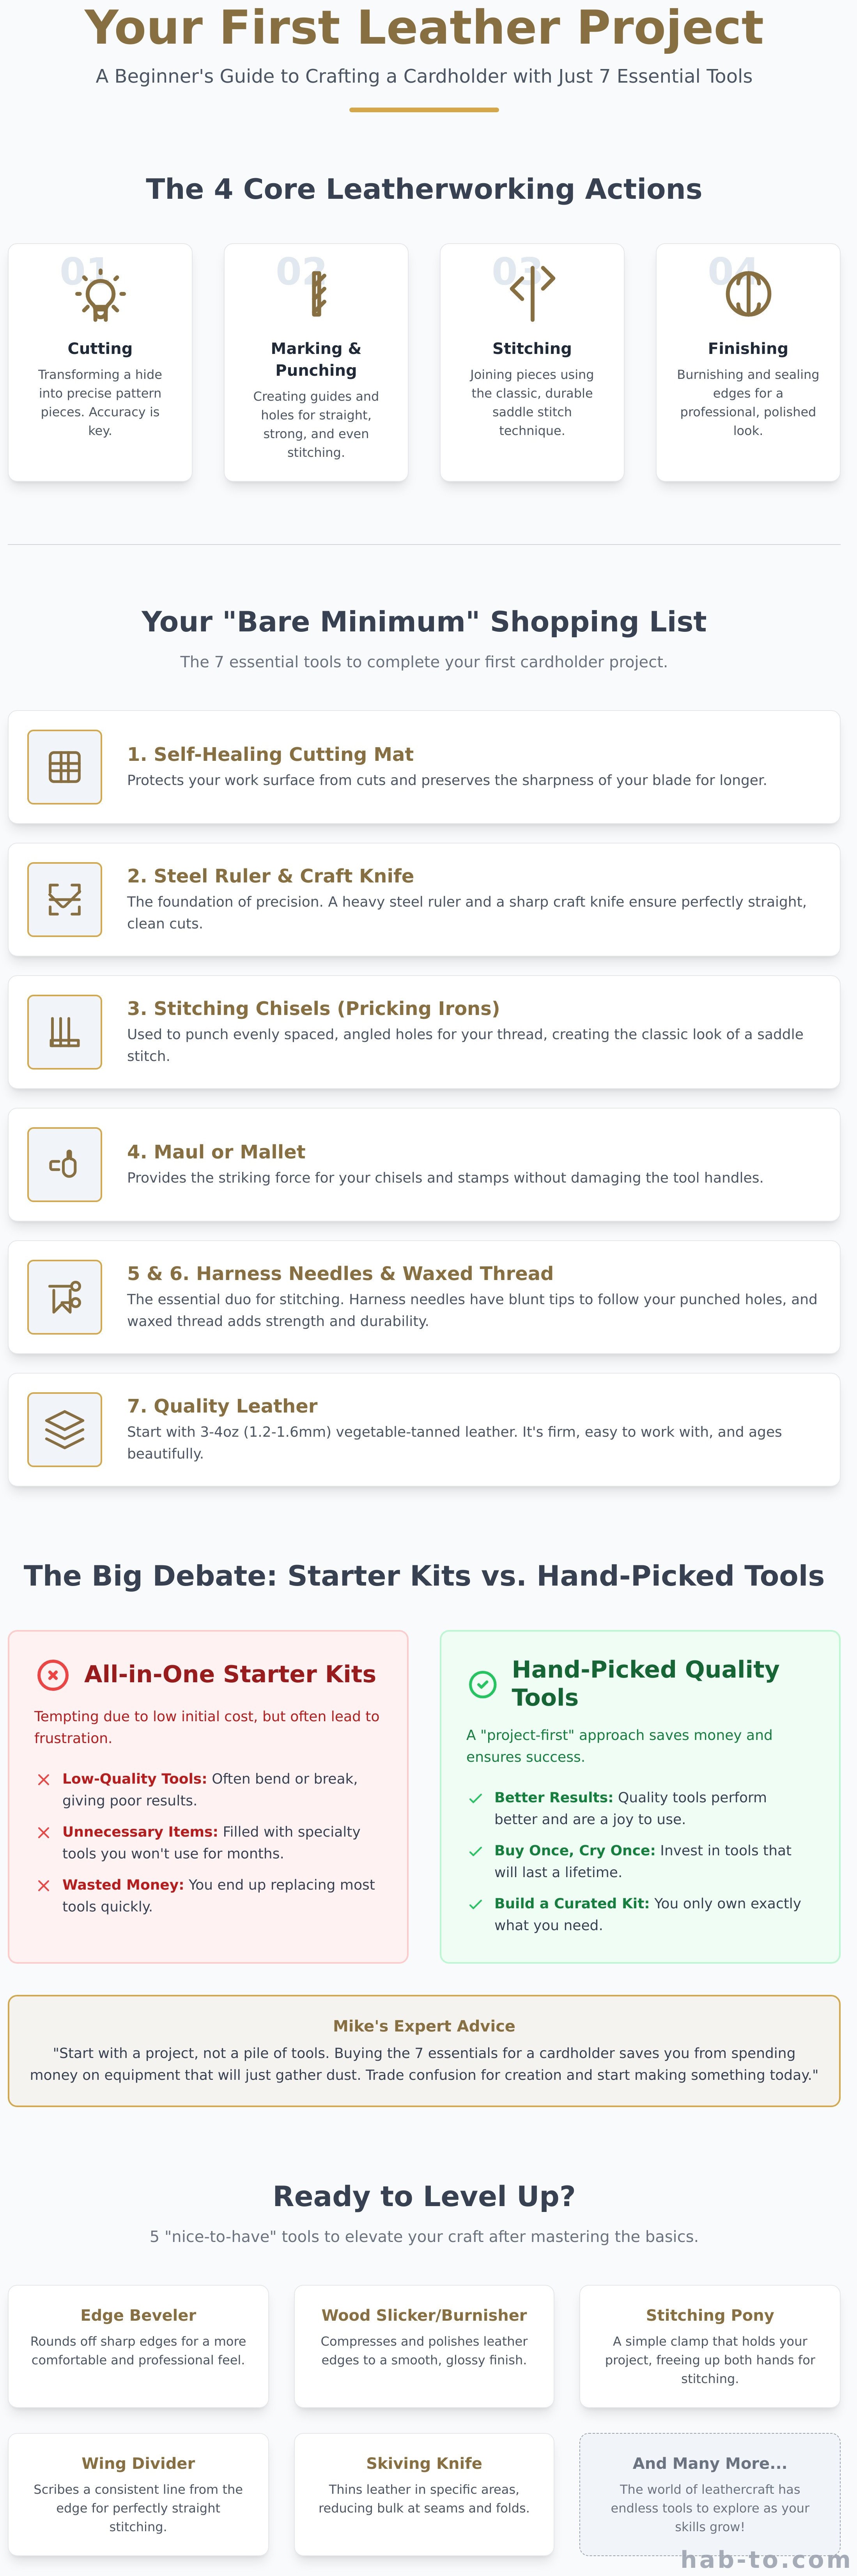
Forget the long lists for a moment. Here are the four fundamental stages of any leather project:
- 1. Cutting: This is where you transform a hide into the specific shapes for your pattern. Precision here is key to a clean final product.
- 2. Marking & Punching: Before you can stitch, you need to mark where your stitches will go and create the holes for the thread. This step ensures your stitching is straight and strong.
- 3. Stitching: The classic art of saddle stitching. This is how you join your cut pieces together to assemble your project.
- 4. Finishing: The final touch. Burnishing and sealing the edges gives your work that professional, polished look. We’ll dive deeper into finishing tools in a later section.
Why a 'Project-First' Approach Saves You Money
It’s tempting to buy a big, all-in-one kit, but I always advise new crafters to start with a project in mind. Decide what you want to make first-like a simple cardholder-and then buy only the essential leatherworking tools for beginners needed for that specific task. This approach saves you from spending money on specialty tools that might sit in a drawer for months. Our guide is built around this idea, focusing on making your first cardholder.
Choosing Your First Piece of Leather
For your first project, I can't recommend vegetable-tanned leather enough. It’s firm, easy to tool, and develops a beautiful patina over time. For a cardholder, look for a thickness of around 3-4 oz (1.2-1.6mm). It’s sturdy enough to be durable but thin enough to work with easily. And since you only need a small piece to start, our 'no minimum order' policy is perfect for getting just the premium materials you need for your first creation. No compromises.
Your First Project: The 7 Essential Tools for a Simple Cardholder
The best way to learn leathercraft is by doing. Instead of getting lost in endless lists of tools, we believe in starting with a tangible project: a simple, elegant cardholder. This project is the perfect introduction, teaching you the core skills of cutting, marking, and stitching. We've curated this essential list of leatherworking tools for beginners to get you from a piece of quality hide to a finished product you can be proud of. It's about building skill and confidence, one stitch at a time.
Think of this as your foundational toolkit. With these seven items, you have everything you need to execute your first project with precision and quality. There are many ways to begin, but focusing on a core set for a specific outcome is a powerful learning method. Excellent resources like this step-by-step leatherworking guide on Instructables often champion this project-based approach. It cuts through the noise and gets you crafting immediately.
The 'Bare Minimum' Shopping List
This short list represents our "no compromises" philosophy applied to starting out. Investing in these quality basics ensures your first experience is enjoyable and successful. We'll explore each one in detail in the next section.
- 1. A Self-Healing Cutting Mat: To protect your work surface and your blades.
- 2. A Steel Ruler & Quality Craft Knife: For straight, clean, and accurate cuts every time.
- 3. A set of Stitching Chisels (Pricking Irons): To mark perfect, evenly-spaced holes for your stitching.
- 4. A Maul or Mallet: For striking your chisels without damaging them.
- 5. Harness Needles: We recommend John James needles for their durability and blunt tips, which follow the holes you've made.
- 6. Waxed Thread: A spool of Ritza Tiger thread is a fantastic, world-renowned start.
- 7. A Stitching Pony: The game-changing 'third hand' that holds your project securely while you saddle stitch.
What About a Pattern?
You don't need to buy a pre-made pattern to get started. For a classic two-pocket cardholder, a simple piece of cardstock or paper is all you need. Just cut a rectangle measuring 10cm wide by 7cm tall for each panel you need. This empowers you to start right away, focusing your initial investment on quality leatherworking tools for beginners that will last a lifetime.
Your Essential Toolkit Explained: What to Buy and Why It Matters
When you're just starting, the sheer number of available tools can be overwhelming. The secret isn't to buy everything, but to invest in the right things. Quality over quantity is a principle we live by at Hab-To, because a good tool doesn't just do the job-it teaches you the correct feel and technique from day one. It’s the difference between fighting your materials and working in harmony with them. Before you even buy your first tool, getting familiar with the Leatherworking Lingo can save you a lot of confusion. This initial investment in knowledge and quality is what sets you up for a lifetime of rewarding craftsmanship, making this selection of leatherworking tools for beginners so crucial.
Tools for Cutting & Marking
Precision starts here. A clean cut is the foundation of any professional-looking piece. Forget scissors; they pinch and compress the leather, leaving a bruised edge. A sharp craft knife with a fresh blade glides through the material, creating a perfect, square edge. You'll need it to ride against a steel-edged ruler for unerringly straight lines. The ruler and your blade are partners with your self-healing cutting mat, which protects your work surface and the sharpness of your knife. For your stitch lines, stitching chisels (or pricking irons) are essential. Diamond-shaped chisels create the classic, angled hole perfect for a saddle stitch, while French-style irons create a more refined, slanted slit. For a beginner, a quality set of diamond chisels is a fantastic and versatile starting point.
Tools for Stitching
This is where your project truly comes to life. Many beginners try to 'hack' this step with regular sewing supplies, which often leads to frustration and broken threads. Leatherwork requires two blunt-tipped harness needles and strong waxed thread. The blunt tips follow the holes you've punched without splitting the thread, and the wax helps lock each stitch securely. To elevate your stitching from wobbly to wonderful, a stitching pony is your best friend. This simple device clamps your leather, freeing both of your hands to handle the needles and thread with control, ensuring even tension and perfectly straight lines. Finally, leave the claw hammer in the garage. A poly mallet delivers a firm, dead blow without damaging the ends of your chisels or stamps, protecting your investment for years to come.
Level Up: 5 'Nice-to-Have' Tools for Your Next Project
You’ve done it. You’ve cut, stitched, and finished your first cardholder. The feeling is fantastic, but as you admire your work, you start noticing the small details. You see the professionally made goods and wonder, "How do they get those beautifully smooth, shiny edges?" This is the moment you get truly hooked on the craft.
These next five items are the logical next step in your journey. They aren't strictly essential for day one, but they are the first upgrades you should consider. Investing in these is an investment in quality and finish, transforming your projects from functional to phenomenal. When it comes to impactful leatherworking tools for beginners, this is where the magic really starts.
Achieving Professional Edges
The single biggest visual upgrade you can make to a leather project is finishing the edges properly. It takes a piece from looking "homemade" to "hand-crafted." This trio of tools works together to create that durable, glossy edge that defines high-quality leatherwork.
- Edge Beveler: This tool is designed to shave off the sharp 90-degree corners of your cut leather. This simple action creates a slight roundness, which not only looks more refined and is more comfortable to hold but is also the crucial first step for getting a perfect burnish.
- Tokonole & Edge Slicker: This is the classic Japanese combination for creating glass-smooth edges. Tokonole is a burnishing agent you apply to the edge. You then use the grooves in the wooden edge slicker to rub the edge briskly. The friction generates heat, which compresses the leather fibres into a hard, sleek, and durable seal.
- Sandpaper: A humble but vital tool. Before you bevel or burnish, sanding the edge with fine-grit sandpaper (400-800 grit) removes any fuzz or unevenness from the cut, giving you a perfectly flat and smooth foundation to work on.
Improving Precision and Design
Once your finishing is on point, the next area for improvement is the precision of your lines and stitching. These tools help you achieve the kind of consistency that is a hallmark of true craftsmanship.
- Wing Divider/Compass: For perfectly straight stitch lines, a wing divider is non-negotiable. Set the desired distance from the edge, run one point along the side of your leather piece, and the other will scribe a flawless, consistent guideline for your stitching chisel. No more wobbly lines.
- Scratch Awl: An incredibly versatile and precise marking tool. A scratch awl allows you to trace patterns onto leather without leaving permanent ink marks. Its fine point is also perfect for gently opening up your stitching holes before sewing, making it easier for the needle to pass through.
While not part of your initial starter kit, these are the leatherworking tools for beginners that bridge the gap to the next level. They are a direct investment in the quality and artistry of your work. When you're ready to add this layer of refinement, you can browse our hand-selected collection of sustainable tools at Hab-To.
Starter Kits vs. Hand-Picked Tools: Mike's Advice for Beginners
Hi, I’m Mike. Over the years, I’ve seen countless aspiring crafters start their journey, and one question comes up more than any other: "Should I just buy one of those cheap, all-in-one kits from Amazon?" It seems like a great deal, but as a fourth-generation leather craftsman, I want to share some advice that will save you time, money, and a lot of frustration.
The Truth About All-in-One Kits
The appeal of a starter kit is obvious. For a low price, you get a box filled with dozens of tools. However, this shortcut often leads to a dead end. The reality is that quality is sacrificed for quantity.
- Low-Quality Materials: Most of these tools are made from soft, inferior steel. They arrive dull, won’t hold an edge, and make clean cuts nearly impossible.
- Unnecessary Filler: A significant portion of these kits is "fluff"-tools you will rarely, if ever, use. This just adds clutter to your workspace.
- The Confidence Killer: This is the most critical point. When a tool fights you every step of the way, you'll think the problem is your lack of skill. You'll get frustrated and might even give up on the craft, believing you're not cut out for it. It’s not you; it’s the tool.
The Hab-To Philosophy: Buy Once, Buy Well
Our philosophy is simple: start with fewer, better tools. Investing in a handful of high-quality essentials will serve you better than a box of subpar equipment. A well-made knife that glides through leather, a set of pricking irons that punch clean holes-these are the instruments that build real skill and joy in the craft. They are an investment that will last a lifetime.
This is why we’ve created our own curated Crafting Bundles. We hand-selected the fundamental leatherworking tools for beginners that you'll actually need and use, all meeting our uncompromising standards for quality. It’s the convenience of a kit with the quality of a professional’s collection.
At Hab-To, we're not just selling supplies; we're here to share our passion and guide you. We want you to fall in love with leathercraft, and that starts with having the right tools in your hands. Ready to build a toolkit you can be proud of?
Browse our hand-picked tools and crafting bundles for beginners.
Your Crafting Journey Starts Now
Embarking on your leatherworking journey doesn't mean buying every tool on the shelf. As we've explored, the key is to start with a specific project, like a simple cardholder, and gather only the essential tools you need for the job. This project-first approach not only saves you money but builds your skills and confidence one stitch at a time. Mastering the basics is the true foundation of quality craftsmanship.
Choosing the right leatherworking tools for beginners is less about quantity and all about quality. A cheap, frustrating tool can stop a new passion in its tracks. That's why every tool we offer is hand-selected, drawing on over 160 years of our family's experience in the leather trade. These are the same tools we trust for our own projects. No compromises.
You have the knowledge; now it's time to create. With no minimum order, you can get exactly what you need for your first project. Start your craft with quality. Explore our beginner-friendly tools. We believe in your potential and are here to support you every step of the way. Happy crafting!
Frequently Asked Questions
What is the best leather for a beginner to start with?
For your first projects, I always recommend vegetable-tanned leather, around 4-5 oz (1.6-2.0mm) thick. This type of leather is firm, holds its shape, and is perfect for practicing cutting, stitching, and burnishing. It’s the traditional choice for true craftsmanship and is very forgiving for newcomers. Unlike softer chrome-tanned leathers, it beautifully accepts tooling and stamping, allowing you to see your progress clearly. It’s an excellent foundation for learning the core skills.
How much does it realistically cost to get started in leatherworking?
You can get started for a surprisingly modest amount. A basic, all-in-one kit might cost between €50 and €100. However, I often advise investing in a few quality individual items for a better experience, which could range from €150 to €250. Prioritise a great knife, a set of stitching chisels, and a mallet. Investing in quality leatherworking tools for beginners from the start means they'll last longer and produce cleaner results, saving you frustration and money in the long run.
Do I really need a stitching pony to start?
While not strictly essential on day one, a stitching pony is one of the best investments you can make for improving your craft. It acts as a third hand, securely holding your project so you can use both hands to stitch. This results in much straighter, more consistent, and tighter seams. You can manage small projects by clamping the leather between your knees, but a pony will immediately elevate the quality and enjoyment of your hand-stitching.
Can I use a regular hammer instead of a leatherworking mallet?
I strongly advise against using a standard metal hammer. A steel hammer will mushroom and damage the ends of your precious tools, like stitching chisels and hole punches. A proper leatherworking mallet, typically made of poly, rawhide, or wood, is designed to absorb the impact and provide a firm, dead blow. This protects your tools, reduces bounce-back, and gives you much better control. It's a non-negotiable tool for protecting your investment and ensuring clean work.
What's the difference between a stitching chisel and a pricking iron?
This is a great question that often confuses newcomers. A stitching chisel is designed to punch a clean, diamond-shaped hole completely through the leather, ready for stitching. A pricking iron, on the other hand, only marks the stitch spacing on the surface. You then use a stitching awl to pierce each hole manually as you sew. Chisels are faster and more common for beginners, while pricking irons offer finer control for high-end, traditional craftsmanship.
How do I sharpen my leathercraft tools?
Keeping your tools sharp is crucial for safety and quality. The two essentials are a sharpening stone (like a whetstone) and a leather strop with a polishing compound. First, you'll use the stone to establish and refine the cutting edge, maintaining a consistent angle. Afterwards, you'll pull the blade across the strop to polish away any microscopic burrs, honing it to a razor-sharp finish. A sharp tool cuts cleanly and requires less force, making your work safer and more precise.
What is the first project a beginner leatherworker should make?
I always suggest starting with something small and simple to build confidence. A keychain, a bookmark, or a simple one-pocket cardholder are perfect first projects. These items allow you to practice the fundamental skills-cutting straight lines, punching stitching holes, hand-sewing, and finishing edges-without being overwhelming. They require minimal material and a basic set of leatherworking tools for beginners, offering a quick and satisfying result that will motivate you to continue this beautiful craft.
