


Making the Most of a Leather Hide: A Masterclass in Yield and Anatomy
Last Tuesday, a maker in our Amsterdam workshop sat with a piece of premium Shell Cordovan for forty minutes, knife in hand, paralyzed by the fear that one wrong move would turn a €120 investment into expensive scrap. We've all felt that hesitation. Mastering the art of making the most of a leather hide is the only way to move past that fear and ensure your high-quality, vegetable-tanned materials don't end up in the bin. You deserve to cut with confidence, knowing exactly how the fibers will react under tension.
I'm going to show you how to strategically map your projects to minimize waste and maximize quality, using the same principles we've followed for 160 years of family tradition. We'll break down the hide from the firm butt to the stretchy belly; giving you a clear plan to utilize every square inch of your premium materials. By the end, you'll have the expertise to handle even the rarest skins with the precision of a master craftsman.
Key Takeaways
- Understand the hide as a biological map to strategically place patterns based on varying thickness, stretch, and leather hierarchy.
- Master the "Dry Run" nesting method to eliminate dead space, ensuring you are making the most of a leather hide before making a single cut.
- Overcome the fear of the "first cut" by learning a sequential breakdown process that transforms large hides into manageable, high-quality sections.
- Learn to identify and integrate natural markings like range scars and fat wrinkles to add authentic character and value to your craftsmanship.
- Gain specialized insights into maximizing yield for premium materials like Shell Cordovan, where every millimeter is critical to your project's success.
Understanding the Map: The Anatomy of a Leather Hide
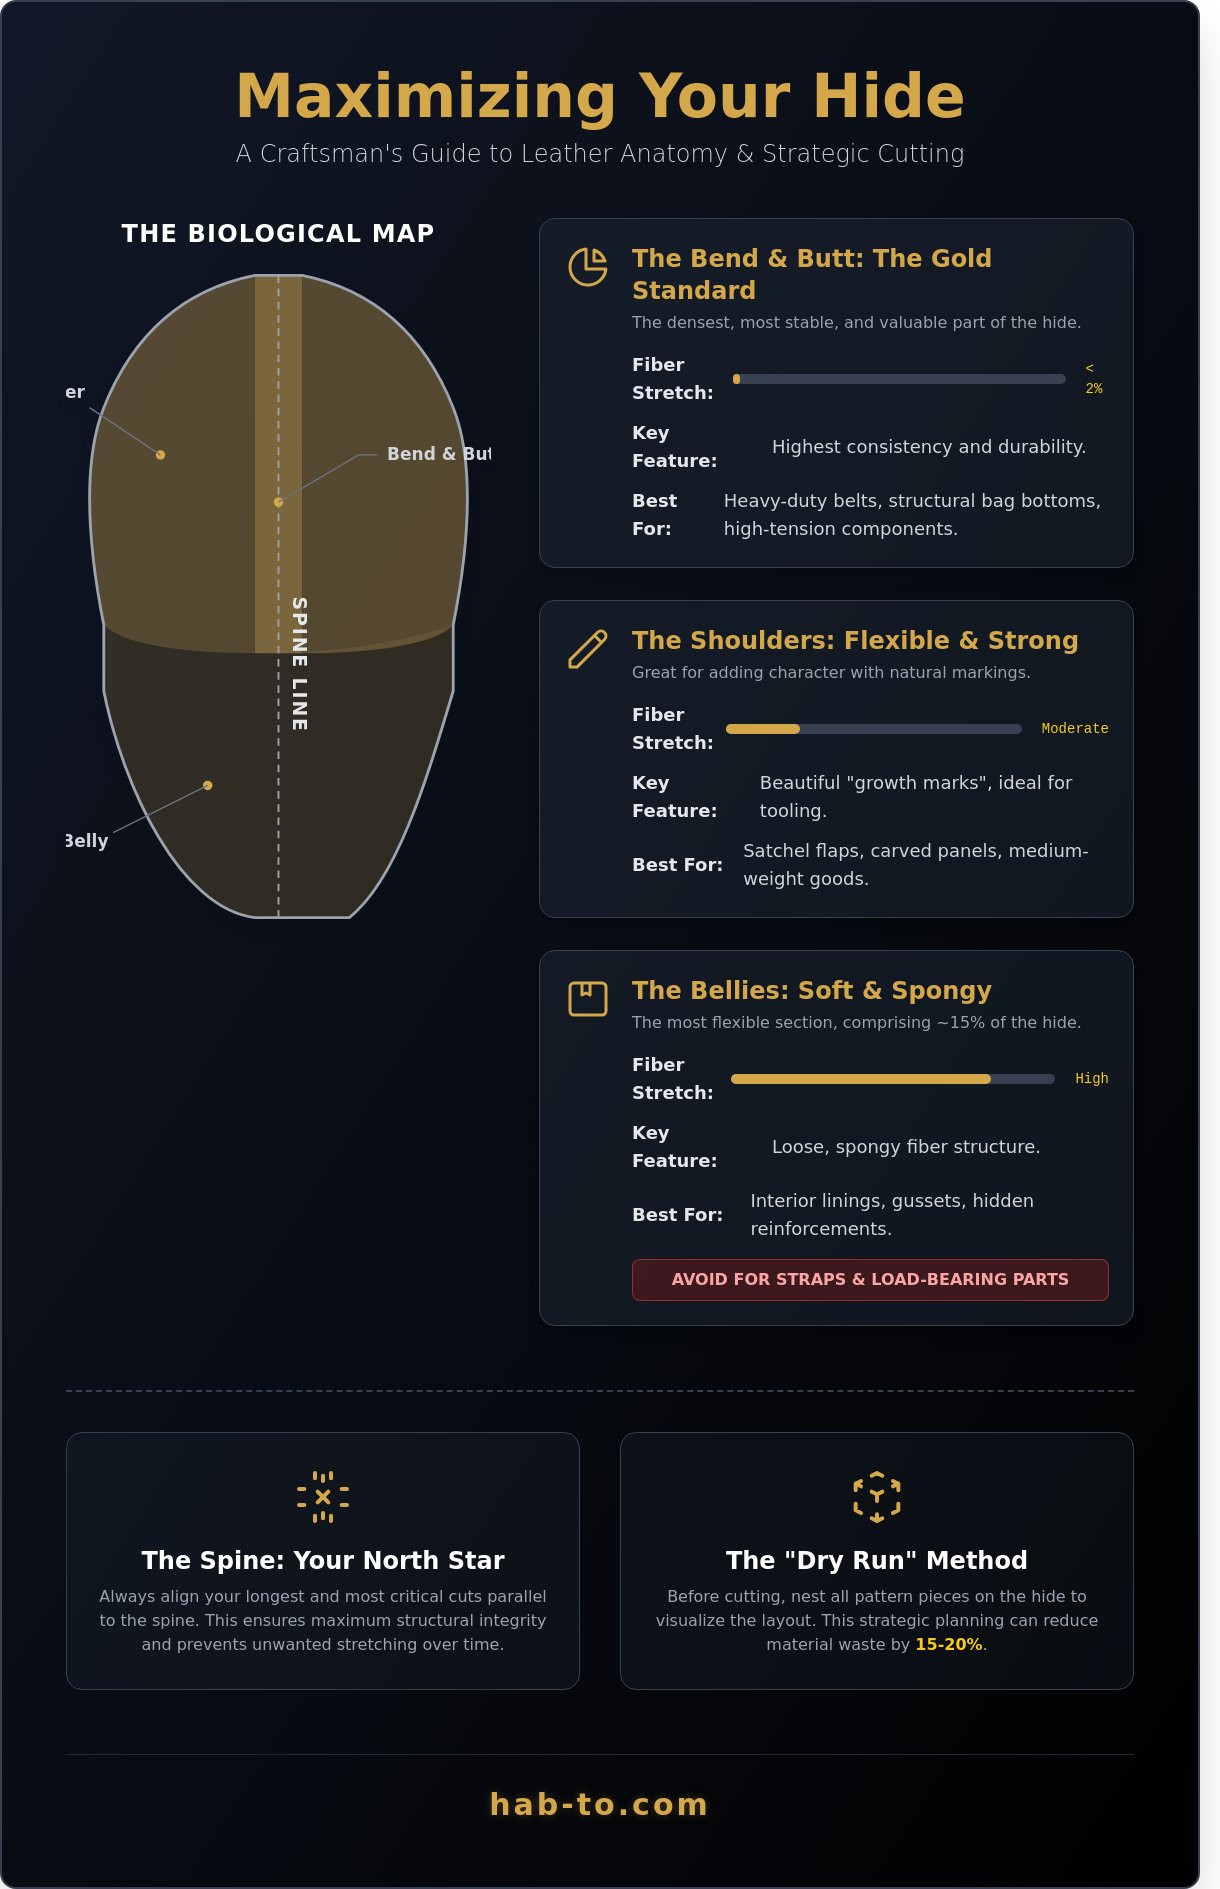
Hi, I'm Mike! When you're standing over a fresh side of leather, you aren't just looking at raw material. You're looking at a biological map. Making the most of a leather hide starts with respecting how the animal lived and moved. Because every animal hide is a natural product, the fiber density and stretch levels vary wildly across the surface. You can't treat it like a roll of synthetic fabric where every inch is identical.
The spine line is the foundation of every successful project. It's your North Star. Most professional makers align their longest, most critical cuts parallel to this line to ensure structural integrity. If you cut a belt strap perpendicular to the spine, you'll find it stretches out of shape within weeks. Understanding this hierarchy allows you to minimize waste and maximize the value of your purchase.
To better understand how these raw materials become the leather on your bench, watch this helpful video:
Tanning methods play a massive role in how these anatomical sections feel under your knife. At Hab-To, we focus on vegetable tanning. This traditional process uses tree barks and tannins to "fix" the fibers in their natural state. In a 4.0mm thick hide, veg-tanning makes the differences between the tight butt and the loose belly very obvious. It's about honesty in materials. No synthetics and no compromises mean you get to work with the true character of the leather.
The Bend and Butt: The Gold Standard
The butt and bend represent the area over the hindquarters and lower back. This is the densest part of the hide with a fiber stretch rate often below 2%. Because it offers the most consistent thickness and highest yield, it's the most expensive section. Wholesale prices for premium butts can sit 50% higher than the rest of the side. Use this for 1.5-inch heavy-duty belts, structural bag bottoms, or any component that must hold its shape under 100 pounds of tension.
Shoulders and Bellies: Flexibility vs. Softness
Shoulders are fantastic for tooling and carving. They often feature beautiful "growth marks" that tell a story of the animal's life. While slightly more flexible than the butt, they remain sturdy enough for medium-weight goods like satchel flaps. Bellies are a different story. This area makes up roughly 15% of the hide's surface but has a loose, spongy fiber structure. Don't use bellies for straps. Instead, save them for interior linings, gussets, or hidden reinforcements. You can identify the transition line by pressing your thumb into the grain; if the leather "breaks" into large, soft wrinkles, you've hit the belly.
Making the most of a leather hide requires a strategic eye. By matching the specific anatomy to the requirements of your pattern, you ensure your craft lasts for generations.
Strategic Planning: Project Nesting and Templating
Before you even think about picking up your head knife, you have to master the layout. This is the stage where you're truly making the most of a leather hide. I call it the 'Dry Run' method. It's a non-negotiable step in my workshop because it respects the material and the animal it came from. You lay every template piece onto the grain side to visualize the final product before a single fiber is severed. This phase can reduce your waste margin by as much as 15% to 20% compared to cutting on the fly.
Planning isn't just about saving space; it's about structural integrity. Understanding the chemistry of leather tanning helps you realize why grain direction is vital. Tanning processes stabilize protein fibers, but those fibers still retain a natural orientation based on the animal's movement. If you cut a load-bearing strap against the grain, it'll likely stretch and warp within 12 months. Always align your high-stress components parallel to the spine for maximum longevity.
Don't forget to account for the 'sacrificial edge'. I always recommend leaving a 3mm buffer around your patterns. This extra room is essential for clean beveling, sanding, and stitching allowances. It ensures that your final dimensions are exact, even after you've finished the edges to a glass-like shine.
Creating a Cutting List
Nesting is the art of interlocking pattern pieces to maximize surface area usage. To do this effectively, start with your largest components first. If you cut small card pockets from the center of the hide, you'll find yourself boxed in when you need a large messenger bag panel. Categorize your parts by required firmness. Use the tight-grained butt and spine area for belts or exterior shells, and save the softer belly leather for interior pockets or linings. If you need a specific temper for your next build, you can browse our premium leathers to find the perfect match.
Tools for the Layout Phase
- Scratch Awls: These are better than pens because they leave a fine, indented line that won't bleed into the leather fibers.
- Silver Pens: Use these specifically for chrome-tanned or dark oil-tan leathers where an awl line is hard to see; the ink wipes off with a bit of rub.
- Pattern Weights: Use at least three 500g weights to keep the hide perfectly flat. A shifting hide leads to asymmetrical pieces.
- Clear Acrylic Templates: These are a game-changer. They allow you to see every natural scar or brand mark, so you can decide whether to hide them or feature them as unique character marks.
The First Cut: Breaking Down the Hide Safely
Unrolling a full side of premium vegetable-tanned leather often brings a bit of "cutter's paralysis." You're looking at a significant investment, and the fear of a misplaced blade is a natural reaction. I've seen makers hesitate for 20 minutes before making that initial mark. The secret to overcoming this psychological barrier is preparation. Use a silver pen or tailor's chalk to map your pattern pieces before the steel ever touches the grain. This visualization turns a high-stakes moment into a simple execution of a pre-verified plan.
In a compact Amsterdam-style workshop, you rarely have the luxury of a 4-meter cutting table. Don't let a small space dictate your quality. Work in sections by unrolling only what you need and weighting the rest of the hide on a side shelf or a dedicated rolling rack. Break the hide down into manageable quarters or specific "project blanks" immediately. This approach simplifies the process of making the most of a leather hide because you're no longer wrestling with the weight and drape of a 25-square-foot skin while trying to maintain precision.
Safety during the breakdown phase is about mechanics and respect for the tool. When you're slicing through 3.5mm or 4mm thick leather, your blade depth matters. Don't extend a utility blade more than 10mm; a long blade flexes under pressure, leading to wandering lines and jagged edges. Keep your guiding hand flat and always positioned behind the direction of the cut. If the blade slips, it should hit the cutting mat, not your fingers.
Essential Cutting Tools
The utility knife is your workhorse for the "rough cut" breakdown phase. It provides the stability needed for long, heavy pulls through thick hide. For precision and tight radii, the Japanese skiving knife is the superior choice. Its single-bevel edge allows for vertical accuracy that a standard box cutter can't match. To maintain a "scary sharp" edge, strop your blade every 15 minutes of active cutting. If you feel the leather bunching, stop immediately. You can find the right gear for these tasks in our curated selection of Hab-To's leather sewing tools.
Straight Lines and Curves
Anchor your hide with a heavy 60cm steel square. The weight prevents the leather from stretching or "creeping" as you pull the knife toward you. For curves, avoid the "chopping" motion that creates faceted, ugly edges. Instead, use a series of fluid, overlapping strokes or rotate the leather itself while keeping your knife hand at a consistent angle. Always cut from the grain side up. This ensures 100% visibility of the leather's natural features and is an essential step in making the most of a leather hide without accidental waste from hidden flaws on the flesh side.
Embracing Imperfections: Working with Natural Markings
The search for a "perfect" hide often leads beginners to corrected-grain leathers that look more like plastic than animal skin. Real craftsmanship celebrates the life of the animal. In a 2023 survey of boutique leather goods buyers, 68% of respondents indicated they preferred leather with visible natural markings over uniform, mass-produced finishes. These marks aren't defects; they're signatures of authenticity. When you're making the most of a leather hide, you aren't just cutting around holes. You're deciding which parts of the animal's history deserve to be seen.
Identifying these marks is the first step in your layout process. Fat wrinkles, often found in the shoulder and neck areas, appear as wavy, textured lines that add depth to the grain. Range scars come from healed scratches against brush or fences, showing up as darker, smooth streaks. Insect bites look like tiny, circular pinpricks. While a hole requires you to move your pattern, these surface marks offer a chance for creative expression. I've found that placing a prominent range scar on the front of a field notes cover gives it an immediate, rugged soul that no machine can replicate.
Strategic placement is where your expertise shines. Don't waste premium square footage by throwing away "marked" sections. Instead, tuck insect bites into internal pockets or the underside of a strap where they won't be seen. For the exterior, remember that vegetable tanned leather patinas differently over scar tissue. Healed scars often absorb oils more slowly, causing the surrounding leather to darken while the scar stays slightly lighter, creating a beautiful high-contrast look after two years of daily use.
The 'Character' Grade
Fat wrinkles on the shoulder are a goldmine for adding texture to bag flaps or large tote panels. These areas provide a tactile quality that smooth bellies lack. You must distinguish between cosmetic character and structural risk. If a scar is deep enough to catch a fingernail or shows signs of "fiber looseness," it's a structural risk. If it's smooth to the touch, it's merely cosmetic. Use these marks to tell a story. Tell your customers that these "flaws" prove the leather is a natural, premium product. It's a hallmark of quality, not a reason for a discount.
Trimming and Skiving Around Defects
Making the most of a leather hide requires a surgical approach to defects. If you encounter a small hole, don't discard the surrounding area. Cut your patterns so the hole sits in the "negative space" between your pieces. If a scar is particularly thick or raised, use a sharp skiving knife to level the flesh side, ensuring your stitching remains even. Never toss the small, scarred offcuts. Use these 3-inch or 4-inch scrap pieces for testing new dyes, checking the heat of your foil stamp, or practicing a new decorative stitch before touching your main project.
Ready to find a hide with true character for your next masterpiece? Browse our hand-selected premium leathers and start creating.
Maximizing Yield in Premium Materials: Cordovan and Beyond
Every millimeter counts when you're working with the king of leathers. Shell Cordovan isn't just leather; it's a dense, fibrous flat muscle found beneath the hide of a horse's hindquarters. Because it's sold by the piece rather than the square foot, making the most of a leather hide like this requires a surgical mindset. A single misplaced cut on a shell costing €100 or more can instantly erase your profit margins. You aren't just buying material; you're buying a limited surface area that demands 95% or higher utility.
Yield varies drastically depending on how the leather is processed before it reaches your bench. A full cowhide often carries 20% to 25% waste due to belly stretch and neck wrinkles. Sides offer a middle ground, but pre-cut panels or "butts" provide the highest efficiency for small goods. At Hab-To, our "No Minimum Order" policy changes the math for independent crafters. Instead of being forced to buy a 20-square-foot side for a project that only needs three, you can purchase specific sections. This prevents "dead stock" from cluttering your workshop and tying up your capital.
Mike's advice for evaluating premium hides is simple: think in "units of wallets." Don't focus on the €120 price tag of a premium panel. Instead, calculate how many bifold interiors or cardholders you can extract. If that €120 panel yields 12 minimalist wallets, your material cost is €10 per unit. When you frame it this way, the "expensive" leather often becomes the most logical choice for high-end craftsmanship. It's about the value you extract, not the price you pay at the counter.
Yield Comparison Table
| Leather Type | Avg. Yield | Best Project Match | Typical Waste |
|---|---|---|---|
| Full Cowhide | 75-80% | Tote Bags, Luggage | 20-25% |
| Side | 82-85% | Belts, Briefcases | 15-18% |
| Shoulder | 88-92% | Wallets, Straps | 8-12% |
| Shell Cordovan | 95-98% | Luxury Small Goods | 2-5% |
The "Sweet Spot" for small-scale crafters is often the Double Shoulder or pre-cut panels, offering high yield without the bulk of a full hide.
The Amsterdam Showroom Advantage
Buying online is efficient, but hand-selecting your hide in our Amsterdam showroom is the ultimate way of making the most of a leather hide. You can lay your physical acrylic or paper patterns directly onto the leather before you buy. This allows you to navigate around natural growth marks or scars that might interfere with a specific pocket design. You get to consult with Mike on temper and grain orientation, ensuring the material matches your project perfectly. We invite you to book an appointment for a personalized material matching session. Don't leave your yield to chance; see the leather, feel the quality, and cut with confidence.
Master Your Craft with Every Strategic Cut
Mastering the anatomy of a hide and utilizing strategic nesting techniques isn't just about saving money; it's about respecting the raw material. When you understand how to navigate natural markings and plan your templates for premium materials like Shell Cordovan, you elevate your work from basic assembly to true artistry. Making the most of a leather hide requires a blend of patience and technical knowledge that only comes with practice. You've learned how to map the belly, shoulders, and butt to ensure every piece of your project has the right strength and temper.
At Hab-To Leather House, we bring 160+ years of family expertise to help you find the perfect piece for your next project. You don't have to navigate these choices alone. Whether you want to visit our Amsterdam-based showroom for a hands-on selection or order from afar, we support crafters of all levels with no minimum order requirements. Quality shouldn't be gated by volume. We believe every artisan deserves access to the best tannery outputs in the world.
Hi, I'm Mike! Need advice on choosing the right hide? Schedule a free consult or browse our hand-selected leather.
Grab your knife and start your next project with total confidence.
Frequently Asked Questions
What is the most efficient way to store a large leather hide?
Roll your hide grain side out around a 10cm diameter cardboard tube to prevent the fibers from cracking. Avoid folding at all costs, as this creates permanent creases that ruin 100% of the affected area. Keep it in a temperature-controlled space between 15 and 20 degrees Celsius with 50% humidity to prevent mold or drying. This method preserves the natural oils for 5 years or longer.
Can I use the belly leather for a belt if I reinforce it?
Don't use belly leather for a structural belt because the loose fiber structure stretches up to 15% more than the butt. While you can line it with a non-stretch material, the leather surface will still grow and wrinkle over time. Stick to the back or double shoulder for belts to ensure they last 20 years without warping or losing their shape.
How do I calculate how many square feet I need for a project?
Add 25% to your total pattern area to account for natural defects and edge waste when making the most of a leather hide. If your pattern pieces total 4 square feet, buy at least 5 square feet. This margin covers the 15 percent of a hide that's typically unusable due to brand marks, insect bites, or thin edges near the belly.
What should I do with the very small scraps left over?
Use scraps smaller than 5cm for zipper pulls, cord organizers, or test pieces for new dyes and finishes. We've found that 95% of makers can turn these offcuts into high-margin small goods like key fobs. Never throw them away; even a 2cm strip is perfect for testing your stitching iron alignment, thread tension, or edge beveler sharpness before starting your main project.
Is it better to buy a whole hide or pre-cut pieces for a beginner?
Start with a pre-cut double shoulder or a side of about 15 square feet to learn the anatomy without the high cost of a full 50 square foot hide. Buying a whole hide is only cost-effective once you're comfortable navigating around the 3 or 4 natural blemishes found on every organic skin. It's about balancing your budget with the learning curve of layout.
How does grain direction affect the strength of a wallet?
Cut your main wallet body parallel to the spine to minimize stretching. Leather stretches significantly more across the width of the animal than along its length. By aligning your load-bearing pieces with the spine, you reduce pocket sag by 40% over 5 years of daily use. It's a simple trick that separates professional goods from amateur projects that lose their shape after 6 months.
Can I remove natural markings like fat wrinkles from leather?
You can't remove fat wrinkles because they're part of the skin's 3D fiber structure, not just a surface mark. Some crafters use a glass slicker to compress the area, but the texture remains 100% visible. Embrace these marks as proof of a natural, vegetable-tanned product. They're the unique fingerprints that distinguish 100% real leather from the sterile, flat look of plastic synthetics.
What tools are absolutely necessary for cutting thick veg-tan leather?
You need a heavy-duty utility knife with a 0.5mm thick blade and a 30cm steel ruler for precision. For leather over 3.5mm thick, a rotary cutter with a 45mm blade provides the most consistent pressure. Don't forget a self-healing mat; cutting on wood or hard plastic dulls your edge 3 times faster, leading to jagged edges that require 15 minutes of extra sanding.
