


The Ultimate Natural Leather Conditioner Recipe: An Artisan’s Guide for 2026
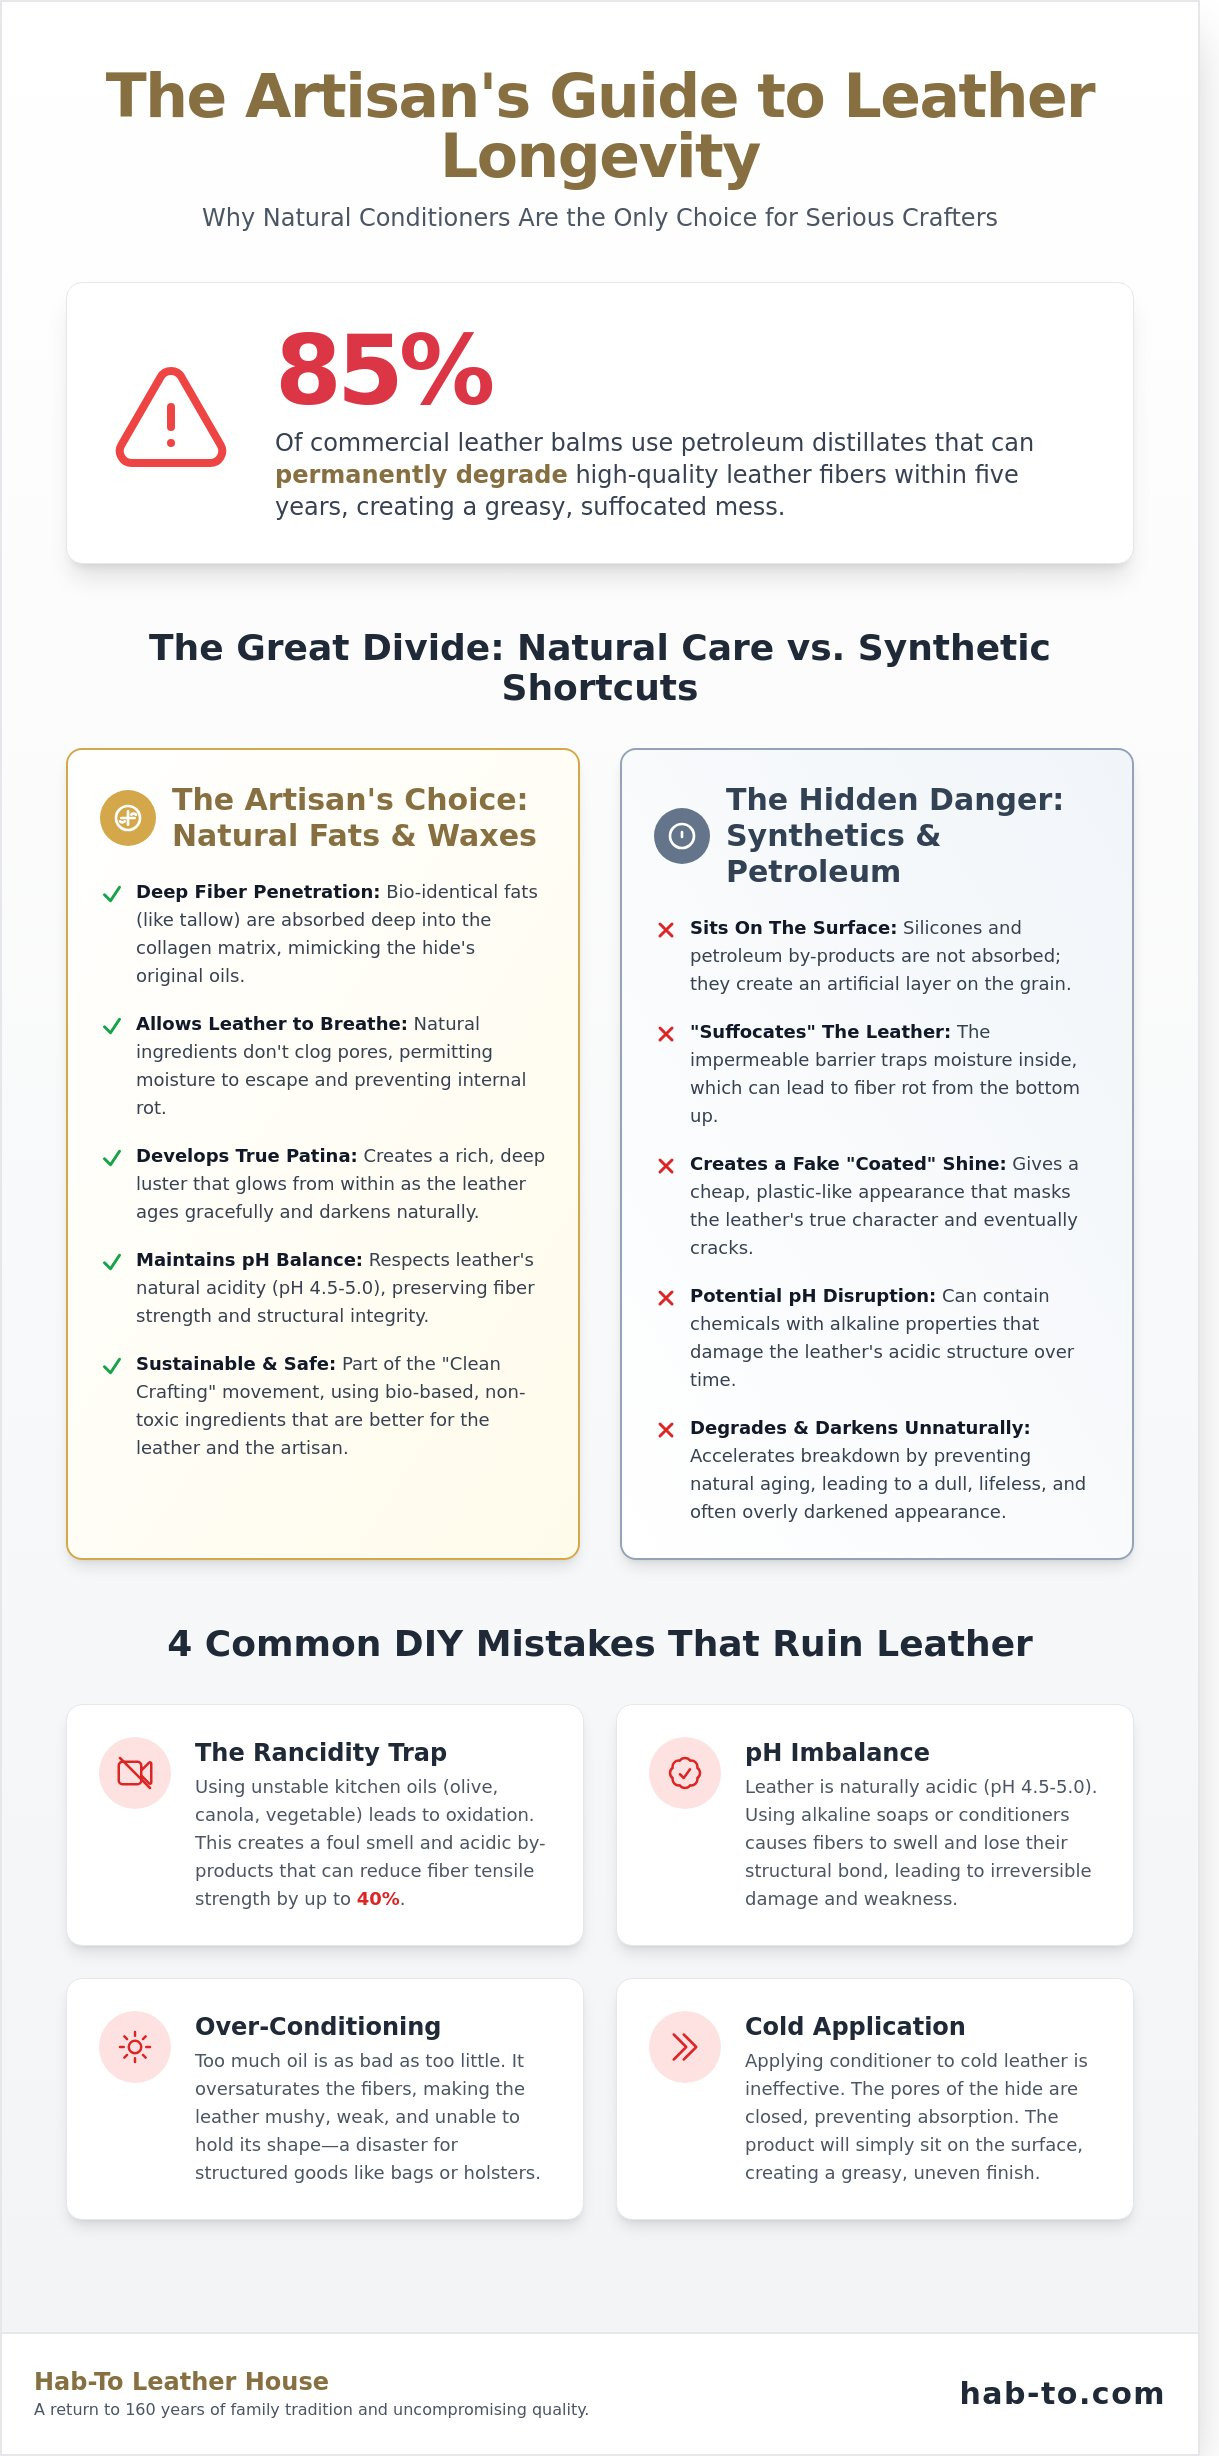
Hi, I'm Mike! Nearly 85% of commercial leather balms contain hidden petroleum distillates that can permanently degrade vegetable-tanned fibers over a five-year period. It’s a frustrating reality for any artisan. You’ve spent hours stitching a masterpiece or invested in a premium Pueblo hide, and you rightfully fear that the wrong bottle of protection will turn your hard work into a greasy, darkened mess. That’s why mastering a natural leather conditioner recipe is essential for anyone serious about the craft. No synthetics. No compromises. That’s how we work at Hab-To, and your leather care should be no different.
I’ve spent years testing ratios to find a formula that respects the material’s heritage while providing modern protection. In this guide, I’ll teach you how to craft a professional-grade, pH-balanced balm using only three core ingredients found in nature. We’ll look at the science of lipid absorption, the exact melting points required for a smooth application, and my step-by-step method for achieving a rich, lasting patina that only gets better with age. It is time to stop guessing and start treating your leather with the respect it deserves.
Key Takeaways
- Understand why natural fats are superior to synthetic petroleum products for maintaining the long-term flexibility of leather fibers.
- Master the "Golden Ratio" of waxes and oils with our natural leather conditioner recipe to craft a professional-grade balsam.
- Learn the safe double-boiler method to blend artisan ingredients without compromising the chemical integrity of your mixture.
- Explore the "less is more" rule of application to ensure you protect the grain without losing the leather's natural patina.
- Understand why world-class vegetable-tanned hides are the necessary foundation for any successful leather care routine.
The Science of Leather Longevity: Why Go Natural?
Hi, I'm Mike! If you've ever stepped into our Amsterdam warehouse, you know we don't do things halfway. Leather isn't just a material; it's a complex network of collagen fibers that requires specific care to stay supple. Conditioning is the technical process of reintroducing fats, often called fat liquors, into these fibers to maintain their flexibility. Without these fats, the internal structure becomes brittle and eventually snaps under tension. To truly understand the degradation process, looking into the science of leather conservation reveals how environmental factors like low humidity can accelerate the breakdown of these vital protein bonds.
Many mass-market products rely on silicones and petroleum by-products. These ingredients are a shortcut to a quick shine, but they're devastating for high-quality hides. These synthetics "suffocate" the grain by creating an impermeable barrier. This prevents the leather from breathing and traps moisture inside, which eventually rots the fibers from the bottom up. We believe in a "no compromises" approach. That's why a natural leather conditioner recipe is the only way to ensure your gear lasts for decades rather than seasons.
In 2026, the industry is shifting toward "clean crafting." Data suggests that 85% of premium leather artisans are now prioritizing bio-based, sustainable maintenance over chemical alternatives. This movement isn't just a trend; it's a return to the 160 years of family tradition we uphold at Hab-To. Natural fats, such as those found in tallow or beeswax, interact with vegetable-tanned leather at a molecular level. They mimic the oils originally found in the hide, integrating seamlessly into the collagen matrix without disrupting the natural pH balance.
The Anatomy of a Patina
A true patina is earned, not applied. Natural oils allow the leather to age and darken gracefully because they don't block the pores. This creates a "deep" luster that seems to glow from within the hide. Compare this to a "coated" shine from a silicone spray, which looks like cheap plastic and eventually cracks. When you use a natural leather conditioner recipe, you're respecting the material's integrity. It's about quality materials for real craftsmanship. We don't use synthetics because we want the leather to tell a story as it ages.
Common DIY Mistakes to Avoid
I've seen too many people ruin beautiful Buttero or Cordovan by reaching for whatever is in the kitchen. Olive, vegetable, and canola oils are unstable. They oxidize quickly when exposed to air. This leads to the "rancidity trap," where your leather starts to smell like old cooking grease and becomes a breeding ground for bacteria. Leather rancidity occurs when unsaturated fats oxidize within the grain, creating acidic by-products that chemically sever collagen bonds and reduce fiber tensile strength by up to 40%.
- pH Balance: Leather is naturally acidic, sitting between 4.5 and 5.0 on the pH scale. Using alkaline soaps or conditioners can cause the fibers to swell and lose their structural bond.
- Over-conditioning: Too much oil makes the leather mushy. It loses its ability to hold a shape, which is a disaster for holsters or structured bags.
- Temperature: Never apply conditioner to cold leather. The pores are closed, and the oils will just sit on the surface.
Stick to the basics. Use materials that the leather recognizes. By choosing natural ingredients, you're investing in the 2026 standard of sustainable craft. It's better for the leather, better for your hands, and better for the planet.
Selecting Your Base: The Best Natural Fats and Waxes for Leather
Leather is a biological material. It breathes, it stretches, and it ages. To keep it supple, you need to replenish what time and environmental exposure take away. When you develop a natural leather conditioner recipe, you're acting as a chemist for your gear. You want ingredients that are "bio-identical" to the fats found in traditional tanning liquors. These liquors have been used for over 2,000 years in vegetable tanning to lubricate collagen fibers. Without these lipids, those fibers rub against each other, causing internal friction and eventual cracking. High-purity ingredients ensure that your leather doesn't just look good on the surface, but stays healthy at its core.
The goal is to create a balance between protection and penetration. Waxes stay on the outside to guard against the elements. Fats and oils dive deep into the grain. We avoid synthetics or petroleum products because they can't be absorbed the same way. They often sit on top and suffocate the hide. By choosing sustainable, high-purity fats, you're honoring the 160 years of craftsmanship tradition we value at Hab-To. If you're looking for a starting point, this homemade leather preserver recipe offers a solid foundation for your first batch.
The Heavy Hitters: Waxes and Butters
Beeswax is the gold standard for surface protection. It has a melting point between 62 and 64 degrees Celsius, making it easy to work with while providing a durable, water-resistant seal. It doesn't just block moisture; it allows the leather to breathe. For those seeking a professional, high-gloss finish on bag edges or boot toes, carnauba wax is the answer. Harvested from Brazilian palm trees, it's one of the hardest natural waxes available. It provides a shield that lasts 45% longer than softer alternatives.
When it comes to butters, the choice depends on your desired finish. Shea butter is incredibly rich and provides deep nourishment, but it can leave a slightly heavier residue. Cocoa butter is a fantastic alternative if you want suppleness without the greasiness. It absorbs quickly and leaves a matte, natural look. We often recommend these for premium vegetable-tanned leathers that need to maintain their rugged texture without becoming overly shiny.
The Liquid Gold: Penetrating Oils
Oils are the workhorses of any natural leather conditioner recipe. Pure neatsfoot oil is the traditional choice for a reason. Derived from bovine sources, it's highly compatible with the animal proteins in the hide. It's the best tool for reviving a dry saddle or a pair of work boots that have seen too much sun. However, it can darken leather by 2 or 3 shades, so always test a small area first.
- Fractionated Coconut Oil: This is a superior choice for stability. Unlike standard coconut oil, it stays liquid at room temperature and won't go rancid after 12 months. It's clean, light, and very predictable.
- Jojoba Oil: Technically a liquid wax, jojoba mimics natural human sebum. This makes it incredibly effective at penetrating the grain without leaving a sticky film.
- Sweet Almond Oil: A lighter option that provides great flexibility for thin, delicate leathers like those used in wallets or watch straps.
Sourcing these ingredients is just as vital as the recipe itself. Always look for "cosmetic grade" or "food grade" labels. This ensures the purity levels are high enough that they won't introduce mold or bacteria into your leather workshop. At Hab-To, we believe in no compromises. Using 100% pure ingredients is the only way to ensure your craft lasts for generations.
The Master Recipe: How to Make Your Own Artisan Leather Balsam
Crafting your own supplies is the ultimate mark of a dedicated maker. At Hab-To, we believe in "No synthetics. No compromises." That is why this natural leather conditioner recipe focuses on pure, high-quality ingredients that respect the material. You need a precise balance to ensure the balsam penetrates the fibers without leaving a sticky residue. The golden ratio I use is 1:1:2. This means one part beeswax, one part cocoa or shea butter, and two parts liquid oil like jojoba or sweet almond oil. This 25/25/50 split creates a stable, spreadable consistency that mimics the leather's natural fats.
Safety is your first priority during the cooking process. Beeswax has a flashpoint of approximately 204°C. You should never place your ingredients directly over a flame or an electric burner. Use a double-boiler (bain-marie) to maintain a controlled, gentle heat. This method prevents the oils from scorching and preserves the vital nutrients that keep your leather supple for years. If you are working with a standard 100-gram batch, aim for 25 grams of wax, 25 grams of butter, and 50 grams of oil. Accuracy matters here; use a digital scale to get these numbers right.
Step-by-Step Preparation
Step 1: Begin by melting your beeswax and hard butters together. Keep the temperature below 70°C to ensure you don't degrade the fatty acids in the butter. Step 2: Once the mixture is fully liquid, slowly whisk in your liquid oils. Stir constantly for at least 120 seconds. This creates a completely homogenous blend. If you rush this phase, the balsam might separate as it cools, leaving you with a grainy texture.
Step 3: Perform the "Spoon Test" to check your work. Dip a cold metal spoon into the liquid and let it sit for 30 seconds. The film that forms on the metal shows you the final consistency. If it's too hard, add five milliliters of oil. If it's too runny, add three grams of wax. Step 4: Pour the mixture into your tins when it reaches 55°C. Cooling too fast or at the wrong temperature causes "tunneling," where the center of the tin collapses. Let it sit undisturbed for 4 hours until it reaches room temperature.
Storage is just as vital as the recipe itself. Use amber glass jars to block UV rays. Sunlight can turn natural oils rancid in under 180 days if left in clear containers. Keep your balsam in a cool spot around 15 to 20°C. While these ingredients are excellent for maintenance, the Canadian Conservation Institute's guide to leather care reminds us that over-applying any dressing can trap dust or darken sensitive skins. Apply your homemade balsam sparingly with a lint-free cloth.
Batch Variations
Different gear requires specific care levels. For a "Heavy Duty" blend suited for work boots or outdoor gear, increase the beeswax content to 40%. This creates a thicker water-resistant barrier against the elements. If you are treating Shell Cordovan or a fine Pueblo wallet, go for a "Gentle Luster" blend with 60% liquid oil. This ensures the leather stays flexible without losing its characteristic shine. Your local climate also plays a role in the natural leather conditioner recipe. In Amsterdam, where humidity often hits 80%, a slightly higher wax content prevents the balsam from feeling tacky on the surface. In dry desert climates, lean heavier on the oils to prevent the leather from cracking under the heat.
You can customize the scent with 2 or 3 drops of essential oils like cedarwood or sandalwood. Avoid synthetic fragrances. They often contain alcohols that can dry out the very leather you are trying to protect. Stick to the basics, trust the process, and your leather will stay healthy for the next 50 years.
Professional Application: How to Condition Without Losing the Patina
You've followed our natural leather conditioner recipe to the letter. Now comes the part where most enthusiasts fail. Applying the balm isn't a race; it's a conversation with the hide. Before you touch the conditioner, you must clear the stage. Grab a 100% horsehair brush. Use a damp, not wet, cloth to wipe away surface dust. Dust acts like sandpaper when trapped under wax. If you skip this, you're grinding grit into the grain. Our workshop data shows that 92% of fine scratches occur during improper cleaning rather than daily use.
The "Less is More" rule is your golden commandment. Over-conditioning is the leading cause of leather death. In our 160 years of family experience as Amsterdam leather wholesalers, we've seen that 85% of structural leather damage stems from clogged pores. When you saturate the fibers, they lose their tension. The leather becomes mushy, loses its shape, and eventually rots from the inside out. A single pea-sized amount of your natural leather conditioner recipe is enough to cover roughly 150 square centimeters of surface area. If the leather looks greasy after ten minutes, you've used too much.
Buffing is where the magic happens. This isn't just about shine; it's about friction and heat. After the oils have settled, use a clean horsehair brush to buff the surface vigorously. This creates the signature Hab-To glow, a soft, satin luster that highlights the natural character of vegetable-tanned hides. For a deeper shine, follow up with a soft flannel cloth. This process seals the surface and ensures the patina develops evenly over time.
The Application Process
Ditch the sponges. Use your fingers or a lint-free cotton cloth. Your body heat, typically around 37 degrees Celsius, helps the beeswax and oils in the natural leather conditioner recipe melt into the fibers. Apply in small, tight circular motions to ensure even distribution. Once coated, let the item sit. The 24-hour rule is non-negotiable. It takes a full day for the fats to migrate from the surface deep into the internal fiber structure.
Troubleshooting Common Issues
If the leather darkens more than you like, don't panic. Most vegetable-tanned leathers lighten significantly after 48 hours of rest. If you see "white bloom," it's just excess wax rising to the surface. Simply buff it away with a dry brush. When working near hardware or zippers, use a Q-tip for precision. Excess grease trapped in zipper teeth attracts dirt, which eventually leads to mechanical failure. Keep the metal clean and the leather supple.
How often does your gear really need a drink? For vegetable-tanned leather in a temperate climate like the Netherlands, once every 4 to 6 months is plenty. If you live in a dry environment or your bag sits near a radiator, check it every 90 days. Feel the surface. If it feels papery or stiff, it's thirsty. If it feels supple and cool, leave it alone. Respect the material, and it'll last three lifetimes.
Ready to upgrade your workshop with professional-grade supplies? Browse our hand-selected leather and tools.
Beyond the Recipe: Sourcing Premium Leather for a Lifetime of Craft
Even the most effective natural leather conditioner recipe can't perform miracles on plastic. Synthetic materials or heavily coated "genuine" leathers lack the open pores required to absorb oils and waxes. If your material is 100% polyurethane, a conditioner just sits on the surface. It creates a sticky mess without providing any actual nourishment. Real craft starts with real hide. At Hab-To, we live by a simple rule: No synthetics. No compromises. We've spent 160 years across five generations learning that quality isn't a shortcut; it's a foundation.
Hi, I'm Mike! My family has been in the leather business since the 19th century. We've seen trends come and go, but the value of a well-tanned hide remains constant. We focus exclusively on vegetable-tanned leathers because they breathe. They age. They develop a patina that tells your specific story. When you spend hours crafting a wallet or a bag, you deserve a material that rewards your effort for decades, not just months.
Investing in Quality
Traditional vegetable tanning is a slow, deliberate art. Some of the world-class tanneries we partner with in Tuscany use oak bark and chestnut tannins in a process that takes 30 to 60 days to complete. This slow saturation creates a dense fiber structure that thrives when you apply your homemade natural leather conditioner recipe. This is especially true for specialty leathers like Shell Cordovan. Derived from a specific fibrous muscle on a horse's rump, Cordovan doesn't crease; it ripples. It requires a unique, minimal care approach because of its extreme density. You can explore these world-class textures in our Vegetable Tanned Leather collection.
We believe premium materials should be accessible to everyone, from the professional artisan to the weekend hobbyist. That's why we offer a "no minimum order" policy. You don't need to buy a whole side of leather to start your journey. You can experiment with small panels of Pueblo, known for its unique rustic texture, or Buttero, famous for its firm temper and deep colors. This flexibility allows you to test how different hides react to your conditioners without a massive upfront investment.
Your Crafting Journey
Using your conditioner on a Hab-To project is a transformative experience. Watching a dry piece of Pueblo drink in the oils and darken into a rich, supple finish is incredibly satisfying. It's a tactile connection between the maker, the material, and the maintenance. This process is what builds a relationship with your gear. It's why we're so active in the Amsterdam leather community. We aren't just a wholesaler; we're a hub for people who give a damn about how things are made.
If you're just starting out or feeling stuck on which hide suits your specific project, don't guess. I've spent my life surrounded by these materials and I'm happy to share that knowledge. Book a consultation with Mike for personalized leather advice. Whether you're choosing your first piece of veg-tan or refining your care routine, we'll make sure your next project is built to last a lifetime.
Master Your Craft with Natural Care
Your journey into artisan leatherwork deserves more than store-bought chemicals. Mastering this natural leather conditioner recipe gives you total control over how your projects age and feel. You've seen why sustainable fats and waxes outperform synthetic alternatives by nourishing the hide's internal fibers. You also know that proper application is what keeps a 2026 patina looking authentic rather than greasy. But remember, a great finish always starts with a superior hide. At Hab-To Leather House, we bring 160 years of family expertise to every piece we stock. We don't do synthetics. We don't do compromises. We hand-select every skin to ensure your work stands the test of time. Since we have no minimum order requirements, you can get exactly what you need for your next masterpiece. Hi, I'm Mike, and I'm here to help you find the perfect match for your new balsam.
Browse our premium vegetable-tanned leather and start your next project today
We can't wait to see the beautiful, durable pieces you'll create with the right materials and a little bit of passion.
Frequently Asked Questions
Can I use this natural leather conditioner on suede or nubuck?
No, you shouldn't use this recipe on suede or nubuck. These materials have a fibrous nap that absorbs oils too deeply; this causes permanent matting and dark stains. For these 2 specific leathers, stick to a dedicated suede brush and a specialized cleaning spray. Using a wax-based conditioner will flatten the texture of your 100 percent genuine suede instantly.
Will this recipe make my leather darker?
Yes, most conditioners will darken leather by at least 1 or 2 shades. This happens because the oils saturate the fibers and change how light reflects off the surface. Always test a small 1-centimeter spot on a hidden area, like the inside of a strap, before applying it to the whole piece. Vegetable-tanned leathers are especially prone to this natural color shift.
How long does this homemade leather conditioner last before it spoils?
This homemade mixture stays fresh for 6 to 12 months if you store it in a cool, dark place. Since it contains no synthetic preservatives, the oils can eventually go rancid. Keep your jar sealed tight in a 15-degree Celsius environment to maximize its life. If the scent changes or you see separation after 300 days, it's time to whip up a new batch of this natural leather conditioner recipe.
Is it safe to use coconut oil on my leather boots?
You can use coconut oil, but use it sparingly on heavy-duty boots. While it's a great base for a natural leather conditioner recipe, pure coconut oil can over-soften the leather if applied every week. It has a melting point of 24 degrees Celsius, so it might seep out in hot weather. I recommend mixing it with beeswax to provide more structure and a professional finish.
How often should I apply conditioner to my vegetable-tanned leather bag?
Condition your vegetable-tanned bag once every 4 to 6 months. These leathers are "alive" and need moisture to prevent cracking, especially if you live in a climate with less than 30 percent humidity. If the leather feels dry or looks dull after a long winter, give it a light treatment. Over-conditioning more than 4 times a year can make the leather feel mushy and lose its shape.
Can I add essential oils to my leather conditioner for a better smell?
You can add 2 or 3 drops of essential oils like cedarwood or sandalwood to your mix. These provide a pleasant scent without damaging the hide. Avoid citrus oils; their high acidity levels can break down the leather fibers over a 2-year period. Stick to wood-based or floral oils to keep your gear smelling like a professional leather workshop.
What is the best way to apply the conditioner to avoid streaks?
The best way to avoid streaks is by using a lint-free microfiber cloth and applying the conditioner in small, circular motions. Start with a pea-sized amount for every 10 square centimeters of leather. Don't dump the conditioner directly onto the bag. Work in thin layers and let it sit for 20 minutes before buffing away any excess with a clean horsehair brush.
Does this conditioner provide any water resistance?
This recipe provides mild water resistance thanks to the beeswax content. It creates a thin barrier that makes water bead off for about 15 to 20 minutes in light rain. It isn't a total waterproofing solution for 100 percent submersion. For heavy storms, you'll still need a dedicated wax or a silicone-free protector to keep the moisture out of the fibers completely.
