


What Is Leather Skiving? The Artisan’s Guide to Professional Finishes
Hi, I’m Mike! The difference between a handmade wallet and a professional heirloom isn't just the leather you choose; it's the thickness you remove. If you've ever felt the sting of ruining a premium piece of Shell Cordovan with one wrong slip, you know that understanding what is leather skiving is the most critical hurdle in a maker’s journey. At Hab-To Leather House, we believe in quality materials for real craftsmanship. No synthetics. No compromises.
It’s a common frustration to finish a beautiful stitch line only to realize the seams are too bulky to fold or look unprofessional. We’ve seen many artisans struggle with unrefined edges that distract from their hard work. This guide will teach you how to master the technique of thinning your material to create the seamless joints that define high-end craftsmanship. We will explore the mechanics of the craft, compare the Japanese skiving knife to the safety skiver, and share the exact techniques used over our 160 years of family experience to avoid cutting through the grain.
Key Takeaways
- Learn how thinning the flesh side of your material eliminates bulk to create the seamless, professional joints found in heirloom-quality goods.
- Understand exactly what is leather skiving and why mastering the "angle of attack" is the secret to achieving elegant, refined transitions.
- Discover the essential tools for the job, from modern safety bevellers to the Japanese Shirogami knife—the gold standard for artisan precision.
- Overcome the fear of cutting through your project with a step-by-step mental checklist and expert tips for consistent, confident results.
- Identify why firm vegetable-tanned leather is the ideal choice for skiving compared to soft, "mushy" chrome-tanned alternatives.
Understanding Leather Skiving: The Secret to Refined Craftsmanship
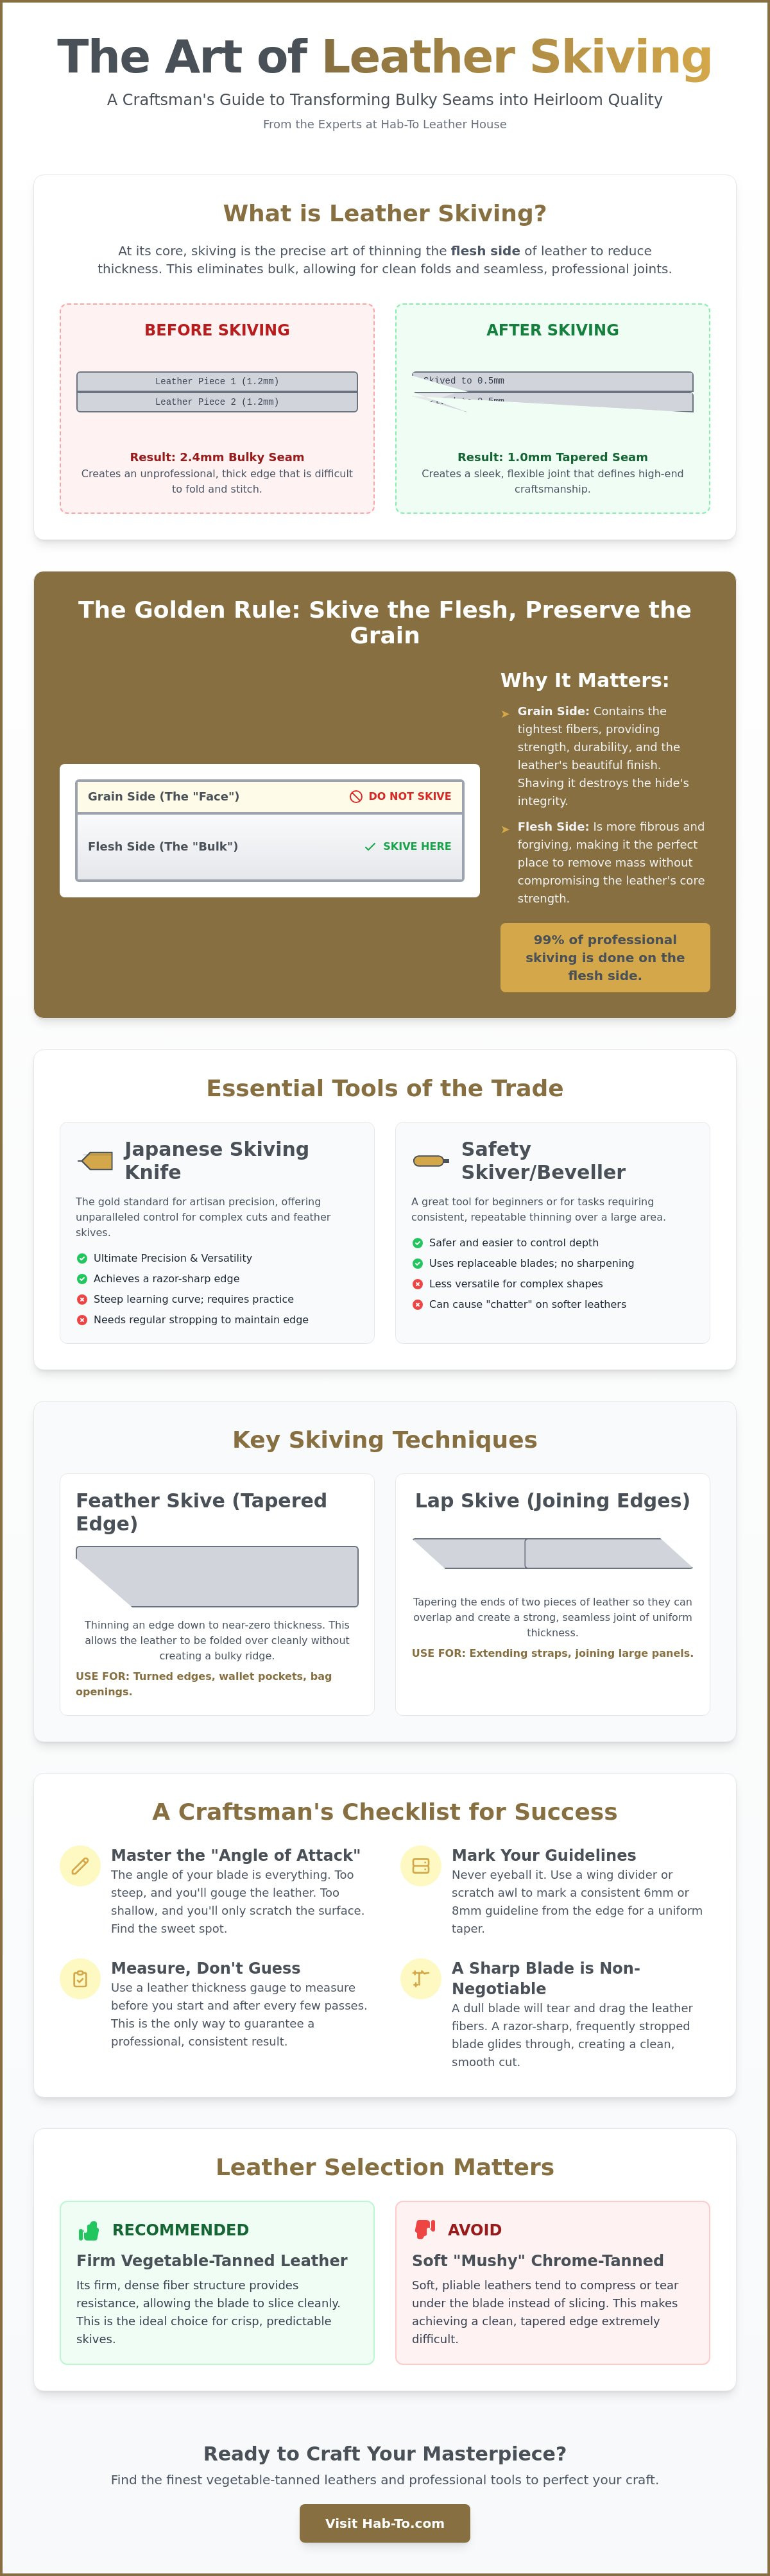
If you've ever held a luxury wallet and wondered why it feels so sleek despite having multiple layers, you're looking at the result of master-level skiving. So, what is leather skiving exactly? At its core, it's the process of thinning the flesh side of a piece of leather to reduce its thickness in specific areas. It isn't about thinning the entire hide, but rather targeted shaving to facilitate clean folds, reduce bulk in seams, and create elegant transitions between different components of a build.
Mastering Skiving (leathercraft) is what separates a hobbyist from a professional. When you do it well, the work becomes invisible. The viewer never sees the transition, but they feel the quality in how the leather bends and sits. At Hab-To, we believe in "No compromises," and that starts with structural integrity. You're thinning the material, but you're never weakening the grain. The grain is where the strength lives; the flesh is just the bulk we need to manage.
To see this technique in action and understand the physical motion required, watch this helpful video:
Why Skiving Is Non-Negotiable for Professional Goods
High-end leatherwork relies on tapered edges. Think about a bespoke watch strap. If you didn't skive the ends where the leather wraps around the spring bar, the strap would be too thick to fit the watch lugs. In a luxury wallet, we often use 100% vegetable-tanned leather. While durable, stacking three layers of 1.2mm leather creates a 3.6mm edge. That's too chunky for a refined pocket. Skiving allows us to feather those edges down to 0.5mm, creating a "tapered" look that remains incredibly durable because the core remains thick while the edges stay delicate.
Flesh Side vs. Grain Side: Where the Magic Happens
In 99% of professional workshops, skiving is performed exclusively on the flesh side. The grain side is the "face" of the leather. It contains the tightest fiber structure and the beautiful finish of premium hides like Buttero or Pueblo. If you shave the grain, you destroy the leather's natural resistance and beauty. The flesh side is more fibrous and forgiving, making it the perfect place to remove mass. You might see grain skiving in rare, 1% scenarios like complex decorative inlays, but for standard craftsmanship, the flesh side is where the magic happens. By focusing your blade there, you preserve the 160+ years of tradition that goes into every high-quality hide.
The Different Types of Skives and When to Use Them
Mastering what is leather skiving requires more than just a sharp blade; it demands an understanding of geometry. Your success depends entirely on the "angle of attack." If your knife is held too steep, you risk gouging the leather or cutting through entirely. If it's too shallow, you'll simply scratch the surface without removing the necessary bulk. Precision starts with preparation. I always use a wing divider or a scratch awl to mark my skive lines first. A 6mm or 8mm guide line ensures your taper remains consistent across the entire edge.
Don't rely on your eyes alone to judge depth. Use a professional leather gauge to measure the thickness before you begin and after every few passes. If you start with a 1.5mm piece and need a 0.7mm edge, that gauge is your only way to guarantee a professional result. For those just starting their journey, this resource on Leatherworking 101 provides an excellent overview of how these techniques fit into the broader craft.
The Feather Skive (Tapered Edge)
The feather skive is the ultimate technique for seamless leather folds. It involves thinning the leather from its original thickness down to a near-zero edge. I use this most often for turned edges on wallets, pockets, and bag openings. By removing the weight at the very perimeter, the leather can be folded and glued without creating a bulky, unsightly ridge. It's the secret to those high-end, slim profiles found in luxury goods. No synthetics. No compromises. Just clean, tapered edges.
The Lap Skive (Joining Edges)
When a project requires a strap longer than your hide allows, the lap skive is essential. This technique involves thinning two pieces of leather to exactly half of their original thickness. When overlapped, the total thickness remains uniform. It's a critical skill for belts, handles, and long straps. To get a "flush" finish, apply a high-quality glue to both skived surfaces before joining. If done correctly, the transition should be nearly invisible to the touch and maintain the strength of the original piece.
The Channel Skive (Folding Lines)
For boxy constructions, such as valet trays or book covers, a channel skive is the best approach. Instead of thinning the edge, you remove a "V" or "U" shaped channel from the center of the leather's flesh side. This creates a built-in hinge for a crisp, 90-degree fold. The trick is to avoid "bottoming out." If you're working with 2.2mm vegetable-tanned leather, leave at least 0.8mm of grain intact to prevent the fold from cracking or tearing. Understanding what is leather skiving in this context allows you to create structural shapes that hold their form. If you need the right gear for these techniques, browse our premium leatherworking tools to find exactly what you need for your next project.
Essential Tools for Skiving: From Japanese Knives to Safety Bevellers
Choosing your tools is a definitive moment for any artisan. If you're trying to understand what is leather skiving in a practical sense, you'll soon realize it's a balance between the right steel and a steady hand. In a small-scale workshop, the debate between manual hand-skiving and machine-skiving usually ends in favor of the hand. While industrial bell skivers handle high-volume production with speed, they lack the tactile feedback required for bespoke, high-end goods. Manual skiving allows you to feel the grain of the leather and adjust your pressure in real-time.
Before you even touch a blade, you need the right foundation. A proper skiving surface is vital for success. Don't use a standard self-healing cutting mat; these are too soft and will cause the leather to dip under the pressure of the knife. Instead, use a polished marble slab or a thick glass plate. These materials provide a perfectly flat, hard surface that ensures your blade glides exactly where you intend, preventing accidental gouges in your premium hides.
The Japanese Skiving Knife: Mastery and Maintenance
The Japanese skiving knife, often crafted from Shirogami or "white paper steel," is the gold standard for many professionals. Its unique single-bevel design is the secret to its precision. This geometry allows the blade to sit flush against the leather, making it much easier to maintain a consistent angle. When newcomers ask what is leather skiving, they're discovering a technique that relies almost entirely on the quality and sharpness of this specific tool.
Sharpness isn't just about performance; it's about safety. A dull knife is the most dangerous tool in your shop because it requires excessive force to move through the fibers. That extra force leads to a loss of control and potential injury. You should develop the habit of stropping your blade every few minutes. A quick pass on a leather strop with a fine polishing compound keeps the edge "scary sharp" and ensures the knife zips through the leather like butter.
Safety Skivers and French Edgers
If an open Japanese blade feels too intimidating, safety skivers are a great entry point. These tools use replaceable blades and a protective guard to limit the depth of the cut. While they offer less nuance than a fixed blade, they're excellent for consistent thinning tasks. French edgers are another specialized option for your kit. They're perfect for skiving a specific, uniform width, such as the area where a strap folds over a buckle or a D-ring.
When you're selecting leatherworking tools, think about your long-term growth as a maker. It's better to own one high-quality knife than a drawer full of mediocre ones that won't hold an edge. Quality materials lead to quality results. No compromises. Your tools should be as premium as the vegetable-tanned leather you're working with.
Mastering the Technique: Tips for Success and Common Pitfalls
Understanding what is leather skiving involves more than just owning a sharp knife; it requires a mental shift from "cutting" to "shaving." Most beginners face a significant mental block when they first approach a piece of premium vegetable-tanned leather. The fear of ruining a project by cutting all the way through is the most common hurdle I see. To overcome this, I always recommend aiming for 80% of your target thinness on the first pass. You can always take more off, but you can't put the fibers back once they're gone.
Success relies heavily on anchoring your body. Your non-dominant hand should press the leather flat against the surface, while your knife hand uses the pinky finger as a "kickstand" against the work table. This creates a physical limit for the blade's depth and prevents it from diving too deep. Instead of trying to remove a thick chunk in one go, adopt a "thin layer" philosophy. You should be removing paper-thin ribbons of leather, often taking 3 or 4 passes to reach a professional 0.5mm edge. This incremental approach gives you total control over the taper.
The Step-by-Step Skiving Process
- Step 1: Secure your leather to a smooth, hard surface. A glass slab or a polished marble block is essential because these materials offer zero friction and won't "give" under pressure.
- Step 2: Hold your knife at a low angle, typically between 10 and 15 degrees. If the angle is too high, you'll gouge the leather; if it's too low, you'll simply scratch the surface.
- Step 3: Use a controlled pushing or slicing motion. If you're using a Japanese skiving knife, a slight diagonal "slicing" movement yields the cleanest results on 2.0mm thick hides.
- Step 4: Verify the thickness frequently. Use your fingers to feel for "high spots" or use a precision thickness gauge to ensure consistency across the entire edge.
Common Mistakes and How to Avoid Them
The most frequent error is working on a soft surface. A standard green self-healing cutting mat is excellent for straight cuts, but it's the enemy of a flat skive. The mat has a slight compression that causes the leather to dip under the blade, leading to an uneven, wavy finish. Professional results require the absolute rigidity of stone or glass to ensure the leather stays perfectly flat during the stroke.
Another pitfall is the "stop-and-start" divot. If you stop the blade mid-cut, you'll almost certainly leave a visible line or a hole in the grain. Maintain a steady momentum through the entire length of the edge. If you feel the blade dragging or requiring extra force, it's a sign you need to stop and strop. A dull blade is the primary cause of accidents because it forces you to apply dangerous amounts of pressure. In our 160 years of family experience, we've found that a sharp blade does 90% of the work for you.
Ready to upgrade your workshop with tools that actually hold an edge? Browse our selection of professional leatherworking tools and feel the difference of quality craftsmanship.
Choosing the Right Leather for Skiving: Why Quality Matters
Understanding what is leather skiving starts with the material in your hands. You can have the sharpest Japanese steel blade in the world, but if your leather lacks structural integrity, you'll struggle to achieve a professional finish. The leather's reaction to the blade is determined by its tanning process and fiber density. This is why choosing the right hide isn't just about aesthetics; it's about the physics of the cut.
Vegetable tanned leather remains the gold standard for artisans because of its firm, dense fiber structure. When the blade hits the surface, the leather stays put. It doesn't compress or shift under pressure. Contrast this with many chrome-tanned leathers. These often feel "mushy" or elastic. When you apply your knife, the leather stretches away from the edge. This leads to uneven bevels or, in many cases, a blade that bites too deep and ruins the entire piece.
If you're working with shell cordovan, you're dealing with a unique challenge. This material is a dense membrane rather than a traditional hide. Its incredible density allows for mirror-like finishes, but it requires a frighteningly sharp edge. If your knife isn't stropped to perfection, it'll simply slide over the shell rather than cutting into it. There's no room for error with the king of leathers.
Material Density and Blade Resistance
The "temper" of your leather dictates every stroke of your knife. Firm leathers like Buttero or Pueblo offer consistent resistance. This resistance is actually your friend; it provides the tactile feedback you need to maintain a steady angle. A premium hide makes skiving 50% easier for a beginner because it provides a stable platform that doesn't buckle under the knife. When the fibers are tight, the blade glides through the material with predictable speed, giving you total control over the thickness of the edge.
Hab-To’s "No Compromise" Selection
At Hab-To Leather House, we don't do synthetics and we don't do compromises. We hand-select hides with consistent thickness across the entire surface to minimize the need for heavy corrective skiving. This precision means you spend less time fixing factory inconsistencies and more time on the artisanal details that define your work. We look for hides that are "skive-ready" from the moment they land on your workbench.
If you're unsure which leather suits your next project, come visit our showroom in Amsterdam. You can feel the temper of the hides yourself, or you can book a personal consult with me for expert advice. I've spent years learning how different tannages react to a blade, and I'm here to help you skip the trial-and-error phase. Choosing the right material is the first step in mastering what is leather skiving.
Ready to start? Browse our premium vegetable-tanned leather selection.
Take Your Craft to the Professional Level
Mastering the art of thinning edges is the defining step that separates a bulky project from a refined masterpiece. Now that you understand what is leather skiving, you can begin applying these techniques to create seamless transitions and professional folds. Success depends on the harmony between a sharp blade and high-quality material. Using the right Japanese skiving knife or safety beveller ensures your work stays precise and your edges remain clean.
Quality craftsmanship starts with the hide itself. At Hab-To Leather House, we've spent over 160 years refining our family expertise to support your creative journey. We specialize in sustainable vegetable-tanned leather and world-renowned Shell Cordovan; this ensures you never have to settle for synthetic substitutes. Because we believe every artisan deserves access to the best materials, we offer no minimum order requirements for crafters. This means you can get exactly what you need for a single wallet or a full collection without overhead stress. No compromises. Just pure, hand-selected quality for real makers.
Shop Premium Veg-Tan Leather for Your Next Project
Grab your knife, trust your hands, and start skiving your way to a better finish today.
Frequently Asked Questions
Is skiving leather really necessary for beginners?
Yes, skiving is essential for any beginner aiming for professional results in projects like wallets or watch straps. Without it, folded edges become bulky and unattractive. Most artisans find that a 0.5mm to 1.0mm thickness reduction at the edges allows for a flush, seamless finish that defines high-quality craftsmanship. It's the difference between a clunky hobbyist piece and a refined product.
Can I skive leather with a regular utility knife or X-Acto blade?
You can use a utility knife in a pinch, but it lacks the control and single-bevel edge required for precision. Standard blades often flex or dig too deep into the grain. For what is leather skiving at a professional level, dedicated Japanese skiving knives or safety bevelers are superior. They provide the flat, consistent angle needed to shave off thin layers without ruining your vegetable-tanned hide.
What is the best surface to skive leather on?
A polished granite slab or a thick piece of glass is the best surface for this task. These materials don't provide any "give" when you apply pressure with your knife. Soft cutting mats often cause the blade to dip, leading to uneven or gouged cuts. Using a 30cm by 30cm granite tile ensures your knife glides smoothly while maintaining a consistent angle across the leather's flesh side.
How do I know if I have skived the leather too thin?
You've gone too thin if the leather starts to feel like paper or looks translucent when held up to a 60-watt light bulb. Ideally, you should leave at least 0.3mm of thickness to maintain structural integrity. If the grain side starts to pucker or shows a shadow of the blade from underneath, you've likely removed too much material and compromised the piece's durability.
Does skiving weaken the leather over time?
Skiving does reduce the physical strength of the edge, but it doesn't cause the leather to fail if done correctly. By removing the dense fibers on the flesh side, you're trading a small amount of tensile strength for better aesthetics and foldability. In a 2021 study on leather durability, edges skived to 50 percent of their original thickness maintained more than enough longevity for daily use items like cardholders.
What is the difference between skiving and beveling?
Skiving involves thinning a wide section of the leather's edge to reduce bulk, while beveling only removes the sharp 90-degree corner of the edge. Think of skiving as preparing a joint and beveling as a finishing touch for comfort. Understanding what is leather skiving versus beveling is key to achieving that premium, hand-selected look found in high-end leather goods. Both steps are necessary for a professional edge.
How often should I sharpen my skiving knife?
You should strop your blade every 5 to 10 cuts to maintain a razor-sharp edge throughout your project. A dull knife is dangerous and leads to ragged, uneven edges. If you're working with tough, vegetable-tanned leathers, expect to return to your sharpening stones every 2 to 3 hours of active work. A sharp blade should glide through the fibers with almost zero resistance or pulling.
