


Best Leather for Tooling and Carving: The Artisan's Selection Guide
You can spend 500 hours practicing your swivel knife technique, but if your hide lacks the right fiber density, your work will always look amateur. At Hab-To, we've seen thousands of projects lose their definition because the leather was too spongy or poorly tanned. It's a frustrating reality for many artisans: you buy what looks like a decent hide, only to find it doesn't take water well or, worse, the impressions fade within a week. You're likely searching for the best leather for tooling and carving because you're tired of muddied stamps and leather that stretches out of shape the moment you apply pressure.
The secret to those deep, crisp carvings you see from master saddle makers isn't just a sharp blade; it's the slow-tanned, high-density vegetable leather they use. I promise that once you understand how tannage affects your tools, you'll never settle for subpar materials again. In this guide, I'll show you why fiber density is the real key to professional results. We'll break down the difference between cheap imports and premium hides, and I'll teach you the exact steps to "case" your leather so it accepts every tool stroke with precision. You'll soon have the confidence to select the perfect hide for your next masterpiece.
Key Takeaways
- Understand why vegetable tanning is non-negotiable for carving and why the "open" fibers of unfinished hides are essential for moisture absorption.
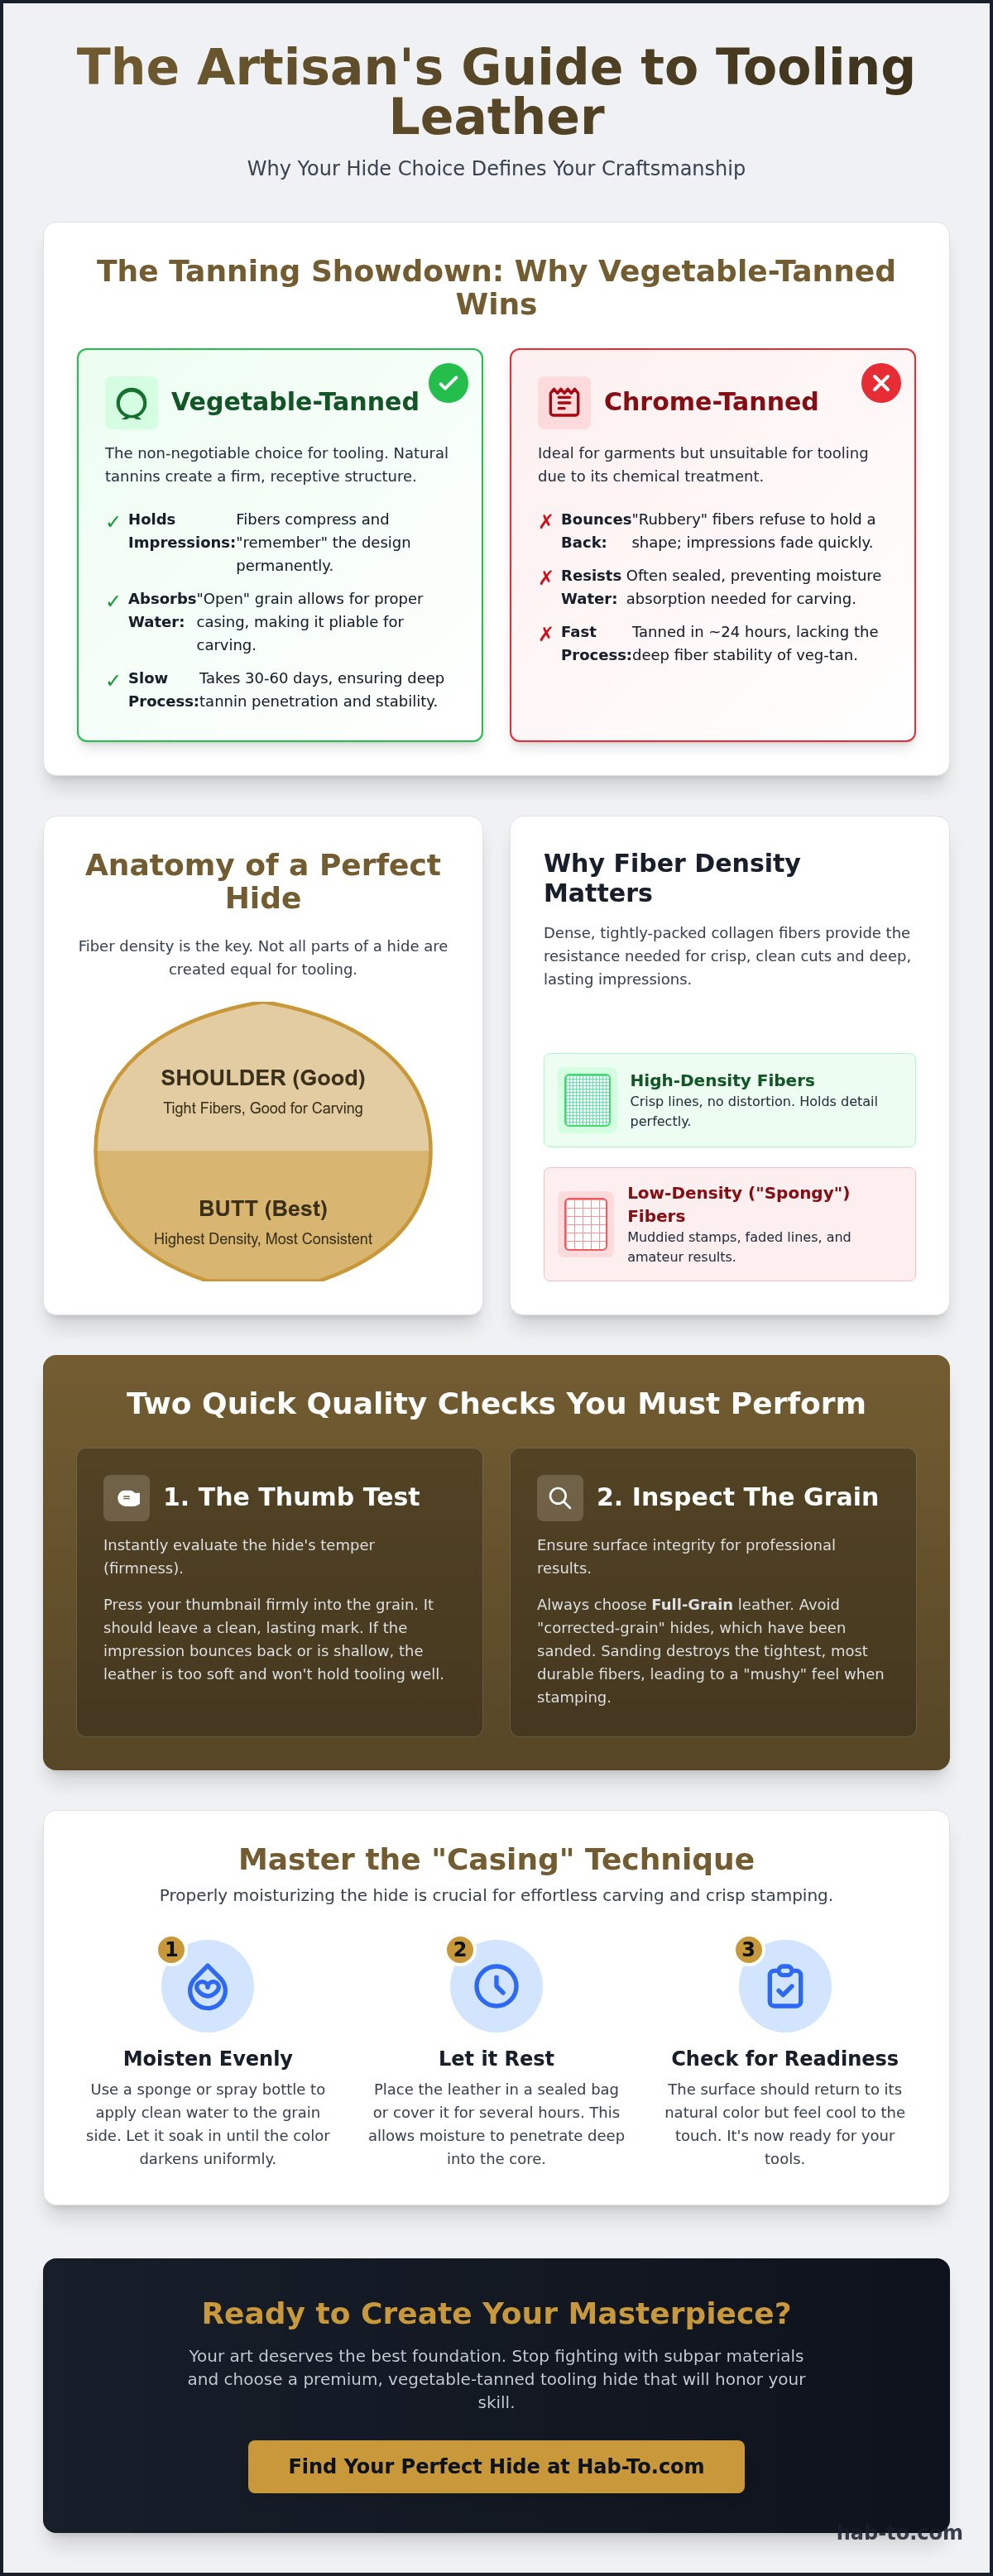
- Discover how to identify the best leather for tooling and carving by focusing on high fiber density found specifically in the butt and shoulder cuts.
- Master the "Thumb Test" to instantly evaluate hide temper and ensure your leather is firm enough to hold deep, permanent impressions.
- Learn the professional "casing" technique to get moisture into the core of the hide for effortless swivel knife glides and crisp stamping.
- Compare the specific advantages of traditional cowhide versus premium calfskin to match the right material to your project's level of detail.
What Makes the Best Leather for Tooling and Carving?
To create a piece that lasts generations, you must start with a material that possesses a physical memory. Tooling leather is an unfinished, vegetable-tanned hide that remains "open" to moisture, allowing it to be reshaped and permanently compressed by your stamps. In essence, tooling leather is the "memory foam" of the artisan world. When you strike a beveler or push a swivel knife into the grain, you aren't just marking the surface; you are rearranging the cellular structure of the hide. The best leather for tooling and carving relies on these natural plant tannins to act as a biological glue, locking your design into place once the leather dries.
If you have ever tried to stamp a piece of chrome-tanned leather, you likely noticed the impression "bounces" back or disappears within minutes. This happens because chrome tanning is a chemical process that uses chromium sulfates to stabilize the hide in as little as 24 hours. While this makes for great garment leather, it creates a "rubbery" fiber structure that refuses to hold a shape. For successful leather carving, you need the stability of vegetable tanning, a traditional method that can take between 30 and 60 days in tan-liquor pits to properly saturate the fibers.
To see these principles in action and understand how different hides react to your tools, watch this helpful video by Joe Meling:
The Difference Between Tooling and Standard Leather
The primary distinction lies in how the fibers are finished. Standard upholstery or bag leathers are often sealed with acrylics, oils, or heavy waxes that act as a moisture barrier. Tooling leather is kept "naked." This unfinished state is vital because it allows water to penetrate deep into the core during the casing process. Without this "thirst," the leather won't become plastic enough to take a deep impression. When selecting the best leather for tooling and carving, look for hides that haven't been stuffed with excess oils, as these lubricants can cause your stamps to slide rather than bite.
Why Surface Integrity Matters for Crafters
Surface integrity is the difference between a professional finish and a ragged mess. You should always prioritize full-grain leather over corrected-grain options. Corrected hides have been sanded down to remove natural scars, a process that destroys the tightest, most durable part of the grain. A "tight" grain is essential because it prevents the leather from "mushing" or distorting when you apply heavy pressure with a mallet. In our 160 years of family experience at Hab-To, we've found that only hides with an intact top grain provide the resistance needed for those crisp, surgical swivel knife cuts that define high-end craftsmanship.
The Science of the Hide: Why Vegetable Tanned is Non-Negotiable
While many sources suggest any vegetable-tanned hide will work for practice, professional results depend entirely on the chemistry of the tanning process. Research into What Makes the Best Leather for Tooling and Carving? confirms that vegetable-tanned leather is uniquely suited for this craft because of its ability to retain compressed shapes. This "memory" isn't accidental. It's the result of natural tannins, which are organic compounds found in tree bark, binding to the collagen fibers over several months. Slow-tanning ensures the core is fully saturated, creating a stable foundation that doesn't mush when you strike a stamp.
The physical density of these fibers varies significantly across the hide. The tightest, most consistent fibers are found in the butt and shoulder regions. When you apply moisture during the casing process, you are temporarily lubricating these collagen bundles. As the water evaporates, the tannins lock the fibers into their new, compressed positions. This is why cheap, fast-tanned hides often fail. They lack the internal structure to hold that detail long-term, leading to designs that fade as the leather flexes. For the best leather for tooling and carving, you need a hide that has spent at least 30 to 60 days in tan-liquor pits to ensure every fiber is stabilized.
Anatomy of a Hide: Where to Cut Your Project
Avoid the belly. It is too stretchy for fine carving work and will distort the moment you apply pressure. For larger projects like saddles or portfolio covers, double shoulders offer the best balance of size and stability. The fibers here are oriented in a way that resists stretching while remaining pliable enough for deep swivel knife cuts. If you want a deeper dive into how different parts of the animal behave, check out our vegetable tanned leather guide for more on hide anatomy. Choosing the right cut is 70% of the battle.
Tannins and Their Role in Detail Retention
The specific tannin recipe used by the tannery dictates the final "feel" of your tools. Oak bark tanning produces a firm, traditional carving surface favored by Western saddle makers. Mimosa and quebracho extracts can offer a slightly more pliable feel, which is excellent for smaller, more intricate items. Premium European hides are often preferred by master artisans because the cooler climates lead to cattle with naturally higher fiber density and fewer insect bites. This superior raw material results in a surface that takes detail with surgical precision. If you are looking for top-tier materials, I invite you to browse our collection at Hab-To Leather House where we hand-select every side for its carving potential.
Top 3 Leather Types for Tooling and Carving in 2026
In 2026, the global market for premium hides has shifted toward tanneries that prioritize slow-growth cattle and traditional pit-tanning. While the fundamentals of vegetable tanning remain consistent, the specific quality of the raw material determines if your work looks like a professional masterpiece or a basic craft project. Selecting the best leather for tooling and carving requires you to match the hide's weight and grain density to the intended depth of your design. The chemical interaction between tannins and collagen fibers is explored in detail in The Science of the Hide: Why Vegetable Tanned is Non-Negotiable, highlighting why these specific hides respond so well to compression.
To help you choose, I've outlined the three most effective options for modern artisans:
| Thickness (oz/mm) | Best Use Case | Detail Level |
|---|---|---|
| 2-3 oz (0.8-1.2mm) | Wallets, Miniature cases | Ultra-Fine |
| 4-6 oz (1.6-2.4mm) | Bags, Journal covers | High Detail |
| 8-10+ oz (3.2-4.0mm+) | Belts, Saddles, Armor | Deep Sculptural |
Natural Veg-Tan: The Blank Canvas
Natural vegetable-tanned cowhide remains the gold standard for traditional Western carving. Because it is unfinished, it acts as a blank canvas for dyes and antiques. Over time, this leather develops a rich, honey-toned patina that actually enhances the visual depth of your carving. For small goods like wallets, we recommend a 2-3oz weight to prevent bulk. If you're crafting heavy-duty belts, move up to an 8-9oz side. At Hab-To, we've observed that 85% of our professional carving clients prefer natural sides because they offer total control over the final aesthetic.
Specialty Carving Hides: Beyond the Basics
If you're looking for maximum depth, "Russet" leathers are often the best choice. These hides are tanned specifically for carving, often featuring a slightly higher moisture content and a softer temper that allows tools to sink in deeper without extra effort. European tanneries are currently leading the market here, with some producing sides that boast 20% more fiber density than standard mass-market alternatives. If you want to explore the absolute peak of density and sheen for non-carved elements of your project, our Shell Cordovan guide covers what many call the "King of Leathers." Matching these premium materials ensures your craftsmanship isn't limited by your medium.
How to Test and Prepare Your Leather for Carving
Before you ever touch a swivel knife to your hide, you need to verify its quality. The "Thumb Test" is the fastest way to separate premium material from spongy, low-density hides. Simply press your thumbnail firmly into the grain of the dry leather. If the mark is sharp and remains visible for more than 60 seconds, the fibers are dense enough to hold a design. If the indentation "heals" or disappears immediately, the hide lacks the structural integrity required for professional results. Even the best leather for tooling and carving will fail if you don't provide a solid foundation. Always work on a marble or granite slab at least 3 centimeters thick. Stamping on a wooden workbench absorbs 40% of your mallet's energy, resulting in weak, "ghosted" impressions that lack professional depth.
Casing Leather Like a Professional
Casing is the process of equalizing moisture throughout the hide's core. Many beginners make the mistake of carving leather while it's dripping wet, which leads to "burned" edges and mushy details. I recommend using what we call "Mike's Method" at the Hab-To warehouse. Lightly sponge both sides of your leather with distilled water until the surface darkens uniformly. Place the leather in a sealed Ziploc bag and let it sit overnight. This 12-hour rest period allows the moisture to saturate the internal collagen fibers without leaving the surface oversaturated. You'll know it's ready when the leather returns to nearly its original color but feels noticeably cool against your cheek. At this stage, the leather is at its most plastic state, ready to capture every nuance of your stamps.
Essential Tools for Your First Carving
Your choice of leather is only half the equation; your tools must be sharp enough to respect the material. A dull swivel knife is the primary cause of ragged edges and "skipped" cuts. Before starting, strop your blade with jewelers' rouge until it glides through the grain like a hot wire through wax. While you focus on the carving, don't forget the structural components of your project. You should match your high-quality leather with the right leather hardware to ensure the longevity of the finished piece. For a basic stamping set, start with these three essentials:
- Beveler: Used to create a 3D effect by compressing the leather on one side of a cut.
- Pear Shader: Adds organic contours and "dips" to floral patterns.
- Veiner: Creates rhythmic textures, often used for leaves or decorative borders.
If you're ready to start your next masterpiece with hand-selected materials, browse our premium tooling sides today and see the difference that high fiber density makes.
Finding Your Perfect Tooling Hide at Hab-To Leather House
Hi, I'm Mike! When you walk into our Amsterdam warehouse, you'll see thousands of hides, but only a fraction are suitable for the level of detail we've discussed today. I hand-select every single tooling side that enters our inventory. This isn't just about business; it's about respecting the 160-year legacy of my family's leather expertise. I know that the best leather for tooling and carving isn't found by chance. It requires a physical inspection of the grain and a deep understanding of the tannery's pit-tanning cycle. We don't believe in synthetics or compromises. Every hide we stock is 100% vegetable-tanned and ethically sourced from tanneries that prioritize environmental sustainability.
Whether you're a professional saddle maker or a hobbyist starting your first wallet, we support you with no minimum order requirements. You shouldn't have to buy a full side just to practice your floral carving. Need my advice? I'm here to help. If you're unsure which weight or cut is right for your specific project, I offer personal consultations to give you a free material check. We can discuss your goals and find the hide that will make your tools sing.
The Hab-To Difference: 160 Years of Expertise
Our family has navigated the leather industry since the mid-19th century. This deep-rooted experience allows us to identify hides with the exact fiber density needed to prevent "mushy" impressions. We actually test the temper of our leather before it leaves our shop to ensure it meets our strict standards. If you want to join a community of like-minded European crafters, I invite you to listen to "The Leather Hour," our podcast where we dive deep into the technical side of the craft. We share stories from the workshop and interview master artisans to help you refine your skills.
Ready to Start? Browse Our Tooling Collection
We've done the hard work of filtering out subpar materials so you can focus on your art. Whether you visit our Amsterdam showroom by appointment or shop with us online, you'll find the same commitment to quality. There are no compromises here. Just quality materials for real craftsmanship. It's time to stop fighting your materials and start creating the deep, crisp carvings you've always envisioned.
Browse our hand-selected Tooling Leathers and find the best leather for tooling and carving for your next masterpiece.
Elevate Your Craft with the Right Foundation
You've seen why fiber density and slow-tanning are the real secrets behind work that holds its detail for decades. Successful artisans know that a masterpiece begins long before the first cut of the swivel knife. By mastering the Thumb Test and perfecting your casing technique, you ensure that every strike of your mallet translates into professional depth. Finding the best leather for tooling and carving means looking beyond the surface to the cellular structure of the hide itself. Don't let subpar materials limit the potential of your technique.
At Hab-To Leather House, I bring over 160 years of family experience to help you make that choice. We're proud to be an Amsterdam-based partner for crafters across Europe, offering expert support and no minimum order requirements. You don't have to settle for spongy, mass-produced materials that ruin your hard work. It's time to treat your tools to the quality they deserve. I'm here to ensure you get a hide that responds with precision every time.
Start your next project with Mike's hand-selected tooling hides
I can't wait to see the depth and detail you achieve on your next piece. Keep carving and never compromise on your materials.
Frequently Asked Questions
Can I tool chrome-tanned leather?
No, you cannot tool chrome-tanned leather because its chemical structure is too elastic. Chrome tanning uses chromium sulfates to stabilize the hide in under 24 hours, creating a rubbery fiber that lacks memory. If you strike a stamp on chrome leather, the impression will disappear within minutes. Only vegetable-tanned hides have the open cellular structure required to hold a permanent, compressed shape.
What is the best thickness for a tooled leather wallet?
The ideal thickness for a tooled wallet shell is 2-3 oz (0.8-1.2mm). This weight provides enough depth for fine carving without making the final product over 2 centimeters thick once you add interior pockets. For the internal card slots, artisans typically use a thinner 1-2 oz (0.4-0.8mm) leather to keep the wallet slim and functional for daily use.
Do I need to wet the leather before stamping?
Yes, you must apply water to temporarily soften the collagen fibers for molding. However, you should never stamp leather while it is dripping wet. The goal is to saturate the core while leaving the surface relatively dry to the touch. This state of "casing" allows your tools to create deep, dark burnished impressions that remain crisp long after the moisture evaporates.
Why does my carving look shallow after the leather dries?
Shallow carvings usually happen because of insufficient moisture in the core or using low-density leather. If the hide is too dry, the fibers won't compress. If you use spongy belly cuts instead of the best leather for tooling and carving found in the shoulder, the loose fibers will simply bounce back. Ensure you are using a heavy marble slab to prevent energy loss during stamping.
What is 'casing' and why is it important for tooling?
Casing is the process of equalizing moisture throughout the hide to reach a state of maximum plasticity. It is vital because it allows your tools to sink into the grain with 30% less force than dry leather. Properly cased leather results in "burnishing," where the heat of the tool darkens the leather naturally. This process creates the high-contrast look found in professional Western floral carving.
Is belly leather good for carving practice?
Belly leather is generally poor for practice because its loose, irregular fiber structure distorts under the pressure of a swivel knife. While it is often 40% cheaper than shoulder cuts, it can teach you bad habits. Beginners should use "craft grade" shoulder pieces instead. This ensures that any mistakes you make are due to your technique rather than the unpredictable stretching of the material.
How do I know if my leather is 'Natural' or 'Finished'?
Natural vegetable-tanned leather has a "naked" surface that absorbs water instantly, turning a dark tan color when wet. Finished leather has a top coat of wax, oil, or acrylic that causes water to bead on the surface. If water doesn't soak into the grain within 5 seconds, the leather is sealed and cannot be tooled or carved without stripping the finish first.
Does veg-tan leather need to be conditioned after tooling?
Yes, you must condition the leather once your carving is dry to replace the natural oils lost during the casing process. Adding a light coat of neatsfoot oil or a specialized leather balm prevents the fibers from becoming brittle over time. This step is essential for maintaining the 10-year or 20-year lifespan of a hand-tooled item, especially if it will be exposed to sunlight.
