


Choosing Between Oil Dye and Water-Based Dye: The Leather Crafter’s Guide
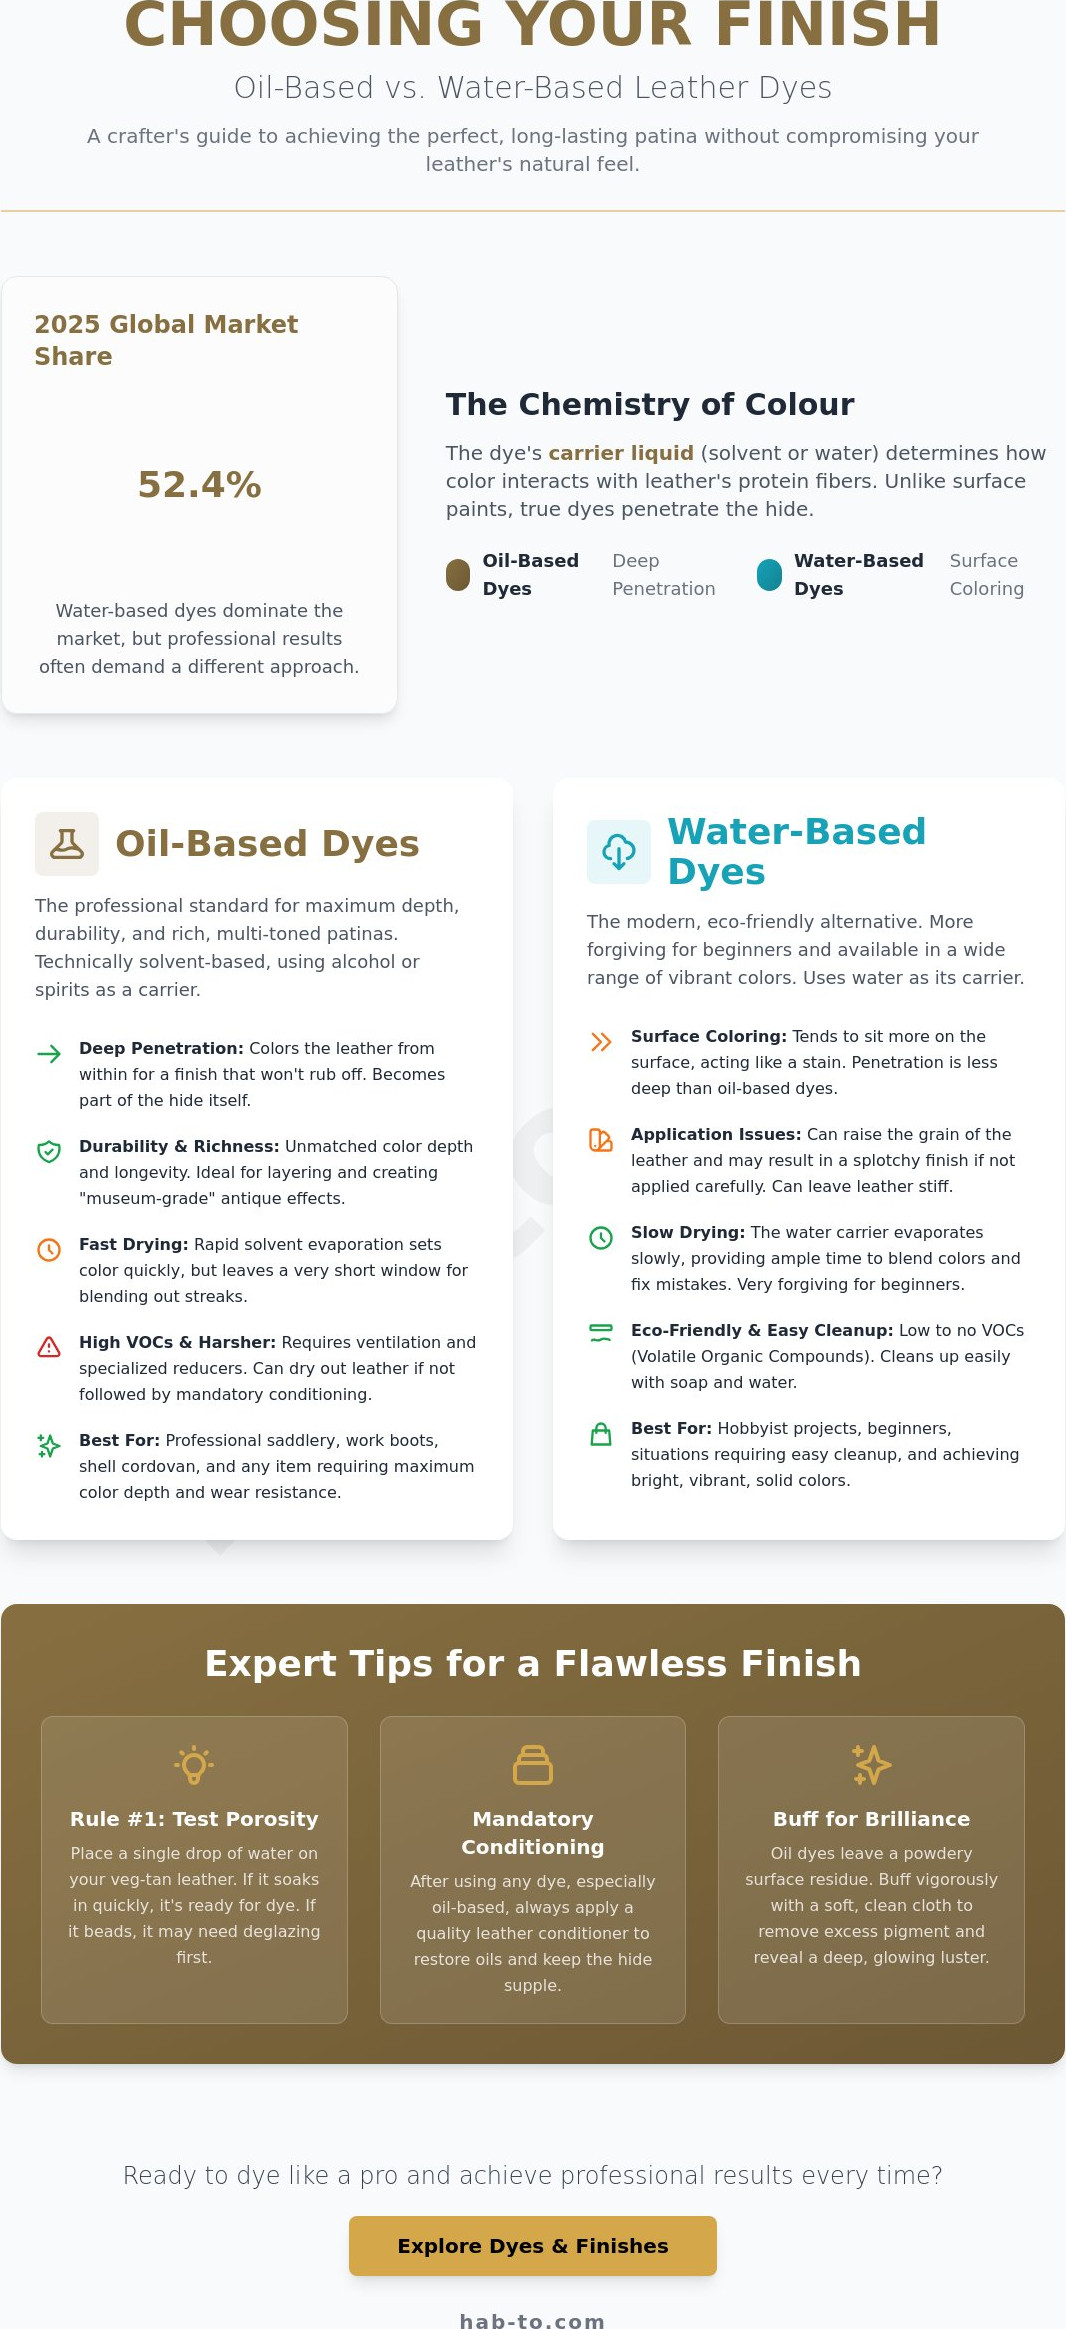
Hi, I’m Mike! You’ve spent twenty hours hand-stitching a premium vegetable-tanned briefcase, only to watch the color rub off on your clothes the first time you use it. It’s a heartbreaking moment that usually stems from one critical decision: choosing between oil dye and water-based dye. While water-based options now hold 52.4% of the global market as of 2025, many crafters still struggle with splotchy application or leather that feels stiff and brittle after drying.
I know how frustrating it is when a project doesn’t meet your standards. You want a rich, even patina that lasts without compromising the hide’s natural feel. This guide will help you master the technical differences between these formulas so you can achieve professional results every time. We’ll explore how to navigate VOC regulations like the 15% limit in effect since 2024, which specific tools prevent uneven streaks, and why the right choice preserves your leather’s suppleness for years to come.
Key Takeaways
- Understand the chemical difference between surface pigments and deep-penetrating dyes to ensure your finish lives within the leather fibers.
- Explore the "Deep Penetration" advantage of oil-based dyes, the gold standard for professional saddlery and items requiring maximum color depth.
- Simplify your workflow by choosing between oil dye and water-based dye based on project needs like ease of cleanup and environmental impact.
- Use our decision matrix to compare drying times and color fastness, helping you plan your production schedule without compromising on quality.
- Master the "Golden Rule" of preparation and the mandatory conditioning steps needed to keep your premium vegetable-tanned leather supple after dyeing.
The Chemistry of Colour: Why Dye Choice Matters for Leather
Dyeing leather isn't just about changing its look; it's a deep chemical interaction with the hide's protein fibers. When you're choosing between oil dye and water-based dye, you're actually deciding how those chemicals will travel through the material. Unlike pigment paints that sit on the surface like a plastic skin, Aniline leather dyes are designed to penetrate. They soak into the grain to color the leather from within. At Hab-To, we take a "No Compromises" approach to quality. This means we avoid synthetic fillers that mask the leather’s natural character. We believe the carrier, the liquid that holds the color, dictates how the leather will feel and age over the next decade. Choosing the wrong one can result in a finish that looks "painted" rather than earned.
To better understand this concept, watch this helpful video:
Solvents vs. Aqueous Bases
The "carrier" is the vehicle that delivers the pigment into the leather. In the modern industry, what we call "oil-based dyes" are technically solvent-based. They usually consist of a dye dissolved in alcohol or a specialized spirit. These solvents evaporate rapidly, which is why professionals love them; they set quickly and reach deep into the fibers. This rapid action is perfect for creating deep, dark blacks or rich chocolate browns that won't fade. However, this fast evaporation means you have a shorter window to blend out streaks. Aqueous or water-based dyes use water as the carrier. They dry much slower, giving you more time to work the color into the hide, but they don't always reach the same depth as their solvent-based cousins.
The Porosity Factor
Before you commit to a color, you need to understand your leather's "thirst." Vegetable tanned leather is the ideal canvas because its open pores haven't been sealed by synthetic topcoats. The tannins used during the tanning process create a natural affinity for dyes, but grain density varies across the hide. A tight, premium shoulder will absorb dye differently than a looser belly piece. You can test this by placing a single drop of water on the surface. If it beads up, the leather is "closed" and might need deglazing. If it soaks in within two seconds, it's ready for a deep, saturated finish. This porosity determines how much dye you'll need and how even the final patina will appear. High-density grain requires more patience, as the dye must fight its way past tightly packed collagen fibers.
Oil-Based Dyes: The Professional Standard for Depth and Durability
Professional cordwainers and saddlers don't just pick a bottle off the shelf by accident. They almost exclusively reach for oil-based dyes because these formulas anchor color deep within the hide's collagen structure. This "Deep Penetration" isn't just a marketing phrase. It’s a chemical reality. Solvent-based carriers are designed to bypass the surface tension of the leather, carrying pigments into the inner fibers. This makes them the undisputed choice for items facing heavy wear, like saddles or work boots. When you're choosing between oil dye and water-based dye, consider that oil dyes interact beautifully with the fats and waxes already present in premium hides. They don't just sit on top; they become part of the material itself.
Achieving the "Museum Grade" Patina
If you want to create a sunburst effect or a rich, multi-toned antique finish, oil dyes are your best friend. They allow for incredible layering. By diluting the dye with a specialized reducer, you can build up color slowly, creating depth that looks three-dimensional. This is why these dyes are the superior choice for shell cordovan. Because cordovan is such a high-density membrane, it needs a potent carrier to take the color effectively. Just remember that the "buffing" phase is non-negotiable. Oil dyes often leave a powdery residue of excess pigment on the surface. You'll need some elbow grease and a soft cloth to buff this away until the leather glows. If you're looking for the right materials to start, browse our hand-selected leather collection to find the perfect canvas for your next project.
Managing the Solvent Drawbacks
The very thing that makes oil dyes effective, the solvent, is also a double-edged sword. These carriers evaporate quickly, which can strip away natural moisture and leave your project feeling brittle if you aren't careful. To avoid this, you must follow up with a high-quality conditioner to restore the hide's suppleness. Safety is another factor you can't ignore. In a small home workshop, you need a respirator and active ventilation to handle the fumes. Since January 1, 2024, regions like Canada have enforced a 15% VOC limit on leather care products to manage these chemical impacts. For a more technical comparison of dye types, you can see how these solvents behave differently at a molecular level compared to aqueous versions. To prevent the dreaded "dye migration" or rub-off on clothing, always apply a dedicated sealer after the dye has fully cured for 24 hours. It's a longer process, but for a finish that lasts decades, it's the only way to work.
Water-Based Dyes: The Modern Artisan’s Eco-Friendly Alternative
The landscape of leathercraft is changing. While traditional solvents still have their place, water-based dyes now account for 52.4% of the global leather dye market as of 2025. This shift is driven by a new generation of artisans who prioritize sustainability without wanting to sacrifice the beauty of their work. When you're choosing between oil dye and water-based dye, the primary difference lies in the "carrier" experience. Water-based options offer a user-friendly entry point. You don't need expensive chemical thinners; you can blend, dilute, and clean your brushes with simple tap water. This accessibility makes them a favorite for those experimenting with vibrant, non-traditional colors like the deep forest greens and burnt oranges that are trending in 2026.
However, water-based dyes come with a unique chemical hurdle: surface tension. Water molecules naturally want to stick together, which can cause the dye to bead up on the surface of a premium hide. If applied haphazardly, this results in a splotchy, uneven appearance that looks amateur. Mastering this medium requires a different set of techniques than solvent-based products, focusing on moisture management and patience rather than rapid saturation.
Safety and Sustainability in the Workshop
I often tell beginners that water-based is the "Hi, I'm Mike!" choice for a home workshop. You don't need a heavy-duty respirator or a dedicated industrial space to use them. Because they lack harsh chemical odors, you can work in smaller, unventilated rooms without worrying about fumes. This is a massive advantage for hobbyists working at a kitchen table. Beyond personal safety, these dyes have a much smaller environmental footprint. Many modern formulations are biodegradable and comply with the strict 15% VOC limits that took effect in early 2024. It’s a way to practice your craft while respecting the natural origin of the materials.
Mastering the Application for Even Tones
To get a professional finish with water-based dyes, you have to beat the surface tension. The best "pro tip" is the damp sponge trick. Lightly wipe your leather with a clean, damp sponge before dyeing. This opens the grain and "primes" the fibers to accept the water-carrier. Water follows water. Instead of one heavy application, aim for three or four thin coats. This prevents the dye from pooling and creates a much smoother transition of color. One thing to watch for is the "stiffness" issue. Because water can temporarily swell the leather fibers, it might alter the temper of your piece. Always follow up with a light conditioner once the dye is dry to restore that buttery, premium feel we all love in high-quality vegetable-tanned leather.
Oil vs. Water-Based Dye: The Decision Matrix
When you're choosing between oil dye and water-based dye, the decision often comes down to your production timeline and the intended use of the item. Solvent-based oil dyes are the speed demons of the workshop. They are often dry to the touch within 15 to 30 minutes, though they require a full 24 hours to cure before you apply a finish. In contrast, water-based dyes can remain damp for several hours; in humid climates, they may take two full days to stabilize completely. If you're working on a tight deadline for a client, the rapid evaporation of solvents is a clear winner, but you pay for that speed with a higher initial investment in respirators and specialized cleaners.
Cost is another factor for the growing artisan. As of mid-2024, a bottle of premium oil dye like Fiebing’s Pro Oil typically retails around $8.99, while water-based alternatives like Tandy’s Eco-Flo sit slightly lower at $7.99. While a one-dollar difference seems small, the long-term yield varies. Water-based dyes are easily diluted with tap water, stretching your supply further for lighter shades. However, oil dyes offer superior color fastness against UV exposure. If your project will spend hours in the sun, like a motorcycle seat or a field bag, the deeper penetration of the oil-based formula ensures the color won't vanish after one summer season.
Project-Specific Recommendations
Matching the dye to the item's purpose is key to lasting craftsmanship. For wallets and small goods, water-based dyes are excellent. The lack of heavy fumes makes detail work more pleasant, and since wallets don't face extreme weather, the surface-level bond is usually sufficient. For belts and saddlery, oil-based is non-negotiable. These items face constant flexing and high stress. You need the dye to live deep within the fibers to prevent the color from "cracking" when the belt is cinched. Footwear requires a balance; while oil dye provides the best penetration for boots, water-based dyes offer great flexibility for lightweight shoes that don't need industrial-strength weatherproofing.
The "Rub-Off" Test
Excessive dye rubbing off on a white shirt is usually a failure of the sealing process, not the dye itself. To ensure your work is professional, always perform a dry-crock test. Take a clean, dry piece of white scrap denim or canvas and rub it vigorously against the dyed surface for 10 seconds. If color transfers, you haven't buffed enough excess pigment away. Oil dyes generally accept heavy wax finishes and carnauba creams better, while water-based dyes pair perfectly with acrylic resolene. To get the best results, you need the right foundations. Shop our premium leatherworking tools and bundles to ensure your workshop is ready for either medium.
Expert Tips for Flawless Dyeing and Post-Dye Care
Mastering the craft means respecting the preparation as much as the final stitch. Even the most expensive pigment won't save a project if the leather isn't ready to receive it. The "Golden Rule" of leather dyeing is simple: always deglaze first. Whether you're choosing between oil dye and water-based dye, skipping this step is the fastest way to ensure your color peels or looks splotchy. Proper preparation ensures the carrier can actually penetrate the protein fibers rather than fighting a losing battle against factory waxes.
The Deglazing Process
Most premium hides arrive with a "tannery finish," a light coat of wax or oil designed to protect the leather during transport. This finish acts as a shield that blocks dye. To remove it, use a high-quality preparer or deglazer on a lint-free cloth. You aren't trying to soak the hide; you're simply stripping that top layer until the grain looks "matte" and feels slightly tacky. It’s vital to identify your leather before starting. If you're working with "finished" leather (like many chrome-tanned varieties), a standard dye won't work regardless of the carrier. Stick to unfinished vegetable-tanned hides for the best results. A quick drop of water will tell you the truth. If it beads, you need more deglazing. If it soaks in, you're ready to dye.
Re-Hydrating Your Project
One of the most common mistakes I see is forgetting to condition after the dye has set. Solvent-based oil dyes are aggressive. They are designed to evaporate quickly, but that process often takes the leather's natural moisture with it. If you don't restore those oils, your premium hide will eventually crack. Our "No Synthetics" philosophy applies here too. Choose conditioners with natural ingredients like neatsfoot oil or beeswax that match the quality of your leather. Timing is everything. Wait about 24 hours for the dye to fully cure before conditioning. This prevents the conditioner from "lifting" the fresh pigment and creating a muddy mess. Once the conditioner has soaked in, buff the surface with a clean horsehair brush for a professional, non-greasy glow.
In my workshop, I often take a hybrid approach. I use water-based dyes for large surface areas to keep the temper soft and the fumes low. Then, I switch to oil-based dyes for the edges where I need maximum durability and depth. Once the dyeing is done, I use high-quality leather hardware like solid brass buckles or rivets to protect the dyed areas from unnecessary friction. Hardware isn't just decorative; it’s a structural shield for your hard work. By combining the right dye with the right prep and protection, you ensure your project doesn't just look good today, but develops a beautiful patina for decades to come.
Master Your Finish and Elevate Your Craft
Mastering your finish is the final step in honoring the material you've chosen. Whether you're reaching for the deep penetration of a solvent or the sustainable ease of an aqueous base, choosing between oil dye and water-based dye ultimately depends on your project's purpose and your workshop setup. Professional results always start with a clean, deglazed surface and end with proper re-hydration. Don't let your hard work go to waste by skipping the conditioning phase once your color has cured for 24 hours.
At Hab-To, we bring 160+ years of family expertise to every hide we source. We believe every crafter deserves access to the best materials. This is why we have no minimum order requirements for independent makers. If you're in the area, visit our Amsterdam-based showroom for personalized advice on your specific project. We're here to help you turn a piece of raw hide into a legacy item. Your next masterpiece is just one dye stroke away.
Ready to start your next project? Browse our hand-selected Vegetable Tanned Leathers.
Frequently Asked Questions
Can I mix oil-based and water-based leather dyes together?
No, you cannot mix oil-based and water-based dyes directly because they have incompatible carriers that will separate or curdle. If you try to combine them in a single jar, the pigments will fail to suspend properly. This results in a chemical mess that won't penetrate the leather fibers. Always stick to one system for a single coat to ensure a professional and even finish on your project.
How do I prevent leather dye from rubbing off on my clothes?
Preventing rub-off requires vigorous buffing with a clean cloth followed by a dedicated top-coat sealer. Most "dye migration" happens because excess pigment sits on the surface instead of inside the grain. Perform a dry-crock test by rubbing white denim against the piece for 10 seconds. If color transfers, keep buffing. Once clear, apply an acrylic or wax-based finish to lock the color in place permanently.
Which dye is better for beginners starting their first leather project?
Water-based options are generally better for beginners because they offer a slower drying time and easier cleanup with tap water. When choosing between oil dye and water-based dye for a first project, the lack of harsh fumes is a major plus. You can work comfortably in a home kitchen without industrial ventilation. It allows you to focus on your technique without the pressure of a solvent evaporation window.
Does oil-based dye make leather waterproof?
Oil-based dye does not make leather waterproof, although the solvent carrier provides slightly more moisture resistance than water-based versions. Leather is a porous material that will always absorb liquid unless it's sealed. To achieve true water resistance, you must apply a top-coat like a heavy wax or an acrylic finish. This creates a physical barrier that protects both the dye and the hide's internal fibers from rain and spills.
How long should I let leather dye dry before applying a finish?
You should let your dyed leather dry for at least 24 hours before applying any finish or conditioner. While oil dyes might feel dry to the touch within 30 minutes, the chemical carriers need a full day to stabilize. If you apply a sealer too early, you risk "lifting" the pigment, which causes streaks. This 24 hour rule applies to both types to ensure the color is fully anchored.
Can I use water-based dye over a piece that was previously oil-dyed?
You cannot successfully apply water-based dye over a previously oil-dyed piece because the solvent and oils will repel the water. The water-based pigment will simply bead up on the surface. If you need to change the color of an oil-dyed item, you must use another oil-based dye or a heavy-duty deglazer. Even then, the original deep penetration makes it very difficult to significantly lighten the shade once it is set.
What is the best way to dilute leather dye for a lighter shade?
The best way to dilute dye is to use the specific reducer or dilutor manufactured for that product line. For oil dyes, this is usually a specialized solvent; for water-based dyes, it's often a clear base or distilled water. Diluting allows you to build color in layers. This technique is essential for achieving a 100% even coat on large surfaces without the overlap streaks that happen with full-strength applications.
Do I need to use a sealer after dyeing vegetable-tanned leather?
Yes, you absolutely need a sealer after dyeing vegetable-tanned leather to prevent fading and rub-off. Choosing between oil dye and water-based dye doesn't change this requirement. An unsealed project will lose its color depth when exposed to sunlight and can stain your clothing when damp. A quality finish also helps protect the leather from the natural oils on your hands, which can darken the patina unevenly over time.
