


Essential Leather Tools for a Small Workshop: The Professional’s Minimalist Guide (2026)
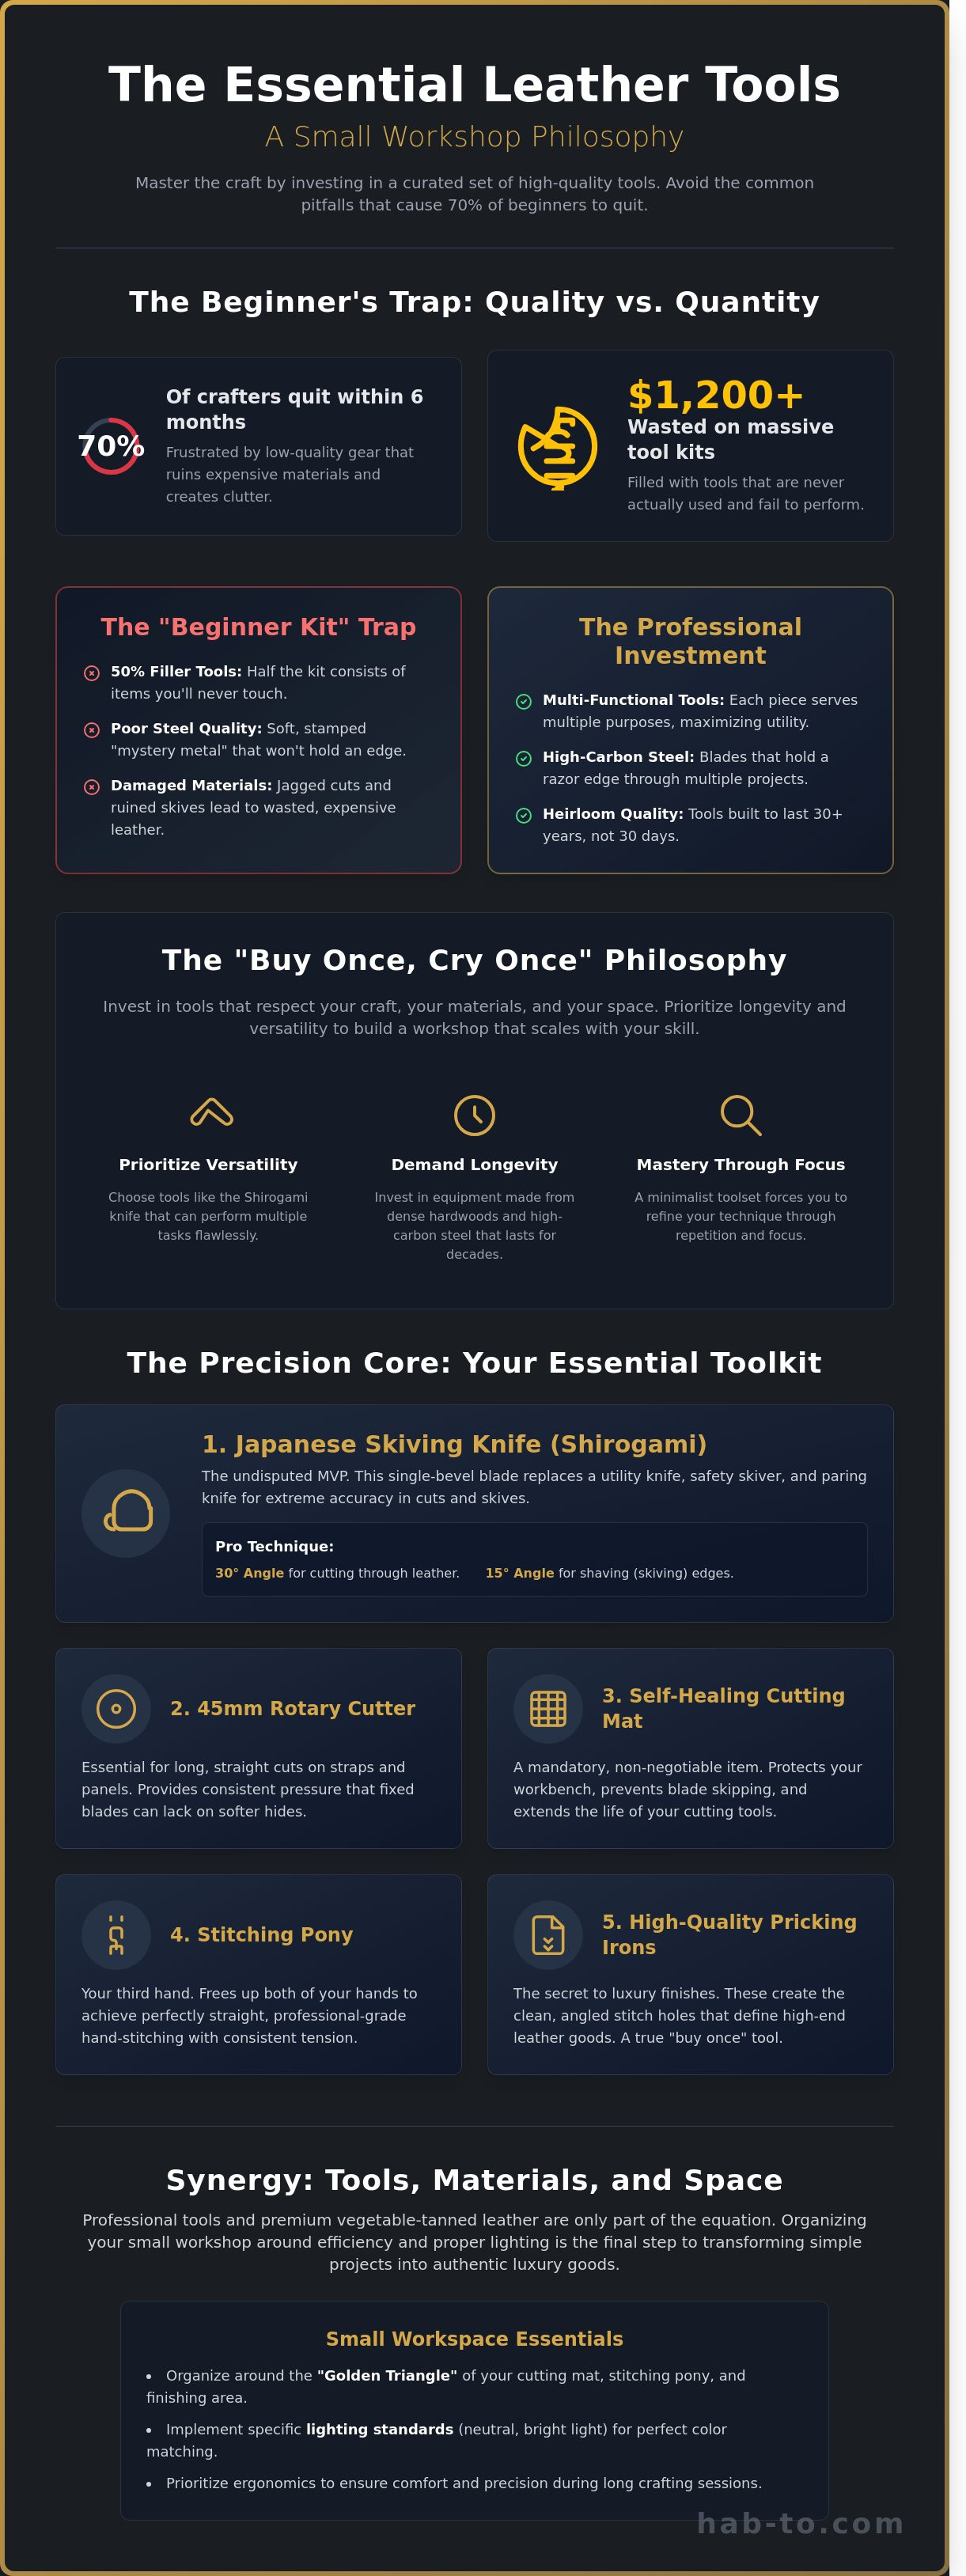
Over 70% of aspiring leathercrafters abandon the hobby within their first six months because they’ve spent upwards of $1,200 on massive tool kits they’ll never actually use. It’s a frustrating cycle of buying low-quality gear that ruins expensive hides and creates unnecessary clutter. Hi, I’m Mike! I’ve spent the last 15 years refining my bench, and I can tell you that you don't need a wall of specialized gadgets to produce world-class work. Finding the essential leather tools for a small workshop is about choosing multi-functional, professional-grade equipment that respects your space and your craft.
You likely agree that quality should always come before quantity, especially when you’re ready to start working on premium materials like Shell Cordovan. You want a setup that feels intentional and helps you focus on the stitch, not the mess. In this guide, I’ll show you how to master the art of leathercraft by discovering the only high-quality tools you truly need to set up a professional-grade workshop. We’re going to look at a curated list of twelve investment pieces that will transform your small workspace into a powerhouse of production by the end of 2026.
Key Takeaways
- Adopt a "buy once, cry once" mindset to avoid the hidden costs of cheap kits by prioritizing tool longevity and versatility.
- Curate a minimalist selection of essential leather tools for a small workshop that focuses on high-precision instruments like the Japanese Shirogami knife.
- Achieve professional-grade hand-stitching and luxury finishes by mastering the use of a stitching pony and high-quality pricking irons.
- Maximize your limited square footage by organizing your workspace around the "Golden Triangle" and implementing specific lighting standards for perfect color matching.
- Discover how the synergy between professional tools and premium vegetable-tanned leather transforms simple projects into authentic luxury goods.
The Small Workshop Philosophy: Why Less is More in Leathercraft
Hi, I'm Mike! When you're setting up your space, it's tempting to buy every gadget you see online. I've seen too many makers clutter their benches with shiny objects that don't actually help them improve. The small workshop philosophy is simple: prioritize versatility and tool longevity over sheer volume. Choosing vegetable tanned leather for your projects requires a level of respect for the material that cheap gear just can't provide. High-quality hides deserve high-quality edges.
A minimalist approach isn't just about saving space; it's about mastering your craft. When you limit your options, you're forced to refine your leather crafting techniques through repetition and focus. You'll learn exactly how a blade should feel when it glides through a 4oz shoulder. Finding the essential leather tools for a small workshop means investing in items that will last 30 years, not 30 days. It's about the "Buy Once, Cry Once" rule. If you buy a cheap tool, you'll cry every time it ruins a project. If you buy a great one, you only cry when you pay for it.
To better understand this concept, watch this helpful video:
The True Cost of 'Beginner Kits'
Most mass-produced starter kits are a trap. Our experience shows that roughly 50% of the items in these $40 bundles are filler tools you'll never touch. The real danger is the steel quality. Soft, stamped metal won't hold an edge, leading to jagged cuts and ruined skiving attempts on premium hides. To identify a tool worth your money, check the balance and the weight. A professional knife should feel substantial in your hand and use high-carbon steel that stays sharp through multiple projects. Don't settle for mystery metal that requires sharpening every five minutes.
Artisan vs. Industrial: Finding Your Middle Ground
You don't need industrial machinery to produce professional work. You need tools that scale with your skills. Focus on pieces that can be maintained and sharpened over decades. My family has been in the leather business for over 160 years, and I still use some of my grandfather's tools because they were built for longevity.
When selecting your essential leather tools for a small workshop, follow these guidelines:
- Identify tools that touch the leather most frequently, like your knife and awl.
- Look for handles made of dense hardwoods or ergonomic brass.
- Prioritize tools that allow for blade replacement or deep sharpening.
- Start with the basics and only add a new tool when a specific project demands it.
The Precision Core: Essential Cutting and Marking Tools
In a compact workspace, every square inch of your bench must earn its keep. You don't need a wall of specialized blades to produce world-class goods. The Japanese Skiving Knife, or Shirogami, is the undisputed MVP of essential leather tools for a small workshop. This single tool replaces a utility knife, a safety skiver, and a paring knife. Its single-bevel design allows you to track a straight line with extreme accuracy or shave leather down to paper-thin margins for folded edges. It's about versatility without compromise.
While the Shirogami handles the heavy lifting, your kit needs a 45mm rotary cutter for long, straight runs. It provides consistent pressure that fixed blades sometimes lack on oily or soft hides. Use the rotary for your initial strap cuts and the fixed blade for tight radii or internal cutouts. To keep these edges sharp, a 3mm self-healing cutting mat is mandatory. It protects your workbench and prevents the blade from skipping, which is a common cause of ruined projects and finger nicks.
Mastering the Knife: Beyond Simple Cutting
A sharp skiving knife is a precision instrument that requires a specific technique. When you're cutting through 2.0mm vegetable-tanned shoulder, hold the knife at a 30-degree angle to the leather. For skiving, drop that angle to 15 degrees. Success depends on your blade path. Always pull the knife toward you while keeping your non-cutting hand firmly behind the blade. In tight workshops, accidents happen when you rush or crowd your workspace. If you're just starting, a comprehensive guide to leatherworking can help you visualize these fundamental movements before you make your first cut.
Marking and Measuring with Accuracy
Precision starts before the blade even touches the hide. A heavy brass ruler is superior to aluminum because its weight prevents it from shifting on the slick surface of the leather. Use it in tandem with a pair of wing dividers to set consistent 3.85mm or 4.0mm stitch lines. This ensures your seams are perfectly parallel to the edge every time.
The scratch awl is perhaps the most underrated tool in the shop. Unlike pens or silver markers, an awl creates a physical indentation without adding chemicals or inks to the leather. This is vital when working with high-end materials like shell cordovan, where preserving the natural grain and luster is the priority. A fine awl mark allows you to see your path clearly without leaving a permanent stain. If you're looking to upgrade your material palette, you can browse our premium leather selection to find the perfect match for your next project.
Stitching and Finishing: Tools for a Professional Edge
A beautiful cut is only half the battle. To transform raw hides into heirloom pieces, you need specific essential leather tools for a small workshop that focus on the "last mile" of production. This is where your craftsmanship becomes visible. While a heavy-duty sewing machine takes up massive floor space and costs upwards of $2,500, hand-stitching offers a level of durability and soul that machines simply can't replicate. It's about the connection between your hands and the material. No compromises.
Your choice between pricking irons and diamond chisels defines your signature aesthetic. Diamond chisels punch through the leather entirely, making them efficient for 95% of small workshop projects. Pricking irons only mark the spacing, requiring a diamond awl to finish the hole. This traditional method, often detailed in this Leatherworking 101 guide, creates that iconic slanted stitch seen in high-end European ateliers. For a minimalist setup, a 3.38mm spacing iron is the most versatile choice for wallets and cardholders.
Don't skip the stitching pony. It's your third hand. Without one, maintaining consistent 5-pound tension on every single stitch is nearly impossible. Investing in a solid 35cm desktop pony is a non-negotiable step when gathering essential leather tools for a small workshop because it ensures your hands remain free for precision work. It's the only way to achieve that perfectly straight, professional line.
The Art of the Traditional Saddle Stitch
Hand-stitching isn't just a hobbyist's compromise; it's a structural upgrade. A saddle stitch uses two needles on a single thread. If one stitch breaks, the other side holds the seam together. Machines use a lockstitch that can unravel completely if snagged. For vegetable-tanned hides like Buttero or Pueblo, I recommend 0.6mm Ritza Tiger thread or Lin Câblé linen thread. Pair these with John James size 004 needles. They're blunt enough to find the hole without piercing the thread, ensuring your work looks clean and professional every time.
Achieving the 'Glassy' Edge
The difference between a "homemade" project and a "boutique" product lies in the edge finish. You need an edge beveller to round off the sharp 90-degree corners. A size 0 beveller is perfect for 1.2mm leather, while a size 1 handles 2.0mm straps. Once beveled, apply a small amount of Tokonole burnishing cream. Use a heavy canvas cloth or a dense cocobolo wood slicker to create friction. This heat seals the fibers, creating a smooth, glassy finish that resists moisture. It's a simple process that honors the quality of the hide for a lifetime.
Workshop Ergonomics: Setting Up Your Small Space
Efficiency in a compact workshop isn't about having every gadget ever made. It's about how you move between your stations. I always advocate for the "Golden Triangle" of leatherwork: Cutting, Stitching, and Finishing. Even if you're working on a single 1.5-meter workbench, you must mentally partition these zones. Keeping your messy dyes and burnishing gums away from your pristine cutting mat prevents 90% of accidental stains on your hides.
Lighting is your most critical diagnostic tool. I've seen many crafters struggle with "muddy" colors because they use warm, yellow household bulbs. 5000K "daylight" LED bulbs are non-negotiable. At 5000K, the color rendering index is high enough to see the true pigment of a vegetable-tanned shoulder. This ensures the tan you see in the shop is the same tan your customer sees in the sun. It eliminates the guesswork that leads to costly mistakes.
When floor space is at a premium, look at your walls. Vertical tool racks keep your essential leather tools for a small workshop within arm's reach without stealing precious surface area. For heavy impact work, gravity is your best friend. Always position your punching stone directly over a table leg. This 4-inch point of contact transfers the mallet's energy directly into the floor. It stops the vibration that causes double-strikes and protects your wrists from repetitive strain.
Designing Your Workflow
- Step 1: Dedicate a "Clean Zone" for handling high-end materials like Shell Cordovan. This leather is the "King of Leathers" for a reason, and even a tiny metal shard on your bench can ruin a 100-euro piece of work.
- Step 2: Bolt your heaviest anvil or granite slab over the sturdiest leg of your bench. This provides a 100% solid strike every time you set a rivet.
- Step 3: Organize your leather hardware in clear, stackable, labeled bins. Spending 15 minutes hunting for a specific solid brass Chicago screw kills your creative momentum.
Tool Maintenance: The Strop is Your Best Friend
A dull knife is a dangerous knife. It requires more force, which leads to slips. You don't need a 500-grit whetstone every day. Instead, build a simple strop by gluing a scrap of heavy veg-tan leather to a flat wooden board. Apply a small amount of green honing compound and give your blades five strokes per side before you start cutting. This 30-second routine keeps your edge "scary sharp" for months.
Living in a Dutch climate means humidity is a constant factor. Rust can form on carbon steel tools overnight if the workshop isn't climate-controlled. I make it a habit to wipe down my metal stamps and knives with a light coat of camellia oil once a week. This simple barrier provides 100% protection against oxidation. Arranging your essential leather tools for a small workshop with a focus on maintenance ensures your investment lasts for a lifetime of crafting.
Ready to build your professional kit? Browse our premium selection of sustainable tools and leathers at Hab-To Leather House.
Sourcing Quality: Why Tools Deserve the Finest Materials
Your choice of essential leather tools for a small workshop only tells half the story. The other half is the material those tools touch. If you use a precision-ground Japanese skiving knife on low-grade, plastic-coated leather, you won't see the tool's true potential. There's a specific synergy between high-carbon steel and premium vegetable-tanned leather like Buttero or Pueblo. These materials respond to the blade with a clean, predictable resistance. This allows for the 0.5mm precision required in luxury goods. When you pair these refined edges with solid brass hardware, a simple cardholder becomes an heirloom piece that lasts 20 years or more.
Most wholesalers demand massive minimum orders that stifle small creators. We don't believe in that. Hab-To supports small workshops by offering premium hides and hardware with zero minimum order requirements. This means you can invest your budget into better tools rather than sitting on expensive deadstock. Before you finish your setup, use this final checklist of the "Essential 7" tools to buy this month:
- Scratch Awl: For marking patterns with surgical precision.
- Diamond Chisel Set: 3.0mm or 3.85mm spacing is ideal for most projects.
- Skiving Knife: A sharp, fixed blade for thinning edges.
- Edge Beveler: Size 0 or 1 for a professional, rounded finish.
- Wood Burnisher: For heat-friction sealing of leather fibers.
- Wing Divider: To mark consistent stitch lines every time.
- Poly Mallet: A 12oz or 16oz weight to protect your punches from damage.
The Hab-To Difference
Hi, I'm Mike. My family has been in the leather industry for over 160 years. That history is distilled into every product we stock. We follow a simple rule: No synthetics. No compromises. I personally test every tool and hide to ensure they meet the standards of a professional workshop. If you're feeling overwhelmed by the options, I'm here to help. You can get expert advice on your specific workshop needs through a direct consultation. We focus on "No Compromise" materials because your hard work deserves a foundation that ages beautifully.
Next Steps for Your Workshop
Building a professional space doesn't happen overnight. It starts with one right choice at a time. I've curated specific tool sets and bundles to take the guesswork out of your shopping list. These kits include the exact essential leather tools for a small workshop that I use in my own daily practice. If you need a more tailored approach, book a consultation to discuss your specific goals. Ready to upgrade? Start your workshop journey with Hab-To's curated supplies today.
Master Your Craft with a Minimalist Setup
Creating professional-grade leather goods in 2026 starts with a shift in mindset. You don't need a warehouse full of machinery to produce world-class work. Focus on the precision core of cutting and marking tools while maintaining an ergonomic workspace that respects your body. Selecting the right essential leather tools for a small workshop ensures that every stitch and edge finish meets the highest standards of the trade. High-quality materials are the foundation of this process; there's no substitute for authentic, sustainable components.
At Hab-To, we've spent 160+ years refining our family expertise to support makers like you. We provide hand-selected vegetable-tanned leathers and premium tools without the burden of minimum order requirements. Our philosophy is simple: No synthetics. No compromises. We're here to help you build a legacy one project at a time. It's your journey, and we're honored to be part of your creative process.
Build your professional workshop with Hab-To's hand-selected tools
Grab your tools and start creating; the world is waiting for your next masterpiece.
Frequently Asked Questions
What is the single most important tool for a beginner leatherworker?
A sharp, high-quality knife is the foundation of every project you'll undertake. I recommend starting with a Japanese skiving knife or a precision utility knife featuring 30-degree snap-off blades. Clean cuts prevent 90% of finishing errors. If your first cut isn't perfect, the rest of the piece suffers. Don't compromise on your blade; a dull edge leads to accidents and ruined premium hides.
Can I use a regular hammer instead of a leatherworking mallet?
You should avoid using a standard metal hammer because it will destroy your expensive punches and stamps within 100 strikes. A 14-ounce poly or rawhide mallet is the correct choice for any workshop. These materials absorb the shock and protect the steel ends of your tools. Using the right mallet ensures your equipment lasts for decades rather than months.
How much space do I actually need for a small leather workshop?
You can set up a professional station in just 1.5 square meters of space. A sturdy 120cm by 80cm workbench provides enough room for cutting, assembly, and finishing. This compact footprint allows you to house all the essential leather tools for a small workshop without needing a dedicated garage. Efficiency matters more than total square footage in a craft like this.
Is it better to buy individual tools or a complete starter kit?
Buying individual, premium tools is always superior to purchasing a mass-produced starter kit. Most 30-piece kits contain low-grade steel that won't hold an edge for more than 5 minutes of work. I suggest starting with five core items of professional quality. You'll save money in the long run because you won't need to replace broken or dull tools after your first three projects.
How often do I need to sharpen my leatherworking knives?
You need to strop your blade every 15 to 20 minutes of continuous cutting to maintain peak performance. A leather strop with polishing compound keeps the edge razor-sharp without removing metal. If you work with vegetable-tanned leather daily, plan for a full sharpening session on a 1000/6000 grit whetstone once every 30 days. Consistent maintenance is the secret to effortless craftsmanship.
What are the best tools for working with thick vegetable-tanned leather?
Heavy-duty diamond chisels and a 1.0mm scratch awl are vital for piercing 4mm thick vegetable-tanned leather. These are the essential leather tools for a small workshop that produces belts or saddles. Pair them with a heavy stitching pony to keep your workpiece stable. Thick leather requires tools that can handle high pressure without bending or losing their alignment during the stitching process.
Do I need a sewing machine for a small professional workshop?
You don't need a sewing machine to run a successful professional workshop in 2026. Traditional hand-stitching, known as the saddle stitch, is significantly more durable than any machine-made lockstitch. Many high-end ateliers prefer hand-stitching because the thread won't unravel even if one stitch breaks. It's a hallmark of true quality that clients value and will pay a premium for.
How can I organize my tools if I don't have a dedicated room?
A vertical pegboard or a rolling tool trolley is the best way to stay organized in a multi-purpose room. A standard 60cm by 40cm pegboard can hold up to 25 individual tools within arm's reach. This setup keeps your workbench clear for the actual crafting. When you're finished, a mobile trolley can be tucked into a closet corner, occupying less than 0.4 square meters of floor space.
