


Finishing the Flesh Side of Leather: A Masterclass for Artisans
Why does the back of your leather often feel like an afterthought? You've carefully selected a premium hide, but that 'furry' or long nap on the reverse can make even the most expert work feel unfinished. Finishing the flesh side of leather is the secret bridge between a hobbyist project and a professional masterpiece. It's about respect for the material. It's about the tactile joy of a smooth, compressed surface. It's about quality without compromise.
I know the frustration of applying dye only to have the fibers stiffen up like sandpaper. It's a common hurdle that can discourage even the most passionate artisan. This guide will change that. You'll learn exactly how to transform those rough backs into sleek, aesthetically pleasing surfaces that elevate your entire craft. We'll compare the performance of Tokonole versus Gum Tragacanth; we'll identify the essential tools for fiber compression; and we'll define the exact moments when you should finish the flesh side versus choosing a traditional lining. Let's refine your technique and bring a new level of polish to your bench.
Key Takeaways
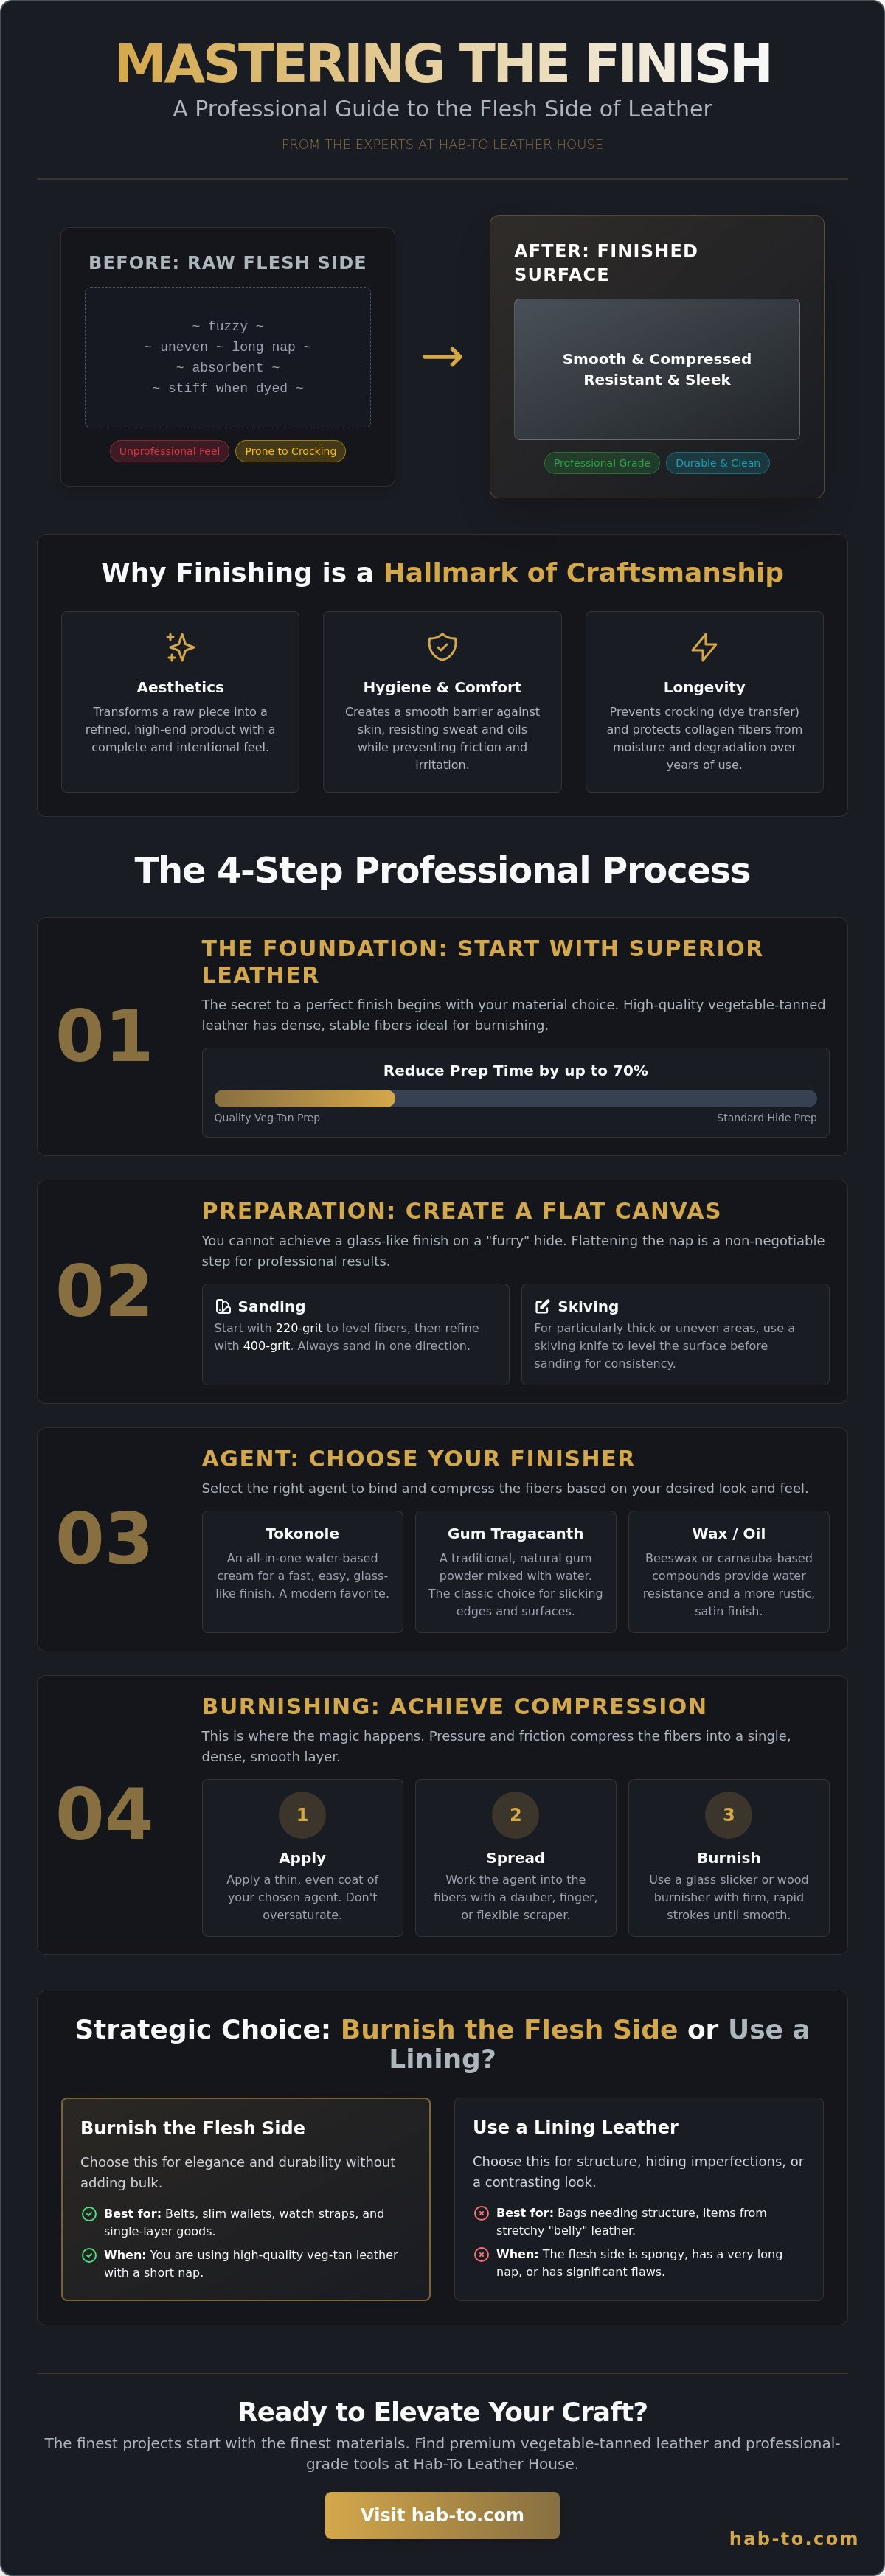
- Learn why sanding and skiving are essential first steps to flatten the collagen fibers and prepare the surface for a professional finish.
- Discover how to choose between Tokonole, Gum Tragacanth, and wax to ensure your finish remains flexible and never becomes "crusty."
- Master the precise application techniques for finishing the flesh side of leather to achieve a smooth, mirror-like compression.
- Understand how starting with high-quality vegetable-tanned leather can reduce your preparation time by up to 70%.
- Identify the specific scenarios where a burnished flesh side is a more durable and elegant choice than adding a separate lining.
Understanding the Flesh Side: Why Finishing Matters
The flesh side is the internal, fibrous heart of the hide. It's the side that once faced the animal's muscle, and it's defined by the "nap." This nap consists of loose collagen fibers that create a fuzzy, sometimes messy texture. While many beginners ignore this side, finishing the flesh side of leather is a hallmark of true craftsmanship. It transforms a piece from raw material into a refined tool. Leaving it untreated isn't just a missed aesthetic opportunity; it can compromise the item's life over years of use.
Why bother with the extra work? It comes down to three things: aesthetics, hygiene, and longevity. A smooth, compressed back resists sweat and skin oils. It's easier to clean. It also prevents "crocking," which is the technical term for dye transferring onto your clothes. Whether you're making a rugged single-layer belt or a slim wallet, a finished back provides a professional touch without the bulk of a lining leather. It makes the item feel intentional and complete.
To better understand this concept, watch this helpful video:
The Anatomy of Leather Fibres
The way a hide behaves depends on the Leather production processes it underwent. Not all sections of a hide are identical. Fibers in the "butt" or "bend" are tightly packed and dense. In contrast, the "belly" is loose and stretchy. This is why material choice is so critical. For artisans, vegetable tanned leather is the gold standard. The natural tannins help stabilize the fibers, making the surface much more receptive to pressure and smoothing agents.
Visual vs. Functional Finishing
Finishing isn't always about looks. Think about a watch strap or a dog collar. These items sit against skin for hours. A raw, fuzzy back causes friction and irritation. By finishing the flesh side of leather, you create a smooth barrier that's comfortable for the wearer. It also prevents the leather from becoming a sponge for moisture. Beyond function, it adds a luxury feel. You can achieve a high-end look on thin items without the added thickness of a second leather layer. It’s about efficiency and elegance combined.
Surface Preparation: Sanding and Skiving for Smoothness
You can't build a house on a swamp, and you can't achieve a glass-like finish on a "furry" hide. If you skip the preparation stage, your burnishing agent will simply sit on top of the loose fibers. This creates a lumpy, uneven texture that eventually peels or cracks. To truly master finishing the flesh side of leather, you must first address the physical structure of the nap. It’s about creating a flat, receptive canvas where the fibers are ready to be compressed into a single, dense layer.
Before you pick up a tool, think about safety. I'm not just talking about your fingers, but the grain side of your leather. Always ensure your work surface is free of metal shavings, dried glue, or stray grit. Laying your leather grain-side down on a dirty mat is the fastest way to ruin a project. I often use a clean piece of craft paper or a dedicated cutting mat to provide a soft, debris-free barrier. Once protected, a light mist of water can be your best friend. Dampening the fibers slightly helps them "relax," making them easier to cut or sand rather than just pushing them around.
How do you know if a hide is ready? If the flesh side feels spongy or has a nap longer than a few millimeters, a simple burnish might not be enough. In these cases, you're often better off using a lining. However, for most quality hides, the right preparation makes all the difference. Understanding the leather finishing process at the industrial level helps us appreciate why we must replicate these compression steps on a smaller scale at our bench.
Mastering the Sanding Block
Sanding leather isn't like sanding wood. You need a gentle touch. Start with a 220-grit sandpaper to knock down the tallest fibers. Once the surface feels relatively level, move to a 400-grit to refine the texture. Always sand in one direction. Find the natural "growth" of the fibers by running your hand across the surface; sand with that flow to avoid tearing the collagen. If you need reliable abrasives or professional leatherworking tools to get started, choosing the right equipment is half the battle.
The Art of the Safety Skive
When the nap is particularly thick, sanding alone takes too long. This is where a French skiver becomes essential. Use it to shave away the excess "meat" or loose flesh in thin, controlled passes. The goal isn't to thin the leather significantly but to remove the uneven height of the fibers. Your blade must be hair-shaving sharp. A dull blade is a dangerous blade; it will catch and tear the fibers, leaving deep gouges that are impossible to sand out. Consistent thickness is the key to a professional result that feels balanced in the hand.
Choosing Your Agent: Tokonole vs. Gum Trag vs. Wax
Selecting the right burnishing agent is where the chemistry of the craft meets the art of design. These substances don't just "paint" the surface; they act as binders that penetrate the collagen fibers and lock them into place. Without an agent, your preparation work in the previous steps would eventually unravel as the leather flexes. The goal is to achieve a surface that feels like a single, unified piece of material rather than a collection of loose threads. It’s a transformation that adds both tactile pleasure and structural integrity to your work.
A common pitfall in finishing the flesh side of leather is the "crusty" finish. This happens when an artisan uses a low-quality acrylic sealer or applies a high-quality agent too thickly. When the leather bends, the rigid finish cracks, leaving unsightly white lines or flakes. To avoid this, always prioritize flexibility. You should also consider your dyeing process. Always apply your dye before your finishing agent. Finishing agents are designed to seal the leather; if you apply them first, your dye will simply bead up on the surface and fail to penetrate the hide.
Tokonole: The Modern Industry Standard
Tokonole has become a favorite in workshops worldwide for a reason. It's a water-based synthetic wax that provides a high-gloss, professional seal while remaining remarkably flexible. It’s easy to apply and doesn't have the harsh chemical smell of older solvent-based products. When using it, remember that a little goes a long way. Use a small spatula or sponge to spread a thin, translucent layer. If you use too much, you risk the agent seeping through to the grain side, which can cause permanent staining on lighter-colored leathers. Clean up any excess on your edges immediately with a damp cloth to keep your work tidy.
Traditional Gum Tragacanth and Beeswax
For crafters who prefer a more organic or matte look, traditional agents remain the top choice. Gum Tragacanth is a natural sap derived from the Astragalus plant. It provides a subtle, "dry" finish that feels more like the original hide than the glossy coat of Tokonole. If you need maximum water resistance, beeswax is your best ally. By rubbing a bar of pure beeswax onto the flesh side and using a glass slicker to create friction, you melt the wax into the fibers, creating a durable, waterproof barrier.
Timing is everything in your assembly. I always recommend completing the process of finishing the flesh side of leather before you begin your hardware installation. Rivets, snaps, and buckles can get in the way of your slicker and prevent an even finish. Once your back is smooth and sealed, you can consult a leather hardware guide to select the right accents for your project. This sequence ensures your hardware sits flush against a professional, compressed surface.
The Step-by-Step Burnishing Process
Once your surface is sanded and level, the real magic begins. Finishing the flesh side of leather isn't about simply painting on a chemical; it's a mechanical process that relies on a specific sequence of actions. You're aiming for a permanent structural change in the collagen fibers. If you rush, you'll end up with a surface that looks okay today but peels tomorrow. Precision at this stage is what separates a student from a master.
Begin by cleaning the surface. Use a soft horsehair brush or a tack cloth to remove every speck of sanding dust. Any debris left behind will be trapped under the finish, creating permanent bumps. Next, apply a thin, even layer of your agent. I prefer using a small plastic spatula or a dense sponge. Spread the agent until the surface looks slightly damp but not soaked. The most critical moment is waiting for the "tacky" stage. If you slick while it's too wet, you'll just move the liquid around. If it's too dry, the fibers won't compress. Wait until it feels sticky to the touch. This is when the leather is ready to be transformed.
Apply heavy, consistent pressure with your tool. Work in long, sweeping strokes. You should feel the resistance change as the fibers begin to lay flat and bond together. For the best results, ensure you have high-quality leatherworking tools on your bench before you start. The right equipment makes the physical labor of compression much more effective.
Glass Slickers vs. Wooden Burnishers
For large, flat areas like the back of a belt or a bag panel, a glass slicker is your best friend. Glass is perfectly smooth and doesn't "grab" the leather, allowing you to generate significant heat through friction. This heat is what permanently sets the fibers in their compressed state. Wooden burnishers are excellent for edges, but they can be too small and inconsistent for wide surfaces. Avoid using plastic scrapers or credit cards. They lack the mass and smoothness needed to create the necessary friction, often leaving streaks instead of a mirror-like finish.
Troubleshooting Common Finishing Issues
Even with careful work, things can go wrong. If your finish looks patchy, it usually means the agent was applied unevenly or the leather was too dry. Simply apply a very light second coat and re-burnish. If you see "bleed-through" on the grain side, you've used too much liquid on a thin hide. To prevent this, work in multiple thin layers rather than one heavy one. If a project "fuzzes up" after a few months of use, don't worry. A light sanding with 600-grit paper followed by a quick burnish with a bit of beeswax will restore that professional sheen instantly.
The Secret to a Perfect Finish: Start with Superior Leather
The quality of your raw material dictates 90% of your final result. If you choose a low-grade hide with loose, spongy fibers, you'll spend hours sanding and burnishing just to achieve a mediocre finish. In contrast, high-quality hides from world-class tanneries require approximately 70% less work. When the leather is tanned slowly with natural extracts, the collagen fibers remain dense and "tight." This structural integrity is what allows you to achieve a glass-like surface with minimal effort. If you want to spend less time finishing the flesh side of leather and more time on the creative details of your design, the solution begins with the hide you select.
In some rare cases, you can bypass the struggle of fiber compression entirely. For example, shell cordovan is fundamentally different from standard bovine leather. Because it's a dense muscle membrane rather than a fibrous flesh side, it arrives with a naturally smooth, non-porous back. It's the ultimate shortcut for artisans who demand perfection without the labor of traditional burnishing. For everything else, Hab-To Leather House serves as your source for materials that are inherently "finish-ready." By starting with the right foundation, you ensure that every stroke of your slicker produces a professional result.
Selecting Hides for Single-Layer Projects
When you're working on unlined projects like belts or tote bags, look for hides labeled as "pasted" or "resined." These have already undergone a light compression at the tannery. Italian and Japanese tanneries are world-renowned for this attention to detail. Their flesh sides are often as beautiful as the grain side. If you're unsure which hide suits your specific needs, just ask us. We take pride in helping you pick the exact skin that matches your project's requirements. This ensures you don't waste hours finishing the flesh side of leather that was never meant to be exposed.
The Hab-To Philosophy: No Compromise on Quality
Our family has 160 years of expertise in the leather industry. We've seen how the market has shifted, but our commitment to structural integrity hasn't wavered. We select our vegetable-tanned leathers specifically for their tight fiber density and clean backs. This is why master artisans prefer our stock; it responds predictably to tools and agents. We believe that your craft deserves a foundation that supports your skills rather than hindering them. Ready to elevate your next project? Browse our curated selection of premium vegetable-tanned leather and feel the difference that 160 years of tradition makes.
Elevate Your Craft with Every Detail
Mastering the art of finishing the flesh side of leather is about more than just aesthetics. It's about the integrity of your work and the respect you show for the hide. You've learned that a professional finish starts with meticulous preparation and ends with the right fiber compression. Whether you choose the modern flexibility of Tokonole or the organic feel of beeswax, your attention to the back of the hide defines you as a true artisan. Every project you create is a testament to your dedication to quality without compromise.
Superior results require a superior foundation. At Hab-To Leather House, we bring 160 years of family leather expertise directly to your bench. We specialize in world-class Shell Cordovan and premium vegetable-tanned leathers that are selected for their tight, finish-ready flesh sides. We believe that every crafter deserves access to the best materials; that's why we have no minimum order requirements. We're here to support your growth from your first stitch to your finest masterpiece.
Discover the perfect leather for your next project at Hab-To Leather House. Your journey as an artisan is a series of small, intentional steps. Keep refining your technique and pushing your boundaries. Your next great work is just one hide away.
Expert Advice: Frequently Asked Questions
Can I finish the flesh side of chrome-tanned leather?
You can apply smoothing agents to chrome-tanned leather, but the results won't match vegetable-tanned hides. Chrome tanning chemically alters the fibers to be loose and heat-resistant, which prevents the permanent compression needed for a glass-like shine. While you can lay the nap down for a cleaner look, the surface will likely remain soft rather than becoming firm and glossy. For these hides, a lining is often a better choice.
Will finishing the flesh side make my leather project stiff?
Finishing the flesh side of leather adds a slight degree of structure, but it shouldn't make your project feel stiff or brittle. The goal is to compress the fibers, not to turn them into plastic. If your leather becomes "crusty," you've likely applied your agent too thickly or used a rigid acrylic sealer. High-quality water-based waxes are designed to maintain the natural flexibility of the hide while providing a smooth surface.
Should I dye the flesh side before or after applying Tokonole?
You must always apply your dye before finishing the flesh side of leather with Tokonole. Burnishing agents act as sealants that lock the fibers and close the pores of the hide. If you apply the agent first, the dye will simply bead up on the surface and fail to penetrate. Dyeing first ensures that the color is deeply absorbed and then safely locked away behind the smooth, burnished seal.
What is the best tool for smoothing large areas of leather?
A glass slicker is the undisputed champion for smoothing large panels like bag interiors or belts. Unlike wooden burnishers, which are designed for narrow edges, a heavy glass plate provides a wide, perfectly flat surface for even pressure. The friction generated by the glass is essential for setting the fibers permanently. It allows you to achieve a uniform, professional sheen across the entire piece that smaller tools simply can't replicate.
Can I use wood glue to slick the back of my leather?
You should avoid using wood glue for this process. While it might lay the fibers down temporarily, wood glue dries into a rigid layer that will crack and peel as the leather flexes. It also prevents the leather from breathing and can cause permanent discoloration. Stick to dedicated burnishing agents or natural gums. These are specifically formulated to bond with leather fibers while remaining flexible enough to move with the project.
How do I prevent the finishing agent from staining the front of my leather?
The secret is to work in thin, controlled layers and stop your application just short of the edges. Use a small spatula or a dense sponge to spread the agent, ensuring it doesn't pool or run. Always work on a clean surface to avoid picking up debris on the grain side. If any agent does seep over the edge, wipe it away immediately with a damp cloth before it has time to dry.
Is it better to finish the flesh side or just use a lining leather?
It's a balance between the desired bulk and the project's complexity. Finishing the flesh side is ideal for single-layer items like watch straps or unlined totes where you want to keep the piece slim and lightweight. Use a lining when you need to hide internal reinforcements or when the leather's nap is too loose to compress effectively. A lining provides a structured, luxury feel that's often preferred for high-end wallets.
How long does a burnished flesh side last before it needs maintenance?
A properly burnished surface can last for many years under normal conditions. However, in high-friction areas, the fibers might eventually start to lift or "fuzz up" again. When this happens, maintenance is simple. You don't need to start from scratch; just lightly sand the area with 600-grit paper and reapply a small amount of beeswax or Tokonole. This quick touch-up will restore the professional sheen and keep the item looking new.
