


How to Apply Antique Finish: The Artisan’s Guide to Depth and Character
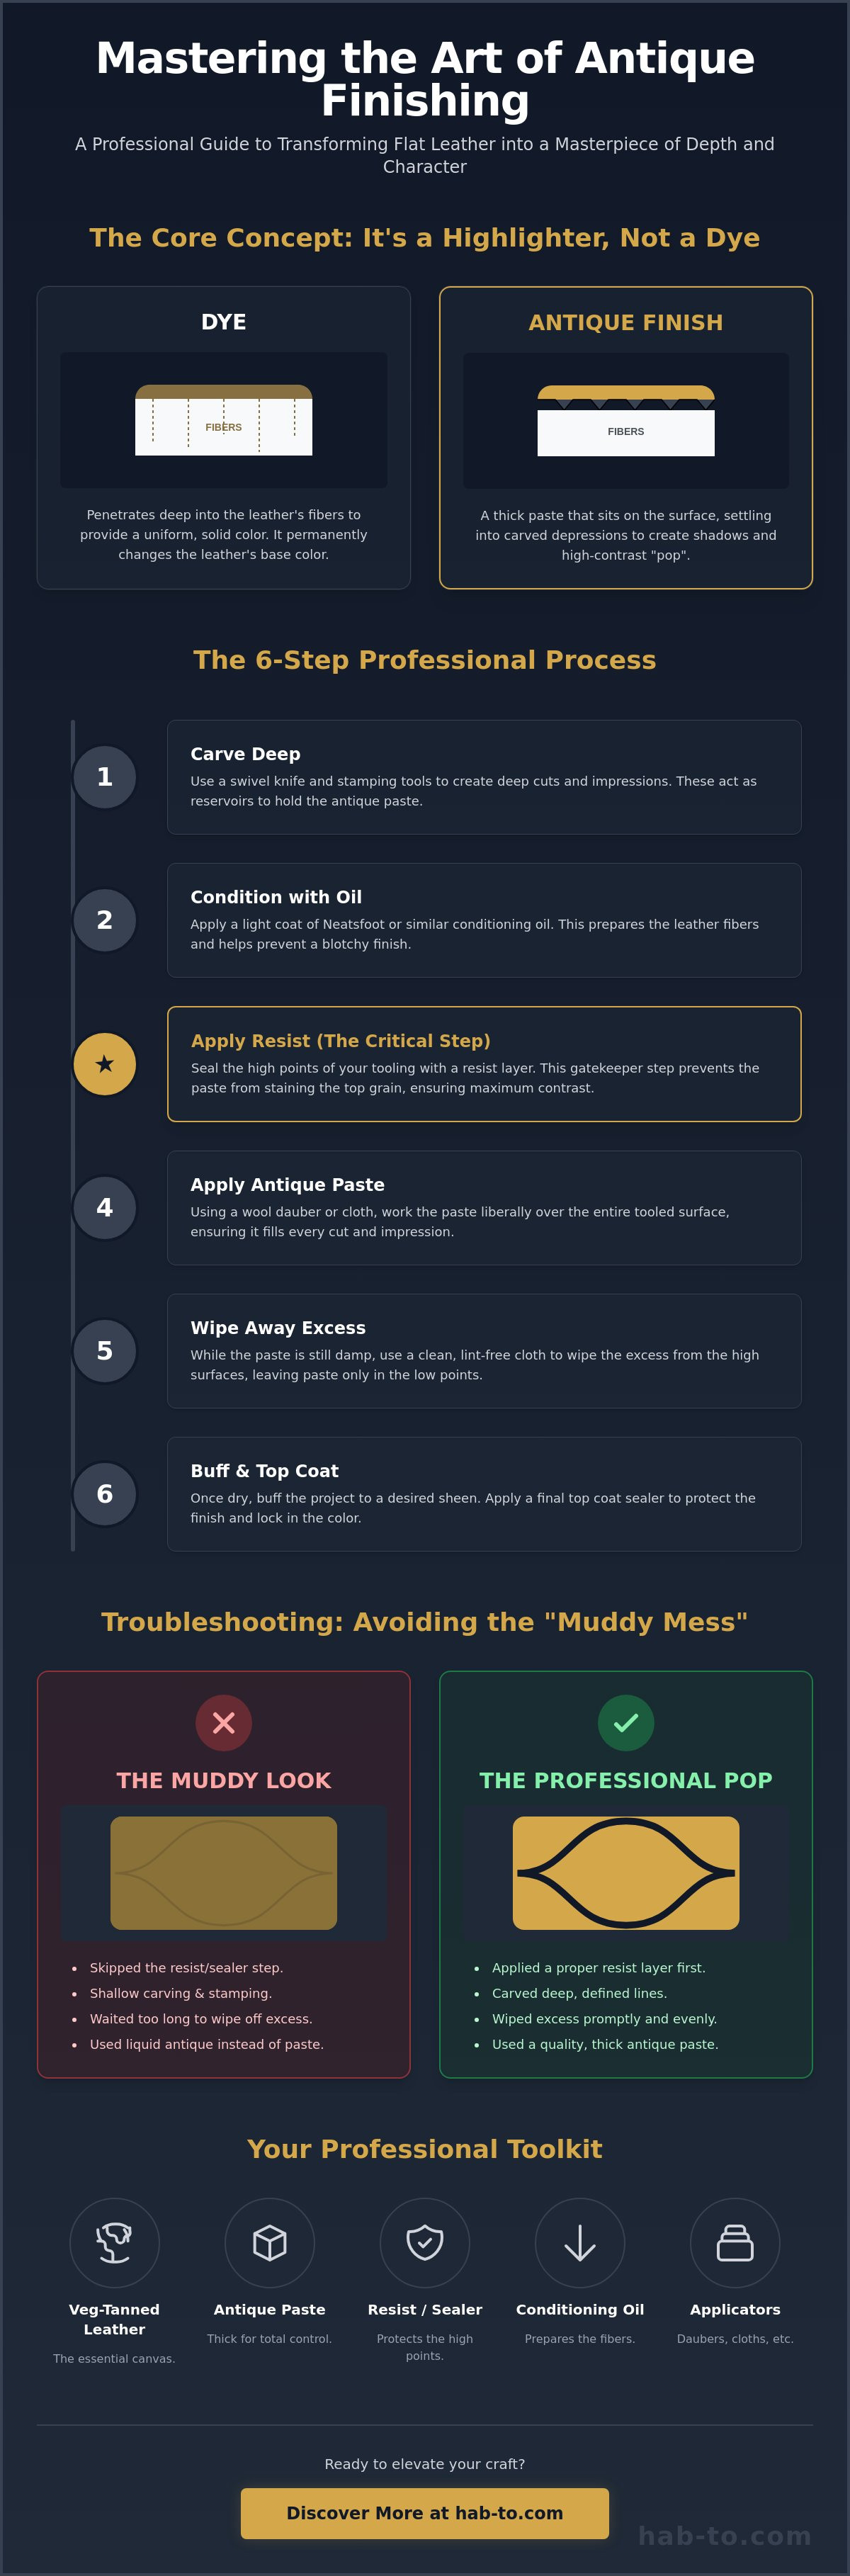
Most leatherworkers treat antique finish like a thick dye, but that's exactly why so many projects end up looking like a muddy mess. It's a heartbreaking moment when you spend ten hours carving a floral pattern only to see it vanish under a dark, streaky layer of paste. You want your hard work to stand out. You want that deep, rich contrast that makes a design jump off the hide. Learning how to apply antique finish correctly is the difference between a project that looks amateur and one that feels like a timeless heirloom.
I understand the frustration of unintentional darkening and the fear of ruining a beautiful piece of vegetable tanned leather. It's a common hurdle, but it's one we can clear together. This guide is designed to help you master the professional technique of antiquing to highlight your tooling and create a high-contrast finish. We'll walk through the essential barrier layers that protect your grain, the secrets to avoiding smears, and the exact steps to achieve a consistent, professional patina across every project you touch. Let's turn that flat surface into a masterpiece of depth and character.
Key Takeaways
- Understand that antique finish is a structural highlighter, not a dye, designed to settle into the low points of your tooling for maximum "pop."
- Discover why premium vegetable tanned leather is the essential foundation for achieving a professional, high-contrast result.
- Learn the precise sequence of how to apply antique finish, including the critical role of oiling and resist layers to prevent a muddy appearance.
- Identify and solve common troubleshooting issues, such as unintentional darkening and streaky application, to ensure consistent results.
- Explore heritage techniques like sunburst effects and multi-colored antiquing to give your handcrafted projects a truly unique, artistic edge.
What is Antique Finish and Why Use It on Leather?
Antique finish is more than a simple coloring agent; it's a structural highlighter for your craft. Unlike liquid dyes that soak deep into the leather's fibers, an antique finish is a thick, pigmented paste or gel designed to rest on the surface and settle into the valleys of your work. Many Leather crafting techniques rely on this specific property to create visual interest. It essentially mimics the natural accumulation of oils and dust that happens over decades. This gives a new piece an immediate sense of history and soul without waiting a lifetime for it to age naturally.
If you want your patterns to truly stand out, learning how to apply antique finish is non-negotiable. Without it, even the most intricate work with leather stamping tools can look flat and one-dimensional. The antique provides the shadow that defines the light. It ensures that every bevel and stamp mark is visible from a distance. I've seen many beautiful carvings lost because the artisan skipped this step or treated it like a standard stain. It's about creating that high-contrast "pop" that separates hobbyist projects from professional, heirloom-quality goods.
To better understand this concept, watch this helpful video:
Antique vs. Dye: Understanding the Difference
Think of dye as a permanent change to the leather's DNA. It penetrates the grain to provide a uniform, solid color from the surface down through the fibers. Antique finish is all about dimension. It doesn't want to change the base color of the hide. Instead, it wants to accentuate the texture. If you're looking for a specific background color, you must apply your dye first. Once the dye is set and sealed, the antique can go on top to fill the cracks without muddying the original shade. This layered approach is the secret to a clean, professional look.
The Role of Carving Depth
Your carving is the foundation of a successful finish. When you're exploring what is a swivel knife used for in advanced projects, the answer is often "creating reservoirs." Those deep cuts act as tiny basins that hold the antique paste. If your stamping is too shallow, there's nowhere for the pigment to hide when you wipe away the excess. This results in a "washed out" look where the contrast is lost. You'll need to adjust your tooling pressure. Ensure your depressions are deep enough to catch and hold the finish. This creates those rich, dark shadows that define high-end leatherwork.
Essential Materials for a Professional Antique Finish
Success in leatherwork often comes down to the quality of your foundation. You wouldn't paint a masterpiece on a dirty rag. Similarly, mastering how to apply antique finish requires a specific set of materials that work in harmony. It's not just about the paste; it's about the chemistry between the hide, the oil, and the barrier layers. If one component is missing, you risk a muddy, flat result that hides your hard work rather than celebrating it.
Gather these essentials before you begin:
- Premium Vegetable Tanned Leather: This is the only canvas that truly accepts antiquing. Its open pores are ready to drink in the oils and hold the pigments.
- Antique Paste: I always recommend paste over liquid or gel for professional work. The thickness gives you total control. It stays where you put it and won't run into areas you want to keep clean.
- Resist or Sealer: This is your gatekeeper. It protects the "highs" of your tooling from absorbing the dark pigment.
- Application Tools: Keep sheepskin remnants for buffing, wool daubers for reaching into deep cuts, and plenty of lint-free cloths.
- Conditioning Oil: A light coat of Neatsfoot oil is vital. It prepares the fibers and sets the base tone of your piece.
Choosing the Right Leather Canvas
Different hides react uniquely to the antiquing process. For a truly distinctive look, Badalassi Pueblo leather is a personal favorite. Its unique, slightly scuffed surface creates a rustic depth that grabs the finish in a way smooth hides can't replicate. If you prefer a more traditional, rich feel, Maryam Vacchetta interacts beautifully with oil-based finishes, developing a deep patina over time. Just remember to stay away from chrome-tanned leather. It's chemically sealed during the tanning process and simply won't accept an antique finish properly.
The 'Resist' Layer: Your Secret Weapon
The resist layer is what creates that coveted high-contrast look. You generally choose between Tan-Kote and acrylic-based resists. Tan-Kote is a classic choice that remains somewhat breathable. Acrylic resists provide a harder, more impenetrable seal. The goal is to create a microscopic barrier on the surface of the leather. This ensures the antique paste only stays in the "lows" of your carving. Before you apply your antique, check your coverage. Hold the piece up to the light; you should see a consistent, subtle sheen across the entire surface. If you see dull spots, you have a gap where the antique will soak in and create a permanent dark stain.
Choosing the right hide is half the battle. You can find our curated selection of premium vegetable tanned leather here to start your next project on the right foot.
Step-by-Step: How to Apply Antique Finish
Preparation is the soul of a good finish. Before you even touch the antique paste, your leather needs to be in the right state to receive it. I always start by applying a light, even coat of Neatsfoot oil. This sets the base tone and ensures the leather doesn't become brittle after the chemical layers are applied. Let the oil soak in for a few hours until the color is uniform. If the leather looks blotchy, you aren't ready for the next step yet.
Once the oil has settled, apply your resist layer. Whether you're using Tan-Kote or an acrylic sealer, consistency is everything. Use a damp sponge to wipe it on in long, overlapping strokes. You must let this layer dry completely; if it's even slightly tacky, the antique will bond to the surface and ruin your contrast. Many artisans rush this part, but I've found that waiting a full hour is the safest bet for a clean result.
Now comes the core of the craft. When you are ready to learn how to apply antique finish, the physical motion you use is what determines the final depth. Use a wool dauber or a soft cloth to apply the paste in a firm, circular motion. This ensures the pigment is forced into every stamp mark and swivel knife cut. Work in small sections, roughly the size of your hand, so the paste doesn't dry on the surface before you can manage it.
After the cuts are filled, remove the excess immediately. Use a damp, not dripping, sponge to wipe across the surface. The goal is to clear the "highs" while leaving the dark pigment safely tucked away in the "lows." Finally, let the piece sit for at least 24 hours before applying a final sealer like Resolene or Bag Kote. This prevents the antique from "bleeding" into your topcoat and keeps that high-contrast look sharp for years.
The Circular Application Technique
Many beginners try to "paint" the antique on in straight lines. This is a mistake. Straight strokes often skip over the deep recesses of your tooling, leaving unsightly gaps in the color. By working in circles, you approach every cut from multiple angles. It's like grouting tile; you need to push the material into the cracks. This technique is especially vital for complex floral patterns where the cuts vary in depth and direction.
Removing the Excess: The Art of the Buff
The cleanup is where the magic happens. I prefer using a slightly damp sponge followed by a dry paper towel or sheepskin remnant. Use a very light touch. If you scrub too hard, you'll actually pull the antique right out of the deep cuts you just filled. You want to "clear the highs" of the leather grain until the base color shines through again. Stop the moment the surface looks clean; over-buffing is the fastest way to lose the character you've worked so hard to create.
Troubleshooting: Avoiding the 'Muddy' Look
Ruining a project after hours of intricate tooling is a gut punch. It's the moment every leatherworker fears. If your whole project turns a uniform, dark brown instead of showing high contrast, you've experienced a resist failure. This happens when the antique paste bypasses your barrier and soaks directly into the grain. It's a common hurdle when learning how to apply antique finish, but it's entirely preventable with the right preparation and patience.
Flat, lifeless tooling is another frequent complaint. This usually occurs because you didn't remove enough surface paste during the buffing stage. If the "highs" of your leather are still covered in a film of pigment, the shadows in the "lows" have nothing to contrast against. On the other hand, if your finish is rubbing off on your fingers, you likely applied your top-coat too soon. The antique needs time to off-gas and set. Rushing to the finish line often results in a mess that won't stay put.
Mastering the Resist Application
Your resist is your only defense against a muddy outcome. Many crafters make the mistake of applying one thick, heavy layer of Tan-Kote or acrylic. This often leads to bubbles or uneven patches. Two thin coats are always better than one thick one. The first coat seals the pores; the second coat ensures total coverage. Pay close attention to the edges of your tooling. These are the areas most prone to "leaking." Always test your resist on a scrap piece of the same vegetable tanned leather before committing to your main project. It's the only way to be sure your barrier is holding.
Timing is Everything
The environment in your workshop plays a massive role in your success. Humidity is a silent variable that changes everything. In a dry room, your paste might turn to concrete in seconds. In a humid basement, it might stay wet for twenty minutes. You're looking for the "Golden Window." This is the brief period when the paste is tacky but hasn't yet hardened. If you miss this window and the paste dries too fast, don't panic. You can use the "re-wetting" trick. Apply a small amount of fresh antique paste over the dried area. The solvents in the new paste will reactivate the old stuff, giving you a second chance to buff it clean.
If you want to ensure your next project has the perfect foundation, explore our premium Badalassi Pueblo leather for your next carving masterpiece.
The Professional's Touch: Heritage Techniques
Once you've mastered the mechanics of how to apply antique finish, you can begin to explore the artistry that separates a good piece from a museum-quality heirloom. The true professional doesn't just fill the cuts; they use the finish to tell a story. One of my favorite heritage techniques is creating a "vignette" or sunburst effect. This involves applying a lighter dye in the center of a project and a darker antique toward the edges. It draws the eye inward and gives the piece an immediate sense of vintage luxury that feels earned rather than manufactured.
You can also experiment with multiple antique colors on a single design. For complex floral work, I often use a tan antique for the petals and a dark brown for the background seeds. It requires patience and a steady hand, but the results are breathtaking. At Hab-To, our philosophy is rooted in respecting the natural grain of the hide. We believe that a finish shouldn't mask the leather; it should celebrate it. By choosing traditional methods over quick fixes, you're building a piece that will patina beautifully over decades, not just days. This is how you create an item that someone will be proud to pass down to the next generation.
Advanced Shading Techniques
For those seeking ultimate control, a wool dauber isn't always the right tool. I often use a fine-tipped brush for "spot antiquing." This allows you to apply the paste into specific design elements while keeping the rest of the piece clean. If you're working on intricate, multi-colored projects, a resist pen is a lifesaver. It lets you "draw" a barrier on tiny details like flower stamens or border lines with surgical precision. Once your antique is dry and buffed, consider layering Carnauba wax over the top. It provides a deep, museum-quality glow that feels soft to the touch and adds a sophisticated layer of protection.
Choosing Quality Over Convenience
It's tempting to reach for mass-produced "all-in-one" finishes that promise a dye, antique, and seal in a single bottle. In my experience, these products often fail the artisan. They lack the nuance and control of a multi-step process. True quality comes from understanding the chemistry of your materials and how they interact with the hide. This is why sourcing your materials from a heritage leather supplier with 160 years of family business experience makes such a difference. We've seen how leather reacts over generations. My final advice is simple: never rush. Practice these advanced methods on scraps of premium Italian leather before you touch your final project. Your future self will thank you for the extra care.
Bring Your Tooled Designs to Life
Mastering the balance between the resist layer and the circular application technique ensures your work never looks flat or muddy. It's about creating intentional shadows that define your artistry. When you understand how to apply antique finish with patience, you transform a standard piece of hide into a storied heirloom with incredible depth. These skills take time to refine, but the results speak for themselves in every high-contrast cut and stamp mark.
To achieve these professional results, you need a canvas that respects your skill. At Hab-To, we bring 160 years of leathercraft heritage to your workbench. Every hide in our collection is sourced from the world's finest Italian tanneries to ensure consistent, premium quality. We offer no minimum orders for artisans and crafters because we believe every creator should have access to the best materials regardless of project size. Explore our selection of premium Vegetable Tanned Leather for your next project and see the difference that heritage quality makes. Your next masterpiece is waiting for its first cut. Keep crafting with passion.
Frequently Asked Questions
What is the best resist to use before applying an antique finish?
Tan-Kote and acrylic-based sealers like Resolene are the most reliable resists for this process. Tan-Kote is a favorite among traditionalists because it allows for a more natural look; however, acrylics provide a harder barrier that's easier for beginners to manage. The key is ensuring your resist is applied in two thin, even layers and allowed to dry completely before you begin the antiquing process.
Can I apply antique finish to chrome-tanned leather?
No, chrome-tanned leather is not suitable for antiquing. The chemical tanning process effectively seals the hide, which means the antique paste cannot settle into the grain or tool marks. It will simply smear across the surface or slide off without creating any contrast. For professional results, you must always use vegetable tanned leather, as its open pores are designed to accept these finishes.
How long should I let the antique paste dry before buffing?
You should begin buffing the antique paste almost immediately, typically within 1 to 3 minutes of application. If you wait too long, the paste hardens into a stubborn film that's very difficult to remove without damaging your tooling. It's best to work in small hand-sized sections. This ensures you can clear the surface while the paste is still tacky and manageable.
Why does my antique finish look streaky after it dries?
Streakiness usually happens because of uneven resist coverage or applying the paste in straight lines. If your resist layer is thin in certain spots, the antique will soak in deeper and create dark patches. Always use a firm, circular motion when learning how to apply antique finish to ensure the pigment is distributed evenly into every recess of your design.
Do I need to seal the leather after applying an antique finish?
Sealing the leather is a mandatory final step for any project. You should allow the antique to dry for at least 24 hours before applying a topcoat like Bag Kote or Resolene. Without this final seal, the antique pigment will eventually rub off on clothing or skin. A good sealer also protects the hide from moisture and locks in that high-contrast professional look.
Can I use antique finish over leather dye?
You can certainly use antique finish over dye to create complex, layered effects. The secret is to ensure the dye is fully dry and then covered with a consistent resist layer before you apply the antique. This approach is perfect for creating sunburst or vignette patterns where you want a base color to shine through the highlighted shadows of your carving.
Is antique gel better than antique paste for beginners?
Antique paste is actually better for beginners because its thick consistency offers superior control. Gels are much thinner and can easily run into areas where you don't want them, which often leads to a muddy appearance. The paste stays exactly where you push it with your dauber. This makes it much easier to manage during the critical application and buffing stages.
How do I prevent the antique from darkening the natural leather colour?
The best way to prevent unintentional darkening is a flawless resist layer. Applying two thin coats ensures that the "highs" of your leather grain are completely protected from the pigment. Additionally, a light application of Neatsfoot oil before your resist helps to prime the fibers. This ensures the leather doesn't drink up the antique paste too aggressively, keeping your base color bright and clean.
