


The Artisan’s Guide to Leather Stamping Tools: Elevate Your Craft
What if your leatherwork could speak without saying a single word? Stamping is a conversation between steel and grain; the tool is merely the translator. You've likely felt the frustration of a stamp that leaves a blurry mess or a cheap tool that bends under pressure. Finding the right leather stamping tools shouldn't feel like a guessing game. It's about quality. It's about precision. It's about respect for the material.
You want impressions that are deep, crisp, and professional. I'm here to help you achieve that. This guide will help you master the art of leather decoration by breaking down the tools and techniques that turn a simple hide into a masterpiece. We'll explore essential stamp categories, how to spot professional-grade equipment, and the secrets to working with premium vegetable-tanned leather. You'll gain the confidence to invest in tools that won't rust or fail, allowing your creativity to finally take center stage. Let's elevate your craft together.
Key Takeaways
- Learn the mechanics of an impression and how to manipulate leather fibers for lasting clarity.
- Identify the specific effects of bevelers and pear shaders to create professional 3D relief in your floral work.
- Understand why vegetable-tanned leather is the only choice for leather stamping tools due to its unique ability to retain "fiber memory."
- Master the art of casing to ensure your leather has the perfect moisture level for crisp, dark burnishing.
- Discover how to select professional-grade tools that offer superior durability and cleaner results than mass-produced kits.
What are Leather Stamping Tools? The Foundation of Tooling
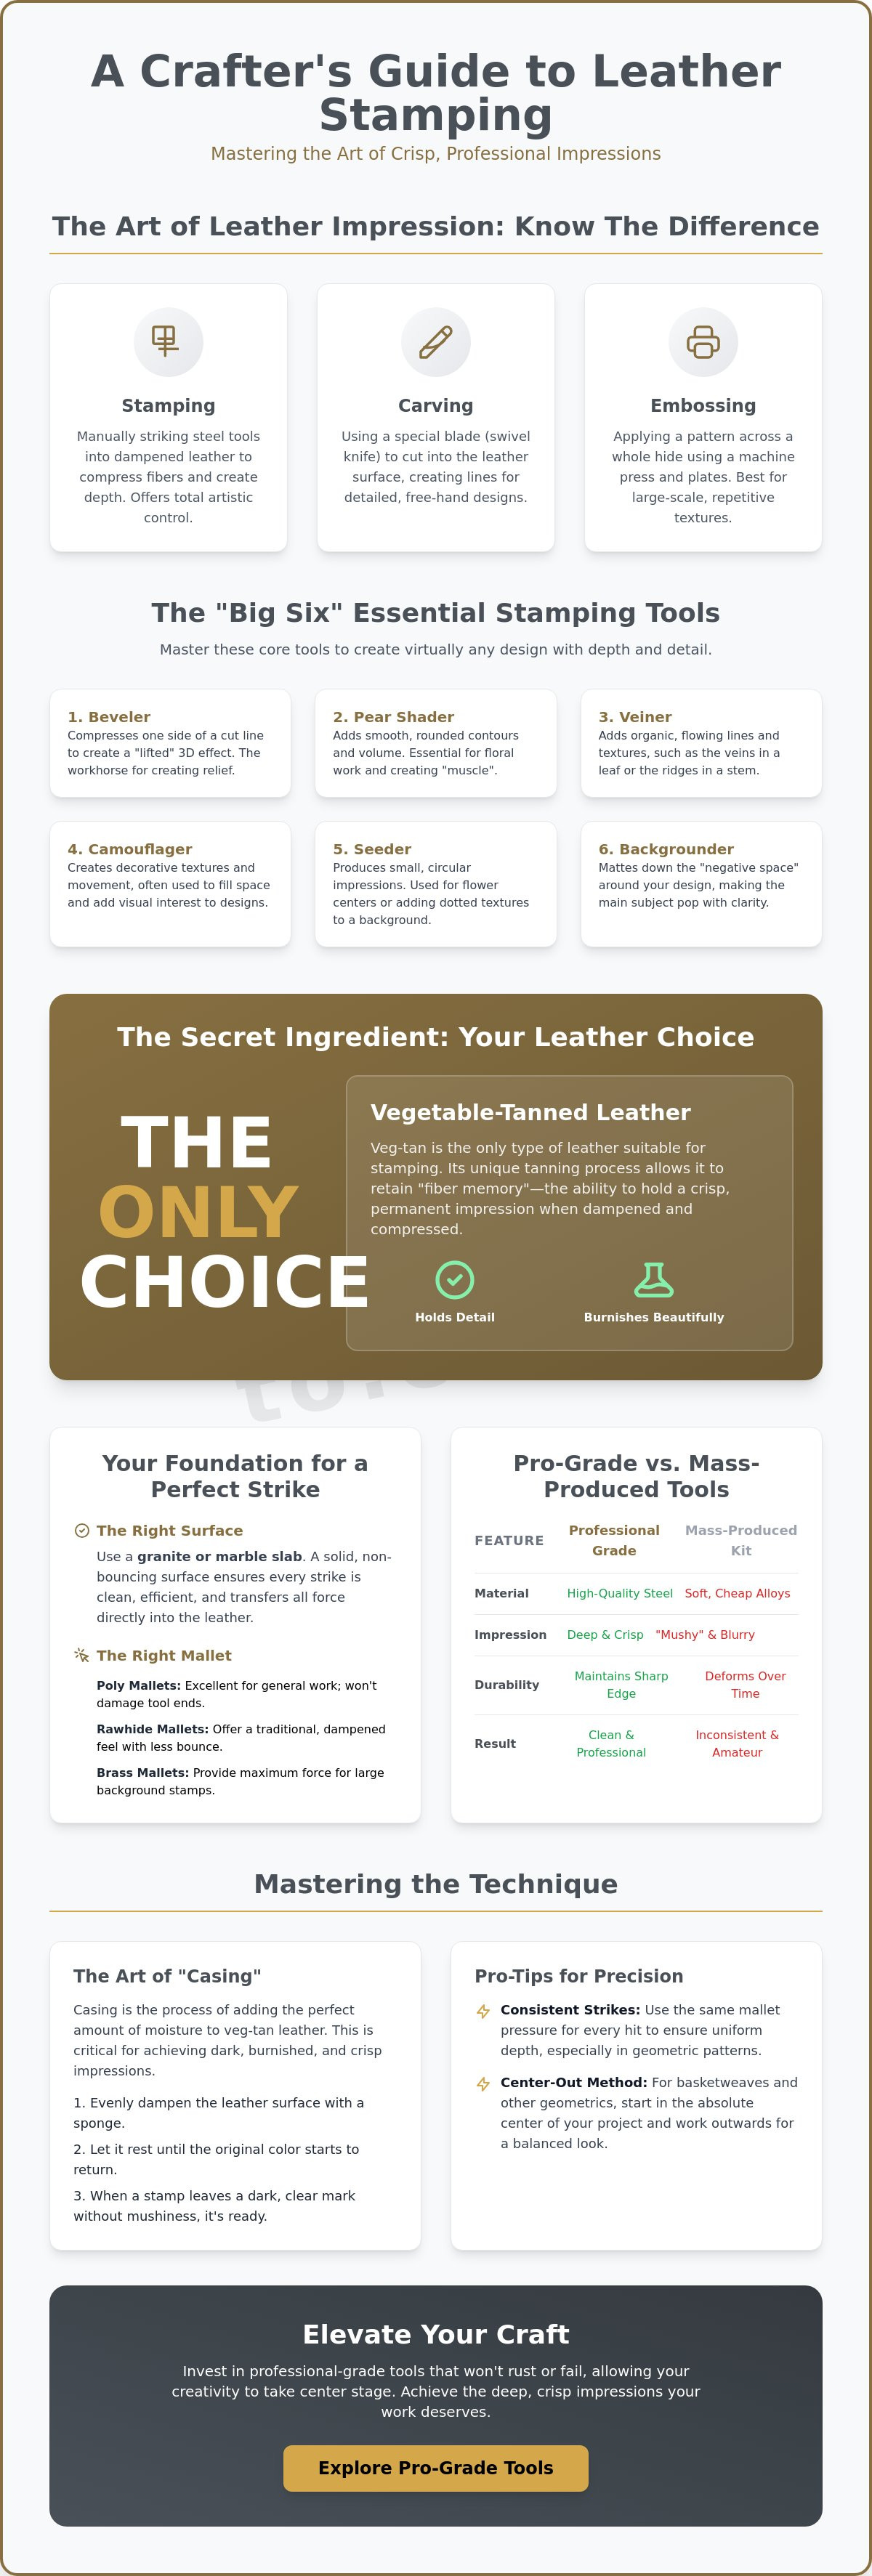
Leather stamping is the art of creating permanent textures and designs by striking a steel tool into the surface of dampened leather. While many confuse it with embossing or carving, stamping is a distinct discipline. Embossing typically involves a machine press to force a pattern across a whole hide. Carving requires a knife to cut into the surface. Leather stamping tools, however, rely on the manual compression of fibers to create depth. When you strike a stamp, you aren't just making a mark; you're rearranging the cellular structure of the leather.
To better understand how the quality of your equipment impacts this process, watch this comparison between entry-level and professional-grade options:
The physics of a perfect impression depends on "fiber memory." High-quality steel tools are essential because they maintain sharp edges and don't deform over time. If a tool is cast from soft, cheap alloys, the impressions will look "mushy" and lose their crispness. You also need the right mallet to deliver the force. Poly mallets are excellent for general work because they don't damage the tool ends. Raw-hide mallets offer a traditional, dampened feel, while brass mallets provide the maximum punch for large background stamps. Choosing the right weight ensures you don't have to strike twice, which often leads to "ghosting" or double images.
The Essential Tooling Kit for Beginners
Every beginner should start with the "Big Six" stamps: a beveler, pear shader, veiner, camouflager, seeder, and a backgrounder. Before you even touch these, you must master the swivel knife. It's the prerequisite for all detailed work. These leather carving tools require a rock-solid foundation to work correctly. Never tool on a wooden table. You need a granite or marble slab to prevent the leather from bouncing. This solid surface ensures every strike is clean and efficient.
Stamping vs. 2D/3D Stamps: Knowing the Difference
Manual leather stamping tools are for artisans who want to create one-of-a-kind, free-hand designs. They offer total artistic control. In contrast, 3D stamps are machine-pressed blocks used for consistent branding, like logos or maker's marks. If you're doing repetitive work like belt borders, modular brass sets are the best choice. They provide geometric precision that's hard to achieve by hand, making them ideal for professional production runs.
Decoding the Stamp Rack: Types and Their Effects
Walk into any professional workshop and you'll see a dizzying array of steel. It's easy to feel overwhelmed by the sheer variety of leather stamping tools available today. However, most intricate designs are built using just a few core categories. Think of these stamps as your brushes. Each one serves a specific purpose in creating light, shadow, and texture. Mastering their effects is the first step toward moving beyond simple patterns into true artistry.
Bevelers are the workhorses of the craft. They create the illusion of three-dimensional relief by compressing the leather on just one side of a swivel knife cut. This creates a "lifted" appearance for your design. Pear shaders follow closely, adding contour and "muscle" to your work. Use them to create the soft dips in a flower petal or the rounded volume of a leaf. Without these, your work remains flat and lifeless. Veiners and camouflage stamps add the necessary movement. They provide organic textures like the ridges in a stem or the fine lines in a scroll. Finally, backgrounders are used to compress the negative space. By matting down the areas around your design, you make the primary subject "pop" with incredible clarity.
If you're looking to expand your kit with professional-grade gear, exploring our collection of leatherworking tools is a great place to start your journey.
Geometric and Basketweave Stamps
Geometric stamps rely on mathematical precision. The classic basketweave, for instance, requires a perfect 45-degree alignment to look professional. Start your pattern in the absolute center of the project and work outward. This ensures any half-stamps or odd gaps fall naturally at the borders. Consistency is vital here. You must maintain the exact same mallet pressure for every single strike. If your strike varies, the "weave" will look uneven and amateurish.
Alphabet and Number Sets
Personalization is a high-demand skill, but it's easy to get wrong. Choosing the right font size is your first hurdle. A 1/2-inch letter might look great on a heavy belt, but it will overwhelm a minimalist card wallet. For those, stick to 1/4-inch or smaller sets. To keep your text straight, don't rely on your eyes alone. Use a masking tape guide or a dedicated alignment jig. A common mistake is stamping too close to the edge of a finished item. Always leave at least 1/8-inch of breathing room to ensure the leather doesn't pucker or distort during the final assembly.
The Secret Ingredient: Why Your Leather Choice Matters
You can own the finest steel in the world. It won't matter if your canvas is wrong. Many beginners blame their leather stamping tools for blurry results when the real culprit is the hide itself. Most mass-produced leather is chrome-tanned. It's fast to produce and excellent for upholstery or jackets. It's also your worst enemy for tooling. Chrome-tanned fibers are elastic. They spring back. When you strike a stamp into chrome-tan, the mark fades almost immediately as the fibers return to their original shape.
True craftsmanship requires vegetable tanned leather. This material possesses what artisans call "fiber memory." When you strike a dampened veg-tan hide, the tannins allow the collagen fibers to compress and lock into place permanently. This is why your impressions stay crisp for decades. Thickness is equally vital. If you want deep, dramatic relief, you need a heavier weight hide, typically at least 6-7oz (2.4-2.8mm). Thinner skins simply don't have enough depth to hold a deep stamp without the risk of puncturing through to the other side.
Tannages also dictate the "burnish" effect. This is the dark, rich color change that happens inside the stamp mark. High-quality vegetable-tanned leather reacts to the friction and heat of the tool. As of 2026, the new LWG Sustainability System has pushed tanneries toward even more refined, eco-friendly vegetable tanning processes. These modern hides offer a cleaner surface that creates a natural, high-contrast burnish without needing a drop of antique paste or dye. It's a direct result of the interaction between quality steel and well-prepared grain.
Pueblo and Exotic Textures
Can you stamp pre-finished leathers? Yes, but you must choose wisely. Pueblo leather is a favorite among modern makers for its rustic, scuffed surface. It takes stamps surprisingly well, though the high oil content can make the impressions slightly softer than traditional russet. Then there's the king of materials. Using stamps to accent the grain of shell cordovan is a master-level skill. Cordovan is incredibly dense. It doesn't absorb water like standard cowhide. You're working with a material so tight that every strike must be deliberate and powerful.
Sourcing the Right Hides
Stop looking at retail craft stores for your primary project hides. Professional wholesalers provide "stamping-grade" selections that haven't been sanded or heavily corrected. Look for "Russet" leather. It's the gold standard for carvers. It's clean, uncolored, and ready to absorb moisture evenly. Before you buy, always evaluate the "temper." You want a firm temper for tooling. If the hide feels like a soft, floppy blanket, it won't hold your art. A firm, vegetable-tanned hide is the only way to ensure your patterns remain as sharp as the day you struck them.
Mastering the Strike: Practical Technique and Casing
Even the most expensive leather stamping tools won't save a project if your technique is flawed. The strike is a physical dialogue. It requires a steady hand and a deep understanding of your material's current state. This starts with casing. Casing is the process of adding moisture to the leather to make the fibers pliable. If the leather is bone dry, the stamp will barely leave a mark. If it's soaking wet, the impression will be mushy and fade as the water evaporates. You're looking for that perfect window where the leather is damp but doesn't feel wet to the touch.
Your choice of mallet defines the quality of your strike. Forget the rubber hammers often found in cheap hobby kits. They bounce. They absorb the energy you need to drive the steel into the grain. Instead, use a high-density poly or brass mallet. A single, confident strike is the goal. Multiple taps often lead to "ghosting," where the tool shifts slightly between hits, creating a blurred double image. Developing a rhythm is the secret to professional-grade borders. Each strike should have the same weight and tempo. This consistency creates a flow that makes a hand-tooled piece look like a masterpiece rather than a collection of accidents.
The dark, rich color you see in high-end work is called the burnish. This isn't just dye. It's a chemical and physical reaction. When you strike a properly cased piece of vegetable-tanned leather, the heat and friction from the steel compress the tannins. This creates a natural darkening that provides contrast and depth. Ready to start your journey? You can find professional-grade leatherworking tools in our shop to ensure every strike counts.
The Step-by-Step Casing Process
Wetting the leather is simple, but mastery lies in the wait. Use a clean sponge and room-temperature water. Apply it evenly until the surface darkens significantly. Now, walk away. You must wait for the "rebound." This is when the leather begins to return to its natural color. The surface should feel cool to the cheek. If it feels cold and clammy, it’s still too wet. When the color starts to lighten but the leather still feels cool, the fibers are at their most receptive.
Troubleshooting Common Stamping Issues
Are your stamps looking blurry? Your leather is likely too wet. Stop immediately and let it dry for another ten minutes. If you experience ghosting, check your surface. Tooling on a wobbly table is the primary cause of double-strikes. You need a dead blow on a solid granite slab. If you misplace a stamp, don't panic. You can sometimes "erase" a shallow mistake by lightly wetting the area and using a smooth modeling spoon to compress the fibers back into place. However, the best recovery is often a clever design adjustment. Sometimes a misplaced leaf can become the start of a new branch.
Choosing Quality: The Hab-To Leather House Philosophy on Tools
Investing in leather stamping tools is an investment in your future as an artisan. Cheap kits are often the most expensive way to start. You might save money today, but you'll pay for it in ruined hides and frustration. Soft alloys bend under the mallet. Poorly machined edges create "mushy" patterns that lack professional definition. Most importantly, cheap plating eventually flakes off, leaving your tool prone to rust and your leather stained. We believe your tools should be as enduring as the goods you create.
The Hab-To Leather House standard focuses on longevity and precision. When choosing a stamp, the material matters. Stainless steel is the gold standard. It provides the crispest impressions because it doesn't compress or deform over time. While plated brass is suitable for certain geometric borders, stainless steel offers superior resistance to rust and wear. We look for tools with a balanced weight. A tool that feels top-heavy or too light will vibrate in your hand, leading to the "ghosting" issues we discussed earlier. Every tool we offer is selected to match specific project goals, ensuring you have exactly what you need to succeed.
160 Years of Craft Expertise
Our family history in the leather trade spans 160 years. This legacy isn't just a number; it's our filter for quality. We've seen tools come and go, but the principles of ergonomics and strike-balance remain constant. We vet every tool for how it feels during a long session at the bench. A well-designed tool reduces hand fatigue and improves accuracy. Beyond the stamps themselves, we connect crafters with the right leather hardware to ensure your finished piece has a professional, cohesive look from the first strike to the final rivet.
Building Your Professional Workshop
Don't feel pressured to buy a massive set all at once. We recommend a modular approach. Start with the essential stamps that fit your current style. As your skills grow, your collection will grow with you. Maintenance is simple but non-negotiable. Keep your stamps clean and dry. A light coat of tool oil every few months prevents rust, especially in humid climates. If you find yourself in Amsterdam, come visit us at Hab-To Leather House. There's no substitute for the tactile experience of choosing your tools in person. Holding a stamp, feeling its weight, and seeing the detail in the steel is the best way to find your next favorite tool. We're here to guide you every step of the way.
Begin Your Journey into Masterful Tooling
Mastering the art of leather decoration is a lifelong pursuit. It starts with a deep respect for the material and the steel you use to shape it. You've now seen how the precise art of casing ensures your impressions are dark and crisp, and why selecting the right hide is the foundation of any project. Your leather stamping tools are more than just equipment. They are the bridge between your imagination and the grain of the hide.
At Hab-To Leather House, we bring 160 years of family leather expertise to your workbench. We are proud to supply Europe’s finest vegetable-tanned hides to artisans everywhere. Because we believe the craft should be accessible to all, we have no minimum order requirements for crafters. This ensures you can access professional-grade materials at your own pace. Don't settle for tools that hinder your potential.
Ready to transform your craft? Explore Professional Leather Stamping Tools at Hab-To Leather House and find the precision your work deserves. Your next masterpiece is just one confident strike away. Keep practicing, stay curious, and let your passion guide every impression.
Frequently Asked Questions
What are the best leather stamping tools for beginners?
Beginners should start with a basic set including a beveler, pear shader, veiner, camouflager, seeder, and backgrounder. These six leather stamping tools cover almost all floral and geometric patterns. It's better to buy three high-quality stainless steel stamps than a twenty-piece kit made of soft alloy. Quality steel ensures your impressions stay sharp as you learn and won't need replacing as your skills evolve.
Do I need to wet the leather before stamping?
Yes, you must wet the leather through a process called casing to achieve a permanent impression. Pure water makes the fibers pliable enough to be compressed. Without moisture, the stamp will only scratch the surface and won't create the dark, rich burnish that defines professional work. Always use a clean sponge and distilled water to avoid mineral staining on your project.
Can I stamp on chrome-tanned leather?
You cannot effectively stamp on chrome-tanned leather because its fibers are too elastic to hold an impression. While the stamp might make a mark initially, the leather will return to its original shape within hours. For any tooling project, vegetable-tanned leather is the only material with the necessary fiber memory to lock in your designs permanently. It's the standard for leather stamping tools across the industry.
What is the best mallet for leather stamping?
A high-density poly mallet or a brass mallet is the best choice for driving stamps into leather. Avoid rubber hammers at all costs. They bounce and absorb the energy of the strike, which leads to blurry edges and ghosting. A weighted poly mallet provides a dead blow that transfers all the force directly through the tool and into the hide for a crisp result.
How do I stop my leather stamps from rusting?
Preventing rust requires keeping your tools clean, dry, and lightly lubricated. After every session, wipe the heads and shafts with a dry cloth to remove any moisture from your hands or the dampened leather. Applying a thin coat of tool oil every few months creates a protective barrier. Store them in a dry environment rather than a damp basement to ensure they last for generations.
What thickness of leather is best for stamping?
For deep and dramatic tooling, a thickness of 6-7oz (2.4-2.8mm) or higher is ideal. Thinner leathers don't have enough depth to hold a deep impression without the risk of tearing. If you're working on heavy belts or saddles, you might even choose 9-10oz leather. This allows for maximum relief and the kind of three-dimensional detail that makes your work stand out.
Is there a difference between stamping and embossing?
Stamping is a manual process using individual hand tools, while embossing typically uses a machine press and a large metal plate. Stamping allows for total creative freedom and unique, one-off designs. Embossing is designed for speed and consistency. It's the standard for mass-producing logos or repeating patterns across an entire hide. Both have their place depending on your production goals.
How long should I case my leather before tooling?
Casing time varies, but you should wait until the hide begins to return to its natural color. This "rebound" phase usually takes twenty to thirty minutes after the initial wetting. The leather should feel cool to the touch but not wet. If it's still dark and clammy, the fibers are too saturated to hold a crisp, dark burnish, so give it more time.
