


How to Condition Vegetable Tanned Leather Before Crafting: A Professional Guide
You might think your premium hide is ready for the swivel knife the moment it hits your workbench, but starting a project without preparation is the fastest way to ruin a beautiful piece of leather. It's a common mistake that leads to surface cracking and shallow stamping. Learning how to condition vegetable tanned leather before crafting is the secret difference between a stiff, stubborn wallet and a masterpiece that develops a deep, even patina. With vegetable tanned leather making up 27% of the global tanning market in 2026, mastering this traditional skill is vital for any serious artisan who respects the material.
I know the hesitation you feel. It's nerve-wracking to hold a bottle of oil over an expensive shoulder, worrying about dark stains or how the moisture might affect your dye work. You want supple leather that's easy to bevel, not a greasy mess. This guide will teach you the professional techniques to hydrate your fibers perfectly, ensuring your tools glide through the grain and your impressions stay crisp. We'll walk through the best conditioners for your specific needs and the exact application methods that guarantee a professional finish every time.
Key Takeaways
- Understand why even "tannery-fresh" hides require immediate hydration to prevent surface cracking and ensure smooth, effortless cutting.
- Master the professional process for how to condition vegetable tanned leather before crafting to create the perfect surface for crisp, deep stamping.
- Identify the specific benefits of Neatsfoot oil versus Mink oil to choose the right level of hydration and weatherproofing for your specific project.
- Learn the "circular buff" application technique to avoid unsightly oil stains and achieve a perfectly even base for future dyeing.
- Discover how starting with premium, sustainably sourced hides from expert suppliers minimizes preparation time and ensures a superior final patina.
Why Pre-Conditioning is the Secret to Professional Leatherwork
Many artisans assume that a fresh hide is ready for the bench the moment it arrives. It isn't. Pre-conditioning is the intentional restoration of essential lipids to the leather fibers before you apply any mechanical stress. During the process of tanning, natural fats are removed and replaced with stable oils, but time is a thief. By the time a hide travels from the tannery to your workshop, those oils have often begun to migrate or evaporate. This leaves the fibers stiff and prone to damage.
Learning how to condition vegetable tanned leather before crafting is about more than just the feel of the material; it's about structural integrity. When fibers are thirsty, they become brittle. This leads to poor burnishability where edges refuse to glass over, no matter how much friction you apply. Properly hydrated leather responds to your tools with a buttery resistance. It ensures your project doesn't just look good today, but stays resilient for decades.
To better understand this concept, watch this helpful video on preparing your leather:
The "Dry Grain" Trap
Dehydrated leather is a silent project killer. You can identify it through a simple bend test. Fold a corner of your leather with the grain side out; if you see tiny, spiderweb-like cracks or a "puckered" texture, your hide is crying out for moisture. Dry leather leads to micro-cracking during tight folds or turn-and-stitch projects. Workshop environments play a huge role here. In a city like Amsterdam, the shifting humidity can pull moisture right out of your storage rack. If you don't intervene, you'll find your leather resists being beveled and snaps under the pressure of a sharp fold.
Improving Tool Response
Conditioned leather makes your tools work better and last longer. When you know how to condition vegetable tanned leather before crafting, your swivel knife will glide through the grain rather than dragging or skipping. This is different from "casing" with water. While casing prepares the leather for stamping impressions, pre-conditioning with oil provides the internal lubrication needed for the knife to pivot smoothly. It also reduces friction during hand-stitching. A lubricated fiber allows the thread and needle to pass through with less resistance, preventing the grain from tearing around the stitch hole. Your blades stay sharper for longer because they aren't fighting through a wall of dry, abrasive fibers.
Understanding Your Canvas: How Veg-Tan Absorbs Oils
Think of vegetable tanned leather as a thirsty, organic sponge. Unlike chrome-tanned leathers that are often sealed with synthetic polymers, veg-tan remains remarkably porous. This open structure is a direct result of the natural tannins used during the tanning process. Extracts from oak, mimosa, or chestnut bark bind to the collagen fibers, creating a dense but breathable scaffold. Understanding how to condition vegetable tanned leather before crafting requires a look at this physical structure. These tannins create the "pockets" that hold the oils and waxes your leather needs to stay supple.
During the final stages of production, tanneries use "fat liquors" to introduce moisture back into the hide. These are essentially emulsified oils. However, these factory-applied lubricants aren't permanent. They begin to dissipate the moment the leather leaves the vat. Following official guidelines on leather finishing, professional tanneries ensure a baseline of stability, but the "bench-ready" state is up to the artisan. Full-grain leather is the gold standard here. Because the grain hasn't been sanded or corrected, the natural pore structure is fully intact, allowing for deep and even absorption of conditioners.
Capillary Action in Leather Fibers
When you apply a conditioner, it moves through the corium layer via capillary action. This is the same physical force that pulls water up through a plant. The fibers draw the oil deep into the center of the hide. You must be careful not to "over-stuff" the material. Too much oil can make the leather lose its "temper," turning a firm piece into a mushy, floppy mess that won't hold a shape. Temperature plays a critical role here. Warm oils have a lower viscosity and penetrate much faster. If you are learning how to condition vegetable tanned leather before crafting in a cold workshop, gently warming your conditioner can ensure it reaches the core fibers rather than just sitting on the surface.
Conditioning and the Patina Process
Pre-conditioning isn't just about moisture; it is the foundation for a legendary patina. When you use high-quality vegetable tanned leather, the oils you apply react with UV light and oxygen. This oxidation process is what turns a pale, natural hide into a rich, golden brown. By applying a light base coat of oil before you start cutting, you ensure this color development happens evenly across the entire project. This prevents the "blotchy" look that occurs when some parts of the hide are drier than others. If you want a project that ages with grace, starting with a premium hide from a trusted source like Hab-To Leather House makes all the difference in how the fibers accept these early treatments.
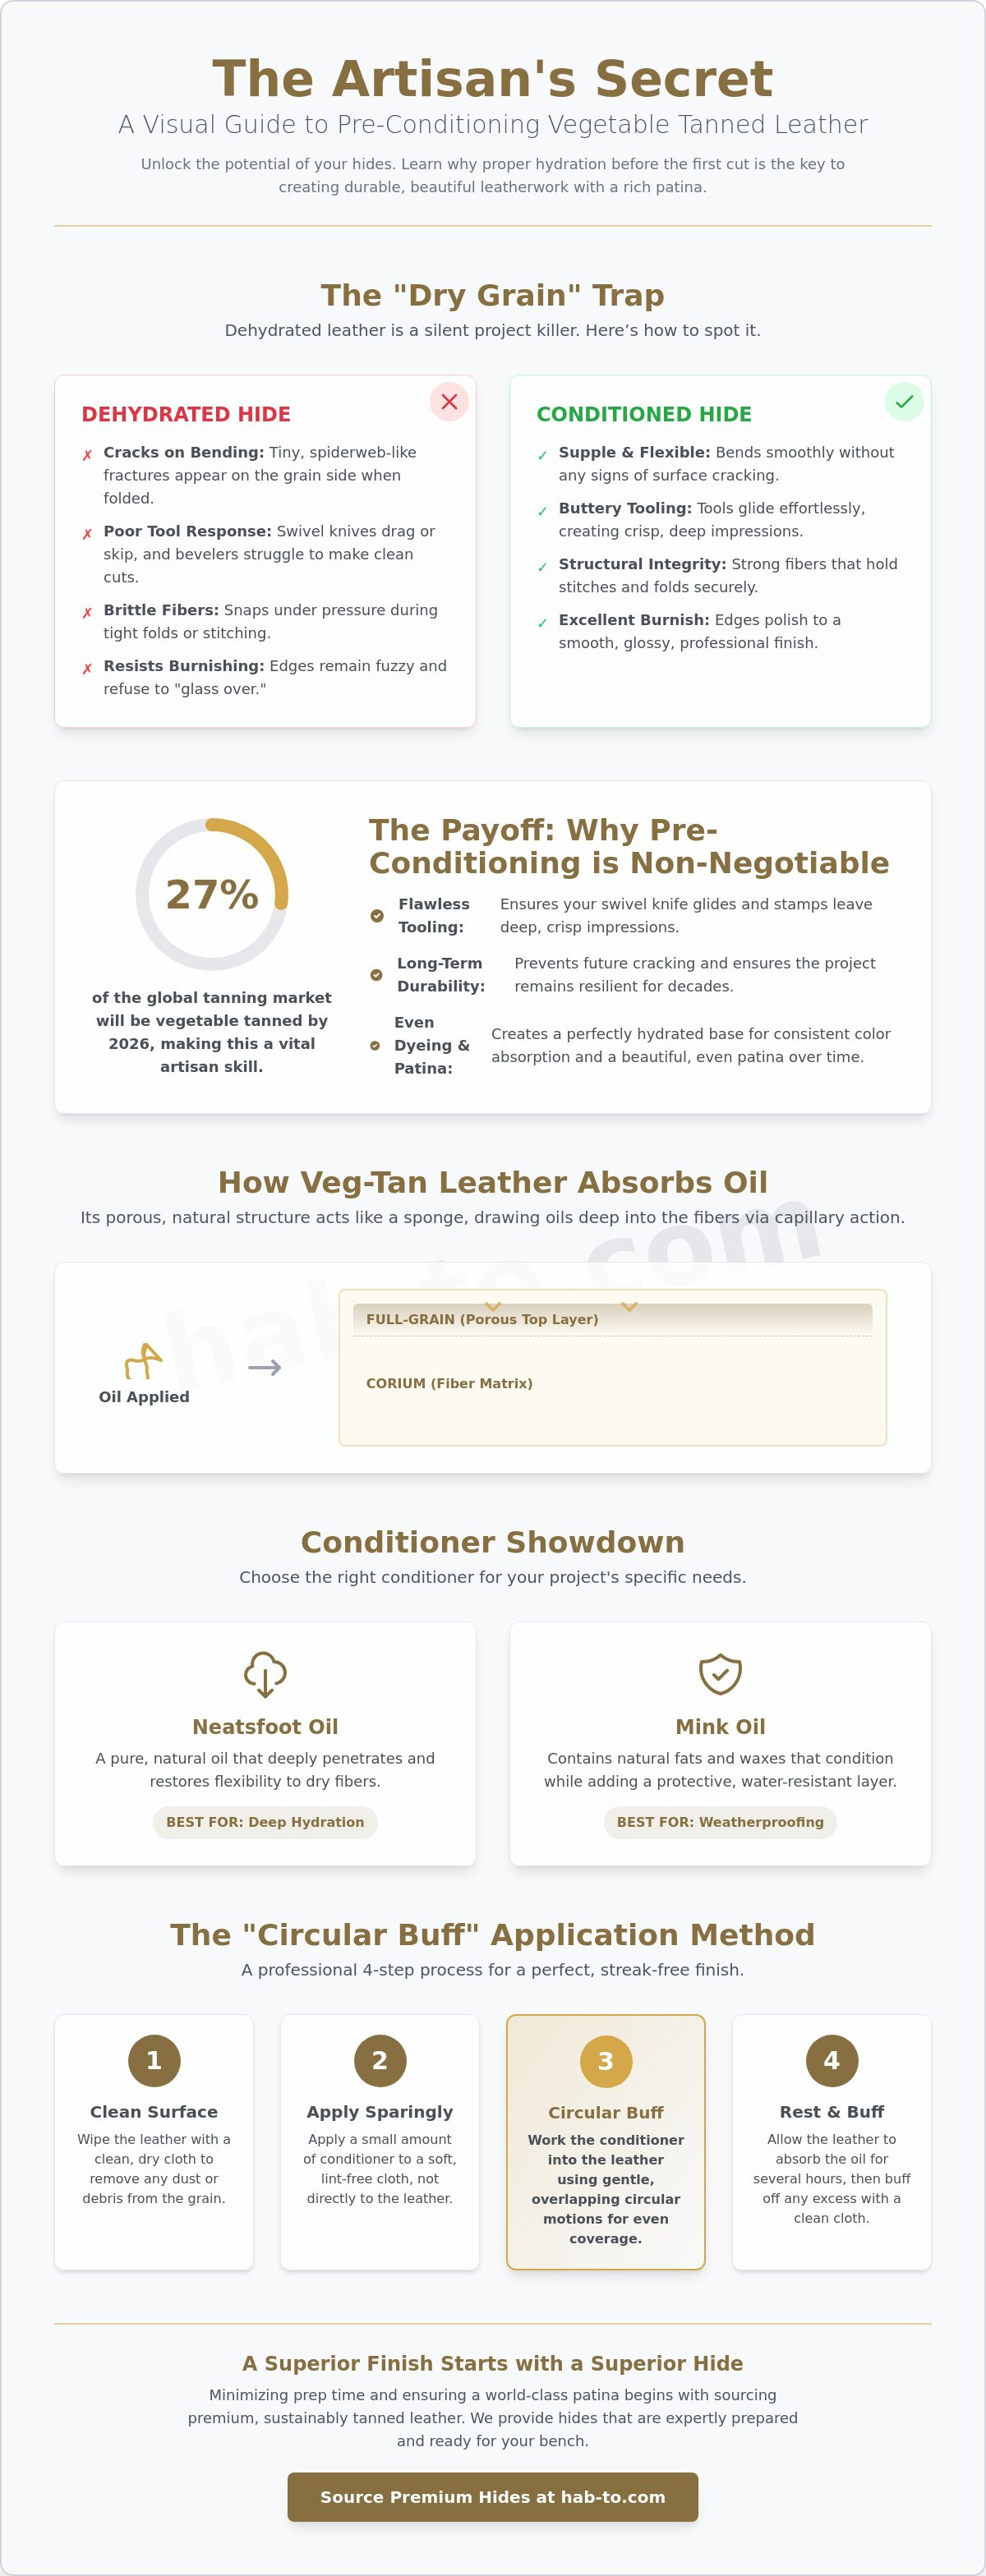
Choosing the Right Conditioner for Your Project
Selecting a conditioner is one of the most critical decisions you'll make before your first cut. Each product interacts differently with the fibers, and the wrong choice can permanently alter your leather's appearance. When you're figuring out how to condition vegetable tanned leather before crafting, you must match the lubricant to the project’s intended use. A heavy-duty saddle requires a different approach than a slim cardholder or a luxury handbag.
Neatsfoot Oil remains the traditional favorite for deep hydration. It’s a 100% animal-based oil that penetrates the corium layer quickly, restoring the "hand" of a stiff hide. If your project involves heavy-duty gear or outdoor equipment, Mink Oil or Tallow are superior choices. These fats provide exceptional weatherproofing and a rugged, waxy feel. For more delicate work, leather balms and creams offer a gentle touch, maintaining the original color while providing enough moisture for easy beveling. At Hab-To, we prioritize sustainable, bio-based options because natural leather deserves natural care. Synthetic conditioners often contain harsh solvents that can degrade the structural integrity of your hide over time.
The Darkening Factor
You must consider how much a conditioner will darken your leather. Neatsfoot oil is notorious for shifting a pale natural hide toward a deep tan. If you want to maintain a lighter hue, a light cream is a better path. This distinction is vital when working with specialty materials like shell cordovan. For these dense, oil-rich leathers, you should only use "Pure" Neatsfoot oil. Avoid "Compound" versions at all costs; they often contain petroleum distillates that can damage the finish. As often suggested in the Leather Crafters & Saddlers Journal, always test your chosen product on a scrap piece. Wait 24 hours to see the true settled color before committing to your main hide.
Wax-Based vs. Oil-Based
Oils and waxes serve different purposes in your pre-crafting routine. Oils provide deep structural flexibility, making the leather easier to fold and stitch without snapping fibers. Waxes, on the other hand, stay closer to the surface. They provide protection and can create beautiful "pull-up" effects, where the color lightens temporarily when the leather is bent. For everyday carry (EDC) items, hybrid conditioners are often the best solution. These blends offer the deep penetration of an oil with the protective surface finish of a wax. Mastering how to condition vegetable tanned leather before crafting involves finding this balance so your tools perform perfectly and your projects age beautifully.
Step-by-Step: Conditioning Your Leather Before the First Cut
Mastering how to condition vegetable tanned leather before crafting is a ritual that demands patience. It is the bridge between receiving a raw hide and creating a professional piece of gear. When you rush this process, you risk uneven color and a finished product that feels stiff or oily. Follow these steps to ensure your leather is perfectly prepared for your swivel knife and stitching irons.
Surface Preparation
Before any oil touches the grain, you must ensure the surface is pristine. Clear the grain with a horsehair brush to remove microscopic tannery dust or waxy "bloom" that often settles on the hide during storage. This bloom is simply natural fats that have crystallized on the surface; brushing it away ensures your conditioner can penetrate the fibers directly. Never condition leather that feels cold or damp. Cold leather keeps its pores tightly closed, making it impossible for oils to reach the core. If your workshop is chilly, let the hide reach room temperature before you begin. Pay close attention to natural marks like fat wrinkles. These areas are more porous and will soak up oil faster than the surrounding grain, so they require a lighter touch to maintain a uniform look.
The Application Process
Your choice of technique determines the final look of your project. The "circular buff" method is best for achieving a seamless finish without unsightly "tide marks." Use a clean, lint-free cloth to work the conditioner into the grain using small, overlapping circles. If you are working on a very large hide, the "long stroke" method is faster, but you must maintain a consistent speed to avoid dark spots where the cloth rests. I recommend applying a light coat to the flesh side first, as it is more porous and helps hydrate the leather from the inside out. Adopt a "less is more" philosophy by using only a dime-sized amount of conditioner for every square foot of leather to prevent over-saturation.
Patience is your most valuable tool. You must wait 24 hours before you start crafting. This rest period allows the oils to migrate through the corium layer and stabilize. After a full day, perform a post-conditioning assessment. The leather should feel supple and "alive" in your hands, not greasy or tacky. If you can bend the leather without seeing any surface tension or micro-cracking, you are ready to begin. To ensure you are starting with the highest quality material possible, explore our complete guide to vegetable tanned leather and find the perfect hide for your next masterpiece.
Sourcing Premium Leather That’s Ready for Your Bench
The foundation of any great leather project isn't just your skill with a knife; it's the quality of the hide you choose. When you start with premium material, the preparation process becomes a joy rather than a chore. At Hab-To Leather House, we bring 160 years of family expertise to every hide we select. We understand that a well-maintained hide from the start means you won't have to fight against stubborn, dry fibers. Starting with a hide that has been stored correctly makes learning how to condition vegetable tanned leather before crafting much less intimidating for beginners and professionals alike.
We believe every crafter should have access to the best materials, regardless of the size of their workshop. That's why we maintain a strict no-minimum-order policy. This freedom allows you to experiment with different tannages and weights without the pressure of a massive investment. You can test how a specific oil interacts with a shoulder or a side before committing to a full project. Our goal is to provide you with a "bench-ready" canvas that responds beautifully to your tools and your personal conditioning routine.
The Importance of Sustainable Tannages
Ethically sourced leather isn't just better for the planet; it's better for your craft. Traditional pit-tanning methods use natural bark extracts to slowly stabilize the hide. This patient process preserves the internal fiber health better than high-speed industrial methods. When the fibers are healthy and intact, they respond more predictably to natural conditioners. You'll find that our hides develop a deeper, more resonant patina because they haven't been compromised by harsh chemicals. Once your leather is perfectly conditioned and cut, you'll need the right components to bring it all together. We invite you to explore our selection of leather hardware to find the perfect buckles and rivets for your masterpiece.
Expert Consultation in Amsterdam
Hab-To is more than a supplier. We're a mentor for the global crafting community. Whether you visit us in Amsterdam or reach out online, we're here to help you match your leather choice to your specific skill level and project goals. We can advise you on which hides require a light touch and which ones can handle a deep Neatsfoot soak. Before you make your first cut, run through this final readiness checklist:
- The Bend Test: Does the leather flex comfortably without any surface micro-cracking?
- Absorption Check: Has the conditioner fully migrated into the fibers, leaving the surface dry to the touch?
- Color Uniformity: Is the hue even across the entire piece, or are there thirsty spots that need another light coat?
- Hand Feel: Does the leather have a "buttery" resistance that tells you your tools will glide through easily?
If your hide passes these checks, you're ready to create something that will last a lifetime. Visit the Hab-To shop today to find the premium vegetable tanned leather and tools you need to take your craft to the professional level.
Elevate Your Craft with Properly Prepared Leather
Pre-conditioning is the silent partner of every master leatherworker. It transforms a stiff, dry hide into a responsive material that holds every stamp and stitch with precision. By matching your conditioner to your project and allowing the fibers to rest, you protect your tools and ensure a lifetime of durability. You've learned the science of absorption and the exact techniques to avoid unsightly stains.
Mastering how to condition vegetable tanned leather before crafting ensures your swivel knife glides through the grain and your projects develop a legendary patina. Now, it's time to put that knowledge into practice on a world-class hide. At Hab-To Leather House, we back your passion with 160 years of family expertise. We offer global shipping from our Amsterdam warehouse and maintain no minimum order requirements. This means you can focus on your craft without limits.
Browse our premium Vegetable Tanned Leather collection at Hab-To and start your next project with a hide that's truly bench-ready. Your workbench is waiting. We can't wait to see what you create.
Frequently Asked Questions
Does conditioning vegetable tanned leather make it darker?
Yes, conditioning vegetable tanned leather will almost always darken its natural hue. Pure Neatsfoot oil is known for its deepening effect, while light balms have a more subtle impact on the color. Always test on a scrap piece first to see the final settled shade. This shift is a natural part of the material's character and often enhances the final aesthetic of your project.
How long should I wait after conditioning before I start cutting?
You should wait at least 24 hours before you start cutting or tooling your hide. This rest period is essential when learning how to condition vegetable tanned leather before crafting. It allows the oils to migrate from the surface deep into the internal corium layer. If you cut too early, the leather may be too soft or slippery, which leads to inaccurate knife work and sloppy edges.
Can I dye leather after I have conditioned it with oil?
You can dye leather after conditioning, provided you apply the oil sparingly and allow it to dry completely. A light coat of oil actually helps spirit-based dyes penetrate more evenly by opening up the fibers. However, over-conditioning creates a barrier that resists dye. If you plan to dye, apply the oil, wait 24 hours, and then proceed with your coloring process for the most professional results.
Will conditioning prevent my leather from developing a patina?
Conditioning does not prevent a patina; it actually provides the necessary foundation for one. The oils you introduce react with sunlight and oxygen to develop that sought-after golden glow over time. Without these lipids, the leather can become sun-bleached and brittle rather than aging gracefully. Proper hydration ensures the patina develops evenly across the entire surface of your finished piece.
What is the best oil for natural veg-tan leather?
Pure Neatsfoot oil is widely considered the best choice for natural vegetable tanned leather. It provides deep, long-lasting hydration that keeps fibers supple during the mechanical stresses of crafting. Avoid compound versions that contain petroleum distillates. These additives can weaken the leather over time and may even damage the thread used in your hand-stitching or the surrounding hardware.
How often should I condition my leather during the crafting process?
One thorough application before you begin is typically sufficient for most leatherworking projects. You only need to re-condition if the leather feels dry after extensive stamping or if you're working in an exceptionally dry workshop. Over-conditioning during the build can make the leather too floppy. This causes the piece to lose its intended shape and structure as you attempt to assemble and stitch it.
Can I use olive oil or coconut oil to condition my leather?
You should avoid using food-grade oils like olive or coconut oil on your leather. These oils can go rancid over time, which leads to unpleasant odors and potentially attracts mold to your project. Professional leather conditioners are formulated to remain stable within the fibers without spoiling. Stick to bio-based products designed specifically for the craft to ensure your projects remain in peak condition for decades.
Should I condition both the grain and the flesh side of the leather?
You should condition both sides, but you must use different levels of intensity for each. The flesh side is more porous and will soak up moisture quickly to hydrate the internal fibers of the hide. The grain side requires a much lighter, buffed application to prevent unsightly staining or tide marks. Understanding this balance is key to mastering how to condition vegetable tanned leather before crafting without ruining the surface finish.
