




How to Use a Pricking Iron for Perfect Hand-Stitching
Your stitch line is the fingerprint of your craft, and a single crooked hole can ruin hours of work on premium vegetable-tanned leather. Learning how to use a pricking iron correctly is the defining step that separates a hobbyist project from an heirloom-quality piece. It's frustrating to spend a fortune on high-quality hides only to end up with wavy lines or uneven spacing that looks amateur. You might feel the hand fatigue setting in or wonder why your results don't match the slanted, elegant aesthetic of luxury leather houses.
We believe that professional results shouldn't be a secret. This guide will help you master the traditional technique of using a pricking iron to achieve perfect, high-end saddle stitching. We'll clear up the common confusion between pricking irons and stitching chisels, explain how to master Stitches Per Inch (SPI), and show you the precise methods Mike has used throughout his decades of expertise. You'll gain the confidence to mark your leather with precision and create projects that truly reflect your passion for the craft.
Key Takeaways
- Learn why the traditional pricking iron and awl combination is the secret to the refined, slanted look found in luxury leather goods.
- Master the step-by-step process of how to use a pricking iron to ensure perfectly straight lines and consistent spacing on every project.
- Discover the professional technique for "walking" your iron around curves and corners to maintain a flawless Stitches Per Inch (SPI) count.
- Identify the essential workspace requirements, including why a non-recoil surface is critical for protecting your delicate tool teeth.
- Gain expert tips on tool maintenance and edge preparation that eliminate drag and prevent hand fatigue during long stitching sessions.
Pricking Iron vs. Stitching Chisel: What is the Difference?
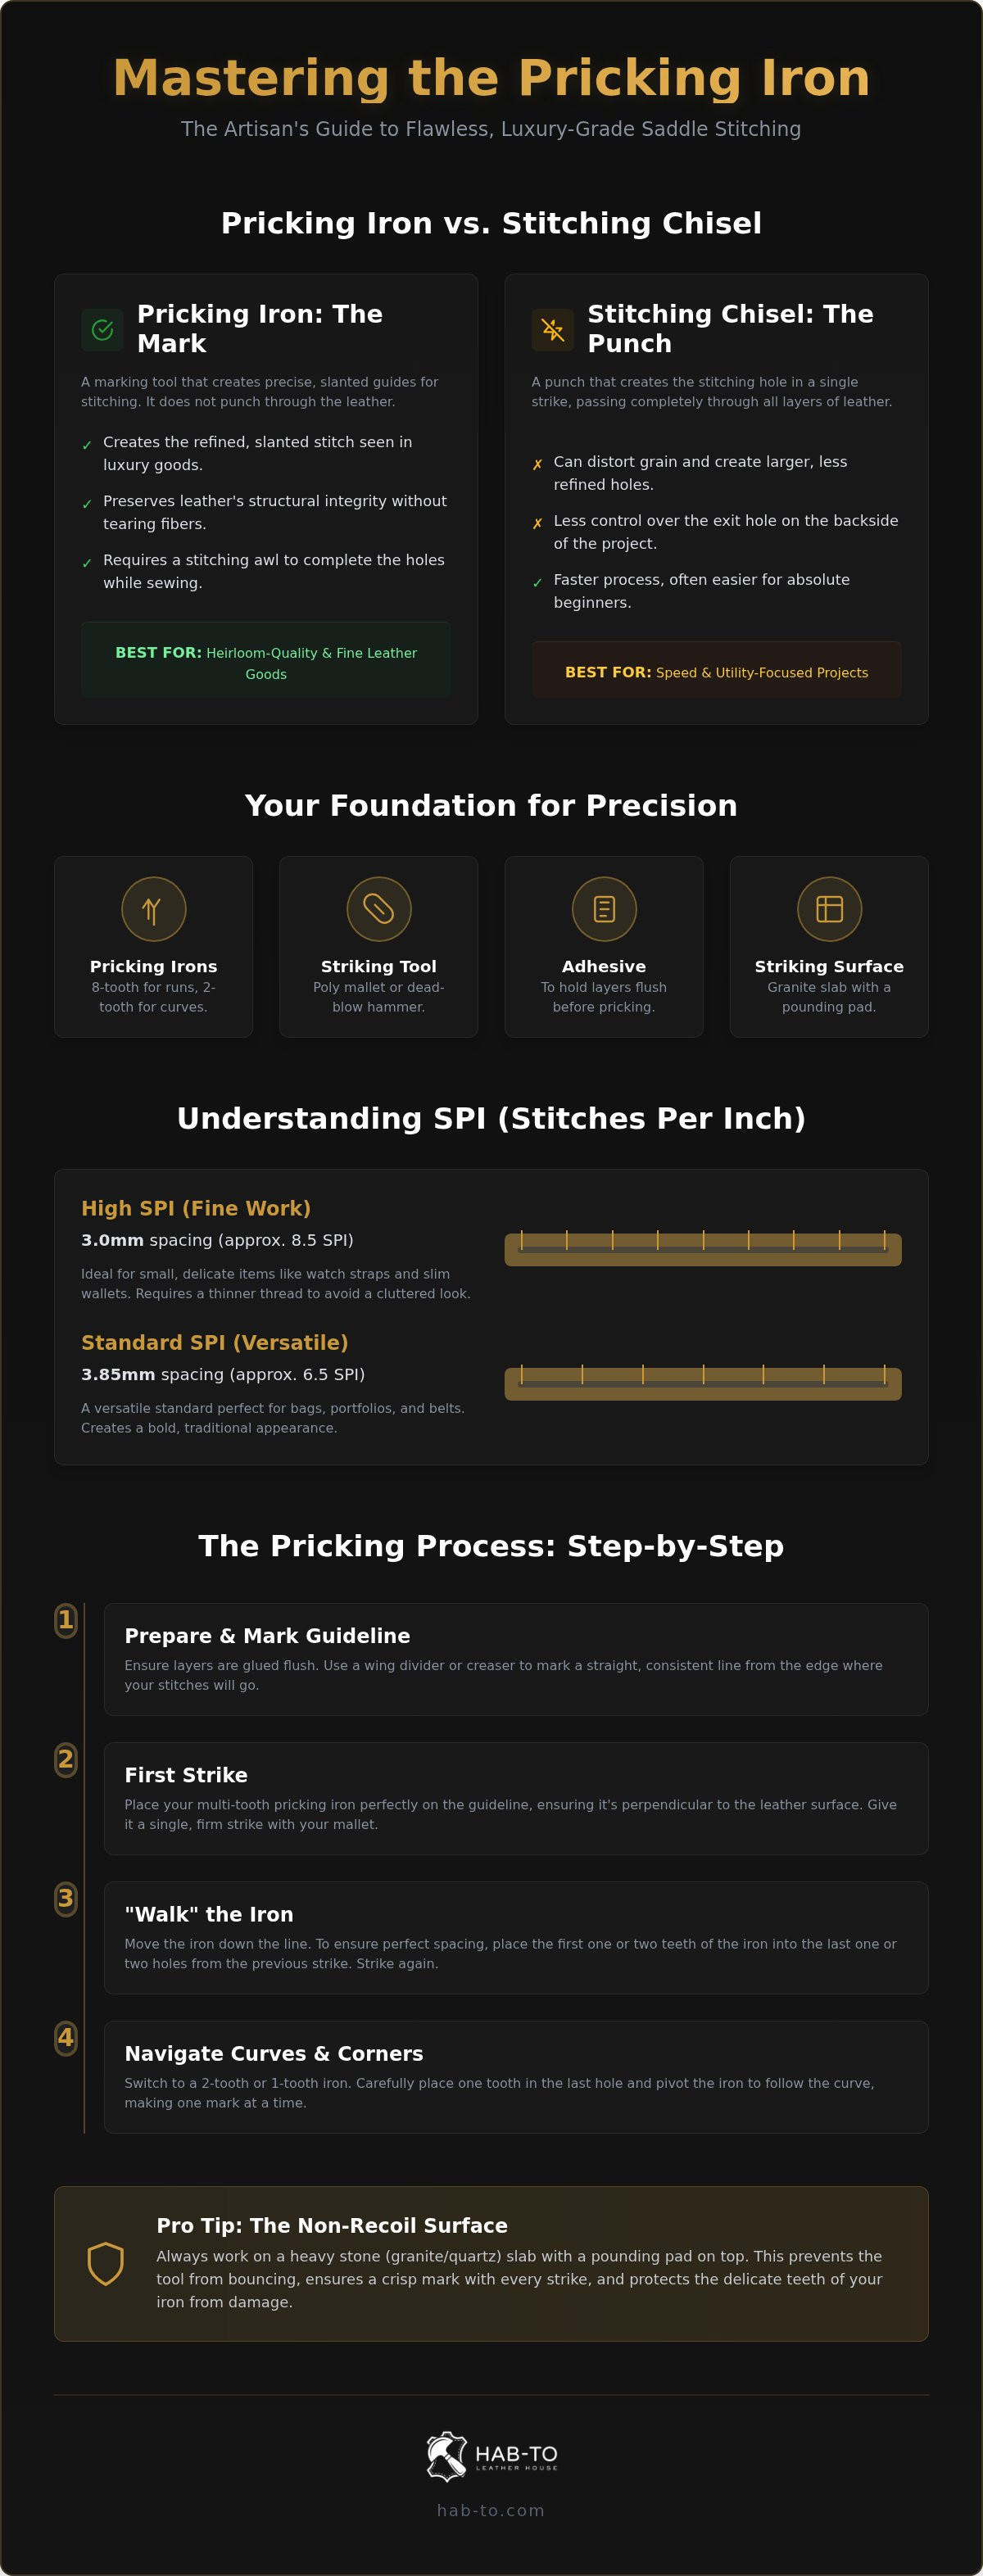
When you first step into our workshop or browse our selection of tools, the choice between a pricking iron and a stitching chisel can feel overwhelming. They look similar, but they serve two very different philosophies of craft. A stitching chisel is a punch. It's designed to go all the way through your leather layers in one strike. While this is fast, it lacks the finesse required for top-tier work. If you want to achieve the refined look seen in luxury boutiques, you must learn how to use a pricking iron.
A pricking iron is essentially a marking tool. It creates the architecture of your stitch by indenting the leather with perfectly spaced, slanted marks. It doesn't finish the hole. Instead, you follow those marks with a diamond-shaped stitching awl as you sew. This two-step process gives you absolute control over the exit hole on the back of your project. This is why high-end artisans almost exclusively use irons when working with premium vegetable-tanned leather. It allows the leather to close up around the thread, creating a cleaner, more durable seam.
Why Pricking Irons Rule Luxury Leathercraft
The magic of a pricking iron lies in the slant. Traditional saddle stitching is famous for its slanted, overlapping appearance. Pricking irons are forged at a specific angle to encourage this aesthetic. When you use an iron and an awl, you preserve the structural integrity of the hide. For a dense, precious material like Maryam Shell Cordovan, forcing a thick chisel through can distort the grain. A pricking iron makes a delicate, compressed mark that guides your awl without tearing the fibers. It results in a stitch line that looks like it grew out of the leather rather than being forced into it.
Understanding SPI and Tooth Spacing
SPI stands for Stitches Per Inch. It's the metric that defines the "weight" of your stitching. A higher SPI means more stitches in a given space, which creates a more delicate and formal appearance. Choosing the right spacing is a vital part of mastering how to use a pricking iron. Common sizes include:
- 3.0mm (approx. 8.5 SPI): This is the sweet spot for fine leather goods like watch straps or slim cardholders. It requires thinner thread to prevent the line from looking cluttered.
- 3.85mm (approx. 6.5 SPI): This is a versatile standard. It's perfect for larger bags, portfolios, or belts where you want a bold, traditional look.
Matching your tool to your project is about balance. If you use a wide spacing on a tiny wallet, it looks clunky. If you use a fine spacing on a heavy bag, the leather may become perforated and weak. We always recommend testing your spacing on a scrap piece of the same hide before committing to your final project.
What You Will Need: Preparing Your Workspace
Before you strike your first mark, you need a foundation that supports precision. Learning how to use a pricking iron effectively depends heavily on your environment. If your surface is too soft or your mallet is too hard, your stitches will never achieve that sought after luxury finish. Professionals prioritize a setup that maximizes force transfer while protecting the delicate teeth of the iron from unnecessary damage.
What You Will Need
- Pricking Irons: An 8-tooth iron for long runs and a 2-tooth iron for corners. Explore our professional-grade irons.
- Striking Tool: A poly mallet or dead-blow hammer to ensure a clean strike without damaging your tool.
- Adhesive: Ecostick 1804 Leather Glue to hold your layers perfectly flush before pricking.
- Surface: A granite or quartz slab topped with a professional pounding pad to provide a non-recoil base.
The Striking Surface and Protection
Your surface matters more than you think. A common mistake is working directly on a self-healing cutting mat. These mats are designed to be soft, which means they absorb the energy of your strike. This leads to inconsistent depth and "ghosting" marks where the tool bounces. Instead, use a stone slab. It provides a non-recoil base that ensures every ounce of force goes into the leather. To protect the delicate teeth of your iron, place a professional-grade pounding pad on top of the stone. For extra security, position your stone directly over a table leg. This transfers the force straight to the floor, giving you a crisp, effortless mark even on heavy harness leather. I often place a piece of scrap leather between the pad and the project for an extra buffer.
Essential Bundles for Beginners
Starting from scratch can be overwhelming, especially when trying to match thread weights to tool sizes. That's why many of our students opt for stitching bundles. These curated sets include the irons, threads, and needles you need to get started without the guesswork. When choosing a bundle, look for high-carbon steel tools that hold their edge and feel balanced in the hand. Preparation also involves keeping your leather layers together. We always use Ecostick before we prick. It provides a temporary, flexible hold that ensures your layers don't shift while you work. If you're looking to simplify your setup, exploring our comprehensive crafting bundles is a great way to ensure all your tools work in harmony.
Step-by-Step: How to Use a Pricking Iron Correctly
Your first mark is the most important. Before you even touch the iron, ensure your leather edges are flush. This means gluing your layers and sanding them until they feel like a single piece of hide. Once prepped, use a wing divider or a creaser to scribe a light guide line. This line is your track. It ensures your stitches don't wander and stay a consistent distance from the edge.
Positioning is where most beginners struggle. You must hold the tool perfectly vertical. If you lean even a fraction of a degree, the holes on the back will be misaligned. When you're ready, strike the iron with a single, firm blow. Don't tap it repeatedly. Tapping causes the iron to shift and creates ghost marks that ruin the look of high-end projects. Learning how to use a pricking iron is about decisive movement and steady pressure.
Grip and Posture for Precision
Your body is part of the tool. For smaller irons, a grip similar to holding a pencil provides excellent visibility. For larger, 8-tooth irons, a firm fist grip is better for control. Keep your elbow tucked close to your ribs. This naturally aligns your arm at a 90-degree angle to the leather. Use your non-dominant hand to press the iron firmly into the guide line before you strike. This pre-seating prevents the tool from jumping when the mallet hits. If you want to see these mechanics in action, Mike offers 1-on-1 advice through video consultations.
The Overlap Technique for Infinite Lines
To create a continuous line, use the one-tooth-in rule. When you move the iron to the next section, place the first tooth of the iron into the very last hole you just marked. This ensures your spacing remains identical across the entire seam. Be careful not to strike too hard during this transition. You only want to mark the new holes, not deepen the existing one, which can lead to a double-mark error that looks messy on the finished piece.
Checking your depth is vital. You aren't trying to punch through. You only need to create a clear, slanted guide for your stitching awl. If the marks are deep enough to see the slant clearly on the surface, you've done it right. Mastering how to use a pricking iron takes patience. Once you find your rhythm, the process becomes meditative and leads to professional, high-end results that last a lifetime.
Mastering Curves, Corners, and Thick Leathers
Straight lines are the foundation of your craft, but curves and corners are where your skill is truly tested. If you've wondered how to use a pricking iron on a rounded wallet corner without the spacing looking stretched or cramped, the secret is in your tool choice. An 8-tooth iron is a straight-line specialist; its rigid width physically cannot follow a tight radius. For any curved edge, you must switch to a 2-tooth iron.
This process is often called "walking" the iron. By placing the first tooth in the previous hole and pivoting the second tooth along your scribe line, you maintain a consistent Stitches Per Inch (SPI). This prevents the awkward stair-step effect that ruins the flow of a professional edge. When working with robust harness or bridle leather exceeding 4mm in thickness, you'll need a more decisive strike to ensure the mark is deep enough to guide your awl through the dense fibers. For a more expressive material like Pueblo, which is softer and more prone to marking, lighten your strike force. Too much pressure here can cause the grain to pucker around the hole.
Navigating 90-Degree Corners
A perfect corner doesn't happen by accident. It requires careful planning. Before you strike, "dry run" your iron along the scribe line to see where the teeth fall. You want a hole to land exactly at the pivot point of the corner. If the spacing doesn't align perfectly, subtly adjust your SPI by a fraction over the last few inches. When you hit that corner, use a single-point mark to pivot. This ensures the slant of your stitch remains consistent as you turn the leather, maintaining that high-end aesthetic we established in the earlier sections.
Dealing with Multi-Layered Projects
Alignment becomes a battle when you're pricking through three or more layers. Even with a perfectly vertical strike, the iron can drift as it encounters different leather densities. For complex assemblies, I often prick only the top layer to establish the visual guide. I then use my stitching awl to pierce through the remaining layers as I sew. This ensures the exit holes on the back remain as neat as the entry holes on the front. For more tips on preparing these complex builds, read our guide on A Crafter's Guide to Essential Leather Hardware.
Tool Care and Professional Results with Hab-To
A high-end pricking iron is a precision instrument, not a disposable punch. If you want to maintain the crisp, slanted marks we've discussed, you must commit to regular maintenance. Every time you finish a project, clean the teeth. Leather fibers and moisture can trap oils that lead to rust or "drag" during your next session. If your tool feels like it's sticking, it's time for a polish. We recommend using jeweler's rouge on a scrap of leather to strop the teeth. This ensures a smoother entry and exit, which is a critical part of learning how to use a pricking iron for professional results. When you aren't working, store your tools in a moisture-free environment. A dedicated leather roll is the gold standard for protection.
The material you choose is just as important as the tool itself. While you can mark many types of hide, high-quality vegetable-tanned leather produces the cleanest, most permanent marks. It has the density to hold the slant of the iron without the hole closing up immediately. This clarity makes your subsequent awl work much more accurate. Using premium hides ensures that the architecture of your stitch remains visible and sharp throughout the entire assembly process.
The Hab-To Difference: Quality Without MOQ
We believe that every artisan deserves access to the best materials, regardless of the size of their project. That's why we offer small panels of premium Italian leather. You don't need to buy a full hide just to practice your technique or test a new SPI. Our family has been in this industry for over 160 years, and we've seen how the right start can transform a hobby into a lifelong passion. If you're unsure about which spacing or brand fits your needs, you can book a free video consultation with Mike to help you select the perfect iron for your specific goals.
Next Steps: Mastering the Awl
Marking the leather is only half the battle. To achieve that iconic saddle stitch, you'll need to master the diamond awl. This is where the marks from your pricking iron become functional holes for your needles. If you're ready to elevate your hand-stitching, our Masterclasses provide deep-dive instruction on traditional techniques. Sourcing the right materials is your next hurdle. Read our guide on Buying Leather Online to learn how to select the best hides for your next project. We're here to support your journey from the first strike of the mallet to the final backstitch.
Elevate Your Craft with Every Strike
Mastering how to use a pricking iron is the definitive bridge between a simple hobby and the world of high-end leathercraft. By understanding that the iron marks the path while the awl finishes the journey, you give yourself the control needed for heirloom results. Consistency isn't a secret; it's the result of correct posture and the "one-tooth-in" overlap technique that ensures your spacing remains flawless across every seam.
At Hab-To Leather House, we've supported this traditional craft since 1857. Our expertise is rooted in 160 years of family tradition and Mike's 25 years of hands-on experience. We specialize in the premium Italian vegetable-tanned leather that allows these traditional techniques to shine. Whether you're navigating a tight curve on a cardholder or marking a long run on a bespoke bag, the right tools and materials are your most trusted partners.
Your journey toward perfect hand-stitching starts with a single, decisive strike. We're here to provide the mentorship and professional-grade tools you need to make every project count. Keep your tools sharp, your lines straight, and your passion for the craft alive.
Frequently Asked Questions
Do I really need a pricking iron, or can I just use a fork or wheel?
You need a pricking iron if you want to achieve the slanted, professional aesthetic of traditional saddle stitching. While an overstitch wheel marks spacing, it doesn't provide the angled guide for your awl. A fork lacks the precision and hardened steel required for leather. Using a dedicated iron ensures your stitches sit at the correct angle, which is the hallmark of luxury craftsmanship and superior seam durability.
What size pricking iron should I get for making a wallet?
Choose a 3.0mm or 3.38mm spacing for wallets and small leather goods. These sizes translate to roughly 8.5 to 9.5 stitches per inch, creating a refined and delicate appearance. Larger spacings like 3.85mm are better suited for bags or belts. Matching the tool size to the scale of your project is a vital part of learning how to use a pricking iron for high-end results.
How do I stop my pricking iron from getting stuck in the leather?
Polish the teeth of your tool with jeweler's rouge on a leather strop to eliminate friction. Most sticking is caused by microscopic burrs or surface oxidation on the steel. If the iron still drags, check that you are striking perfectly vertically. A slight tilt creates a wedging effect that makes the tool difficult to remove. A well-maintained, polished iron should slide out of the hide with minimal effort.
Can I use a metal hammer with my pricking iron?
No, you should never use a metal hammer on your leatherworking tools. Steel-on-steel contact will mushroom the top of the iron and can eventually cause the tool to shatter. Always reach for a poly mallet or a dead-blow hammer. these materials absorb the shock and protect your investment while providing a clean, decisive strike that ensures your marks are consistent across the entire project.
Why are my stitch lines straight on the front but crooked on the back?
Crooked lines on the flesh side are almost always caused by holding the iron at an angle. If the tool isn't at a perfect 90-degree angle to the surface, the teeth will exit the leather in a different position than they entered. Focus on keeping your elbow tucked and your wrist locked. Consistent posture is the most effective way to improve how to use a pricking iron for straight lines on both sides.
Is it better to have more teeth or fewer teeth on a pricking iron?
You actually need a combination of both for a professional workflow. A tool with 8 or 10 teeth is essential for maintaining speed and straightness on long seams. However, these long irons cannot navigate curves. A 2-tooth iron is necessary for walking around rounded corners and tight radii. Starting with a set that includes both a long and a short iron will cover almost any project needs.
How do I sharpen a pricking iron if it becomes dull?
Sharpening is rarely necessary if you use a proper pounding pad; usually, the tool just needs a high-sheen polish. Use 2000-grit sandpaper to lightly remove any deep scratches on the sides of the teeth. Follow this by stropping each tooth with jeweler's rouge until the surface is mirrored. This reduces the force required for each strike and prevents the tool from tearing the delicate fibers of your vegetable-tanned leather.
Should I mark my stitches before or after dyeing the leather?
Always mark your stitches after you have dyed and finished the leather. The dyeing process involves moisture and drying cycles that can cause the hide to shrink or shift slightly. If you prick the leather beforehand, your spacing might become uneven as the fibers move. Marking your lines on the finished surface ensures that your SPI remains perfectly consistent and your guide lines stay crisp and visible.
Disclaimer
All our blog articles are made for information purposes only we dont take responsability for any content from third parties.