


How to Wet Form Vegetable Tanned Leather: The Artisan’s Masterclass
Wet forming isn't just a technical process; it's a conversation with the natural fibers of the hide. When you learn how to wet form vegetable tanned leather, you stop fighting the material and start guiding it into a permanent, sculptural state. It's the secret to turning a flat piece of skin into a structural masterpiece. Because vegetable tanning is the only method that keeps collagen fibers reactive enough for molding, mastering this craft is the ultimate way to respect the heritage of your materials.
You've likely felt the frustration of a premium hide cracking during a tight bend or seeing a crisp shape lose its definition as it dries. It's painful to watch water stains or "burn" marks ruin a project you've poured hours into. We understand that passion for perfection. This masterclass will give you the tools to achieve rock-hard, permanent 3D shapes with clean, professional edges every time. We'll walk through the exact soaking techniques, the pressure required for molding, and the drying secrets that ensure your work stays crisp for a lifetime.
Key Takeaways
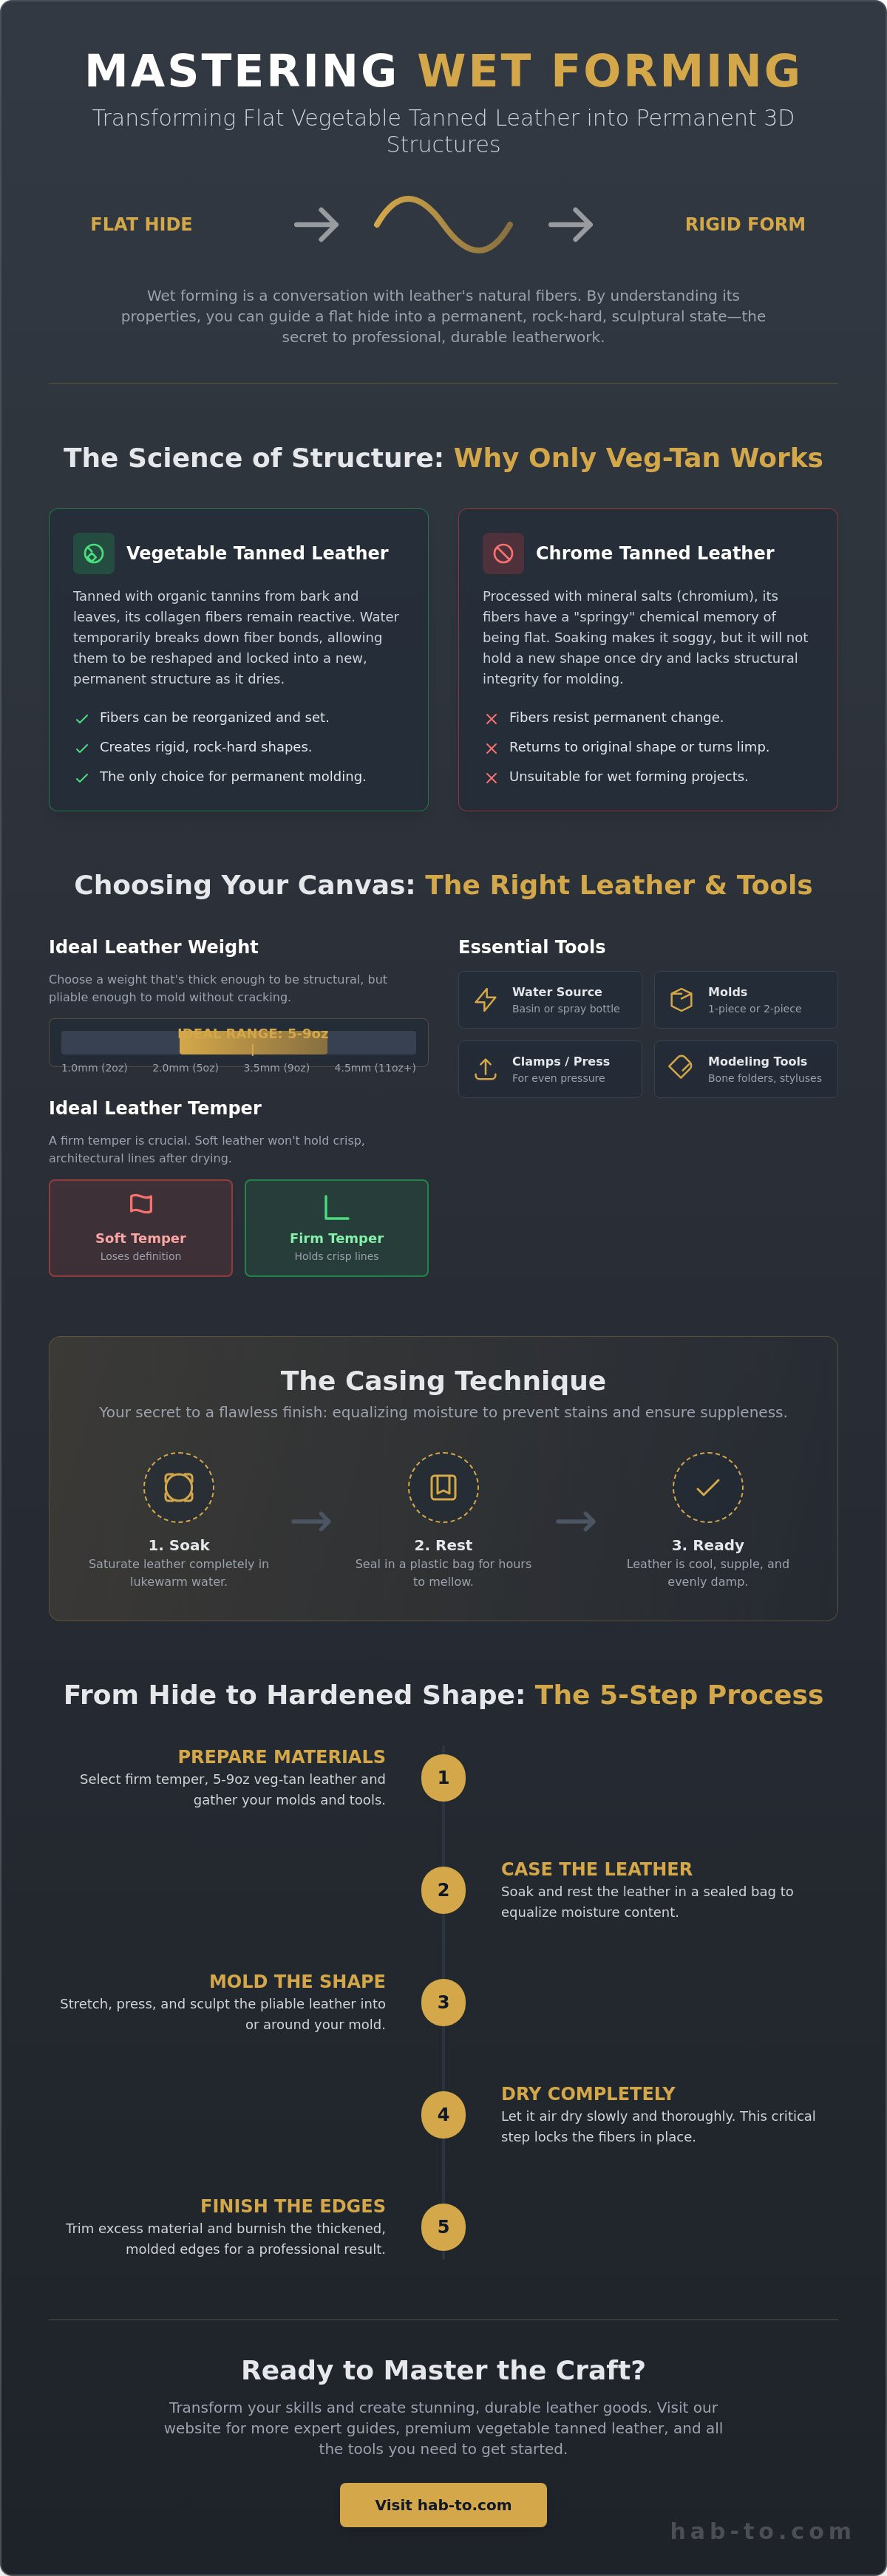
- Understand why vegetable tanned leather is the only material capable of holding permanent shapes due to its unique fiber structure.
- Master the step-by-step process of how to wet form vegetable tanned leather using professional hand-sculpting and mold-pressing techniques.
- Identify the ideal leather weights and firm tempers that prevent cracking while ensuring your designs stay rock-hard after drying.
- Learn the essential "casing" technique to equalize moisture, which eliminates water stains and keeps your hide supple for molding.
- Discover expert finishing tips for trimming and burnishing thickened molded edges to achieve a high-end, artisan result.
What is Leather Wet Forming and Why Does it Work?
Wet forming is a technique as old as the craft itself. At its core, it's the process of saturating leather with water to temporarily break down the bonds between its fibers. When the leather is wet, it becomes pliable, almost like clay. This state of "plasticity" allows you to stretch and compress the material into 3D shapes. As the water evaporates, the fibers lock into their new positions. You can find excellent technical backgrounds on Leather Wet Forming which explain how this structural shift occurs at a microscopic level. It's a dialogue with the material where you provide the pressure and the leather provides the memory.
This isn't a modern invention. Medieval artisans used this method to create hardened cuirasses and helmets that could deflect a blade. Today, we use it for high-end EDC gear, custom holsters, and sculptural art. The beauty of the process lies in the permanent memory of the hide. Once it's dry, it isn't just a shape; it's a rigid structure that protects whatever it holds. Understanding how to wet form vegetable tanned leather is what separates a basic hobbyist from a true artisan.
To see this structural transformation in action, watch this helpful demonstration:
Veg-Tan vs. Chrome-Tan: The Science of the Soak
You might wonder why you can't just soak any scrap of leather. The answer lies in the tanning chemistry. Chrome-tanned leather is processed with mineral salts that make the fibers resilient and "springy." It has a chemical memory of being flat. If you try to soak it, it will simply return to its original shape or turn into a soggy mess. It lacks the structural honesty required for molding.
In contrast, vegetable tanned leather uses organic tannins from bark and leaves. These tannins allow the collagen to be reorganized. However, not all veg-tan reacts the same. While standard tooling leather is the baseline, specialty hides like Pueblo have a buffed surface that absorbs water almost instantly. Shell Cordovan, though vegetable tanned, is extremely dense and requires much longer soak times to achieve plasticity. Understanding these nuances is key when learning how to wet form vegetable tanned leather effectively.
Common Projects for Wet Forming
Wet forming serves both form and function. In the world of practical gear, it's the gold standard for knife sheaths and firearm holsters. By molding the leather directly to the object, you create a "friction fit" that eliminates the need for straps or buttons. It's secure, silent, and professional. Valet trays are another favorite, as the molded corners provide a structural rigidity that keeps the tray's shape for decades.
Artistically, the possibilities are endless. Mask makers use wet forming to create intricate facial features, while sculptural artists use it to build rigid vessels or organic art pieces. Beyond the aesthetics, the process actually increases the durability of your project. As the fibers tighten during the drying phase, the leather becomes significantly harder and more resistant to impact. It transforms a soft hide into a protective shell.
Preparing Your Materials: Weights, Tempers, and Tools
Selection is the foundation of the craft. If you don't choose the right hide, even the best technique won't save the project. When learning how to wet form vegetable tanned leather, you have to look beyond the color. You're looking for the right weight and the right temper. If the leather is too thin, it won't hold its shape. If it's too soft, it won't capture the fine details of your mold.
For most structural projects like knife sheaths or valet trays, aim for a weight between 2.0mm and 3.5mm. This range, often referred to as 5oz to 9oz, offers the best balance. It's thick enough to stand on its own once dry, yet pliable enough to stretch around a mold without cracking. Temper is equally critical. You want a firm temper hide. A soft-tempered leather is too forgiving; it won't hold the crisp, architectural lines that define professional work. The internal properties of vegetable tanned leather mean that denser collagen fibers in firm hides create a stronger "memory" once the water evaporates. This is why high-quality tooling sides are the gold standard for molding.
Your tools should be as refined as your materials. You'll need a few essentials to get started:
- Bone folders: Essential for defining edges and hand-sculpting details without marring the surface.
- Spring clamps: These secure the leather to your mold or forming board while it dries.
- Non-staining molds: Use wood, plastic, or resin. Avoid raw iron, as it reacts with wet tannins to create permanent black stains.
- Stainless steel hardware: Always choose stainless or plastic to prevent rust and chemical reactions during the soak.
The Artisan’s Tool Kit for Molding
A bone folder is your most important ally. It's smoother than your fingers and more precise than a spoon. You'll use it to define the edges and "chase" the leather into the recesses of your mold. For precision projects, you can use carved wood, 3D printed plastic, or even dedicated "blue gun" forms for holsters. To keep everything steady, you can use essential leather hardware like Chicago screws or temporary clamps to secure the leather to your forming board while it sets.
Selecting the Right Hide for the Job
Natural veg-tan is the ultimate canvas because it absorbs water evenly and takes dye beautifully after forming. However, working with pre-dyed leathers adds another layer of complexity to how to wet form vegetable tanned leather. If you're using a hide like Pueblo, expect a slight color shift. The water and friction often darken the leather and smooth out its signature "scuffed" texture. For those seeking the pinnacle of luxury, Shell Cordovan offers a unique experience. Its extreme density makes it incredibly durable, but it requires a much longer soak to achieve the necessary plasticity for wet forming.
Ready to start your first project? Browse our collection of premium vegetable tanned leather to find the perfect weight and temper for your next masterpiece.
The Two Methods: Hand Forming vs. 2-Piece Molds
Every artisan eventually faces a choice: do I sculpt this piece by hand or build a dedicated mold? Both paths rely on the same Traditional Craft Techniques, but they offer vastly different rewards. Hand forming is intimate and deeply artistic. It's the perfect choice for one-off custom pieces where you want the leather to follow the natural, unique grain of that specific hide. Mold forming, by contrast, is about consistency and power. If you're crafting a run of ten identical knife sheaths, you need the repeatable precision that only a mechanical press can provide.
Choosing the right method depends on your project's volume and the level of detail you need. While hand forming allows for real-time adjustments, 2-piece molds excel at creating sharp, uniform corners that are difficult to achieve with finger pressure alone. Many professionals even use a hybrid approach. They start with a mold to handle the heavy stretching and then finish the fine details by hand while the leather is still in its pliable state.
The Art of Hand Sculpting
Hand sculpting is about developing "the feel" for the material. When you're learning how to wet form vegetable tanned leather by hand, moisture control is your greatest challenge. If the leather is too wet, it won't hold the detail you're trying to impress. If it's too dry, you risk tearing the grain. You're looking for that sweet spot where the hide feels like heavy, cold clay. Use your bone folder to incrementally stretch the fibers. Avoid the temptation to force a deep shape in one go. Slow, rhythmic pressure prevents those ugly stretch marks and ensures the grain stays smooth. This tactile feedback tells you exactly where a corner needs to be sharpened or where a stitch line should sit. It's a slow process, but the results feel uniquely human and authentic.
Precision with 2-Piece Molds
For those seeking industrial-grade precision, 2-piece molds are the answer. This method uses a male "plug" and a female "frame" to sandwich the leather into its final shape. Accuracy is vital here. When you design your mold, you must account for the leather's thickness in your tolerances. If you're using 3mm leather, your female frame needs to be slightly more than 3mm wider on all sides than the male plug. Without this gap, you'll crush the grain or even break your mold. C-clamps are your best friend for this method. They provide the even, sustained pressure needed to lock those collagen fibers into place. To avoid leaving permanent clamp marks on the visible grain, always use a scrap piece of leather or a smooth wood block as a buffer between the clamp and your project.
If you're tackling incredibly complex shapes with deep recesses, you might eventually consider a vacuum press. This tool uses atmospheric pressure to pull the wet leather tight against every tiny contour of a mold. It's significantly faster than hand forming and captures more detail than most 2-piece presses. Regardless of the method you choose, the goal remains the same: a rock-hard, permanent shape that honors the heritage of the craft.
How to Wet Form Leather: A Step-by-Step Guide
The workbench is where theory turns into tangible art. To master how to wet form vegetable tanned leather, you need a disciplined sequence that respects the material's natural limits. Start by submerging your hide in lukewarm water for two to ten minutes. Never use hot water. High temperatures can "cook" the collagen fibers, making the leather brittle and prone to cracking once it dries. Watch the surface closely during the soak. The signal for core saturation is when the air bubbles stop rising to the surface.
Don't reach for your tools the moment the leather comes out of the water. This is where most beginners fail. Instead, move into the casing phase. Place the wet leather in a sealed plastic bag and let it rest. This allows the moisture to equalize throughout the thickness of the hide. Professional saddlers often case their leather for several hours, sometimes overnight. When you finally remove it, the leather should feel cool to the touch and firm, much like modeling clay, rather than a soggy sponge. This state provides the perfect balance of plasticity and resistance.
Position your cased leather over the mold or object. Always work from the center outward to prevent the grain from bunching or creating unsightly folds. Use your bone folder to perform a "first pass" burnish. This sets the primary lines and defines the boundaries of the shape before you apply your final clamps. Once the shape is established, secure the edges. Ensure your clamps have buffers to avoid leaving permanent marks on the damp grain.
Ready to equip your workshop for your first masterpiece? Explore our professional leatherworking tools to get the precision your craft deserves.
Mastering the Soak and Case
The signal that your leather has reached full core saturation is when the air bubbles stop rising to the surface. Using lukewarm water is a vital safety measure for your hide. Hot water risks damaging the protein structure of the leather, leading to a finished piece that feels like cardboard. The secret of casing is patience. By waiting for the water to distribute evenly, you ensure that the leather stretches uniformly without tearing the delicate top grain.
The Drying Process: Patience is the Key
Patience is your most important tool during the final stage. You must never use a hair dryer, heat gun, or radiator to speed up the drying process. Forced heat causes the leather to shrink unevenly, which leads to warping and surface cracks. For those working in a typical European climate, aim for a steady ambient temperature of 20°C with moderate airflow. This allows the fibers to lock into place slowly and securely. You can tell the leather is bone dry when it no longer feels cold to the touch and has returned to its original, natural color. Only then should you remove the mold.
Finishing Your Molded Masterpiece
Once the leather is bone dry, it's time for the reveal. Removing the mold is the most satisfying part of learning how to wet form vegetable tanned leather. If the hide feels "springy" or tries to flatten out, it likely still holds internal moisture. Don't force it. Put it back in the mold for another twelve hours. When the shape is finally locked, you'll notice the edges have thickened due to the compression of the fibers. Use a sharp trim knife to clean these up. Since the leather is now rock-hard, you can sand and burnish these edges to a glass-like finish that wouldn't be possible with a soft, un-molded piece.
Dyeing wet-formed pieces requires a different mindset. Alcohol-based dyes are popular for their deep penetration, but they can react aggressively with the "thirsty" fibers of a molded hide. Because you've already stressed the material, the dye will soak in rapidly. It's best to apply the dye in thin, multiple layers rather than one heavy coat. This prevents the leather from becoming overly brittle or saturated. Specialty hides like Pueblo react beautifully to this final stage, as the buffed surface drinks in the color and develops a rich, deep patina almost instantly.
Dyeing and Tinting Post-Forming
Stretching the grain often causes the color to lighten in high-tension areas. This isn't a flaw; it's an opportunity. You can create a stunning "antique" effect by applying a darker dye or gel to the raised molded areas. This highlights the architectural lines you worked so hard to create. Always dye after the forming process is complete. If you dye beforehand, the soaking phase will cause the pigment to migrate. This leads to messy streaks and uneven patches on your final masterpiece.
Conditioning and Water-Proofing
The wet forming process is essentially a deep-cleaning for the leather's internal structure. While it's necessary for the shape, it leaves the hide stripped of its natural oils. If you leave it as is, the piece will eventually crack. You must re-introduce lipids. For structural items like holsters, a light coat of neatsfoot oil followed by a wax-based sealant is ideal. If you need a hard, water-resistant shell, an acrylic finish like Resolene works best. For a more traditional, tactile feel, pure beeswax can be buffed into the grain. Unlike Shell Cordovan, which has a high natural oil content, standard veg-tan hides will be particularly hungry for this final treatment.
Mastery of this craft starts with the right material. Browse our curated vegetable tanned leather collection to find your next project piece and start your journey into 3D leatherwork today.
Elevate Your Craft with Sculptural Detail
Mastering the sculptural potential of a hide is a transformative milestone for any maker. You've discovered that success isn't found in force. It's found in the patient dialogue between water and fiber. By understanding how to wet form vegetable tanned leather, you've unlocked the ability to create objects that are as structural as they are beautiful. From the precise casing period to the final application of protective waxes, every step honors the heritage of the craft.
The quality of your molded masterpiece will always be tied to the integrity of the hide you choose. We bring 160+ years of family leather expertise to your workbench. Our mission is to provide sustainable, ethically sourced European hides without the barrier of minimum order quantities. We're here to support your journey from a flat piece of skin to a rigid, permanent work of art.
Shop Premium Veg-Tan Leather for Your Next Molding Project
Your tools are ready and the water is waiting. It's time to bring your vision into three dimensions.
Frequently Asked Questions
Can I wet form leather that has already been dyed?
Yes, but you should proceed with caution. Pre-dyed hides often bleed or lose their finish when submerged in water for several minutes. If you're learning how to wet form vegetable tanned leather, it's best to start with natural hides. This allows you to control the final color post-forming and avoids the messy dye migration that often happens during a deep soak.
How do I prevent the leather from getting moldy while it dries?
Prevention starts with consistent airflow and a clean environment. Mold grows when damp leather stays in stagnant air for too long, especially in humid climates. Ensure your drying area has moderate circulation and stays around 20°C. If you must case your leather in a plastic bag, don't leave it for more than 24 hours. A tiny drop of mild antiseptic in the water can also help.
What happens if I use hot water to soak my leather?
Hot water will permanently damage the collagen fibers in your hide. It essentially "cooks" the leather, causing it to shrink, curl, and become extremely brittle once it dries. Once this thermal damage occurs, the material loses its ability to hold a shape and will likely crack under any pressure. Stick to lukewarm water to keep the fibers supple and reactive for the molding process.
How long does it typically take for a wet-formed project to dry completely?
Most wet-formed projects require 24 to 48 hours to dry fully. Thick hides, like 3.5mm tooling leather, take significantly longer than thinner skins used for small pouches. You'll know the process is finished when the leather feels room temperature rather than cold to the touch. Don't be tempted to remove the mold early, as the shape might slump if the core is still damp.
Is it possible to 'undo' wet forming if I make a mistake?
You can't perfectly return the leather to its original flat state, but you can re-soak and re-shape it. Once the fibers have dried in a 3D position, they remember that form. While a second soak makes the piece pliable again, it often loses some of its original crispness. It's much better to get the shape right the first time rather than trying to reverse the structural change.
Do I need to use a specific type of water, like distilled water?
Distilled water is recommended if your local tap water has a high mineral content. Iron and other minerals can react with the natural tannins, leading to dark streaks or graying on natural hides. If you're working with premium vegetable tanned leather, using distilled water is a simple, inexpensive way to ensure the grain stays clean and free from accidental chemical staining during the soak.
Will wet forming make my leather darker permanently?
Yes, the process of wetting and molding typically results in a permanent color shift. The water brings tannins to the surface, and the pressure from your bone folder creates a slight burnishing effect on the grain. This usually leaves the leather a shade or two darker than its original state. Most crafters find this deepened patina adds to the professional, rugged look of the finished piece.
Can I wet form chrome-tanned leather if I soak it long enough?
No, chrome-tanned leather cannot be wet formed because its chemical structure is designed to be resilient and springy. The chromium salts used in the tanning process create a permanent bond that forces the leather back to its flat state. Even with a long soak, the fibers won't reorganize and lock like they do in vegetable tanned hides. It's simply the wrong material for sculptural work.
