


Leather Tooling Patterns for Beginners: A Guide to Mastering the Craft
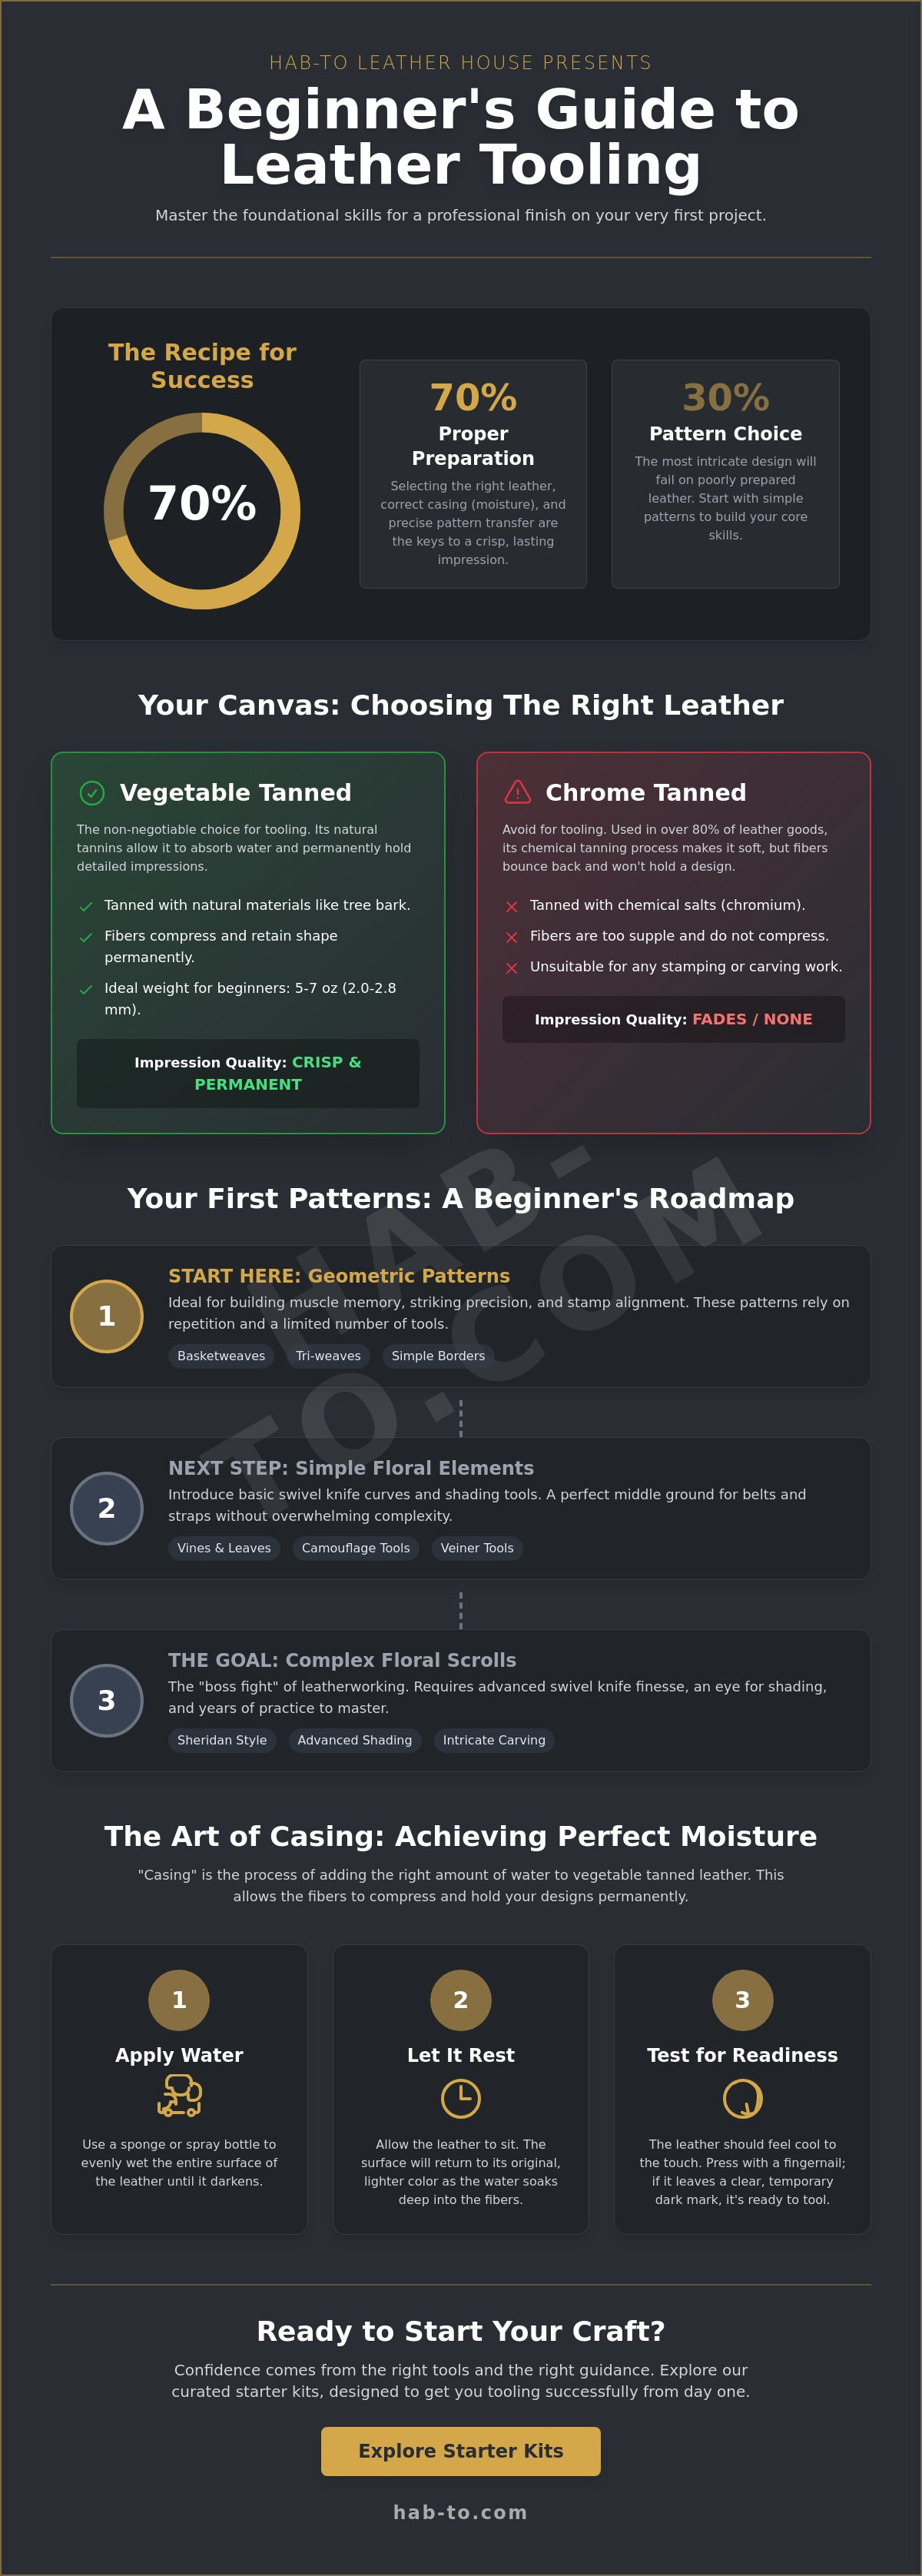
You can buy the most intricate stamps in the world, but if your leather isn't prepared correctly, your project is doomed before you even pick up a mallet. Successful leatherworking is actually 30% pattern choice and 70% proper preparation. It's heartbreaking to watch a beautiful piece of vegetable tanned leather go to waste because a stamp cut too deep or a design didn't transfer clearly. I've seen many beginners lose confidence because they started with the wrong tools or a hide that wasn't meant for tooling at all.
You deserve to feel the pride of a finished piece that looks professional on your very first try. Finding the right leather tooling patterns for beginners shouldn't be a guessing game that ends in wasted material. I'll walk you through how to select accessible designs and transfer them to your hide with precision. You'll learn exactly which stamps are worth your investment and how to choose the right vegetable tanned leather to ensure every strike of the mallet creates a crisp, lasting impression. Let's get your workbench ready for a successful first project.
Key Takeaways
- Learn why geometric designs are the ideal starting point to build essential muscle memory and striking precision.
- Understand the science of vegetable tanned leather and why it's the only material that truly holds a lasting, professional impression.
- Master foundational techniques like the classic basketweave and simple borders to give your very first projects an expert finish.
- Discover the art of casing to achieve the perfect moisture level for clean, crisp design transfers every time.
- Explore how to select your first crafting bundle to practice leather tooling patterns for beginners with confidence and minimal waste.
What Makes a Leather Tooling Pattern Beginner-Friendly?
Welcome to the workbench. If you're holding your first swivel knife, you might be tempted to jump straight into a complex floral scroll. I've seen many enthusiasts do this, only to feel frustrated when the lines don't flow. A truly beginner-friendly pattern relies on repetitive, predictable motions. These designs allow you to focus on your grip and striking force without worrying about the artistic curves of a vine or leaf. When you start looking for leather tooling patterns for beginners, prioritize designs that use a limited number of stamps. This keeps your focus on consistency. You're building muscle memory, and that happens best when you aren't constantly switching tools.
Understanding the distinction between carving and stamping is your first step toward mastery. Carving involves using a swivel knife to slice the surface, while stamping uses metal tools to compress the leather fibers. You can explore a variety of leather carving techniques to see how these two methods work together to create depth. For your initial projects, I recommend patterns that emphasize stamping over intricate knife work. It's much easier to master the weight of the mallet than it is to control the swivel knife's curve on your first day. To better understand this concept, watch this helpful video:
Geometric vs. Floral: Which should you choose?
Geometric patterns like the basketweave or tri-weave are your best friends. They teach you how to align stamps and maintain even pressure across a large surface. Floral patterns, specifically the famous 'Sheridan' style, are essentially the 'boss fight' of leatherworking. They require advanced swivel knife finesse and an eye for shading that takes years to develop. If you want a challenge that isn't overwhelming, border patterns for belts or straps are a perfect middle ground. They use simple tools like camouflagers and veiners to create elegant, professional edges without the complexity of a full floral scene.
The Anatomy of a Tooling Pattern
Every pattern has a specific logic you need to decode. Look for the line work first; these are your primary cuts where the swivel knife defines the shape. Next, identify 'dead space.' This is the area around your design that needs 'backgrounding' to make the main image pop. Most quality leather tooling patterns for beginners include a 'key' that tells you exactly which stamp to use in each section. Don't improvise yet. Stick to these keys until you understand how different textures interact. Choosing a pattern that matches the stamps in your basic toolset ensures you can finish what you start without needing to buy specialty equipment mid-project.
The Essential Canvas: Why Vegetable Tanned Leather is Non-Negotiable
You can't build a house on sand. In the same way, you can't execute leather tooling patterns for beginners on the wrong material. Chrome-tanned leather accounts for over 80% of global production, but for an artisan, it's essentially a closed door. It's soft and supple because of the chemical salts used in the tanning process, but those same chemicals make it impossible to tool. The fibers bounce back. They won't hold an impression. If you try to stamp a design into chrome-tan, you'll find the leather simply refuses to remember the strike of your mallet.
Vegetable tanned leather is different. It's processed using natural tannins from tree bark and leaves. These tannins allow the leather to absorb water and, more importantly, permanently retain the shape of your tools. When you strike a stamp into damp veg-tan, you're rearranging the fibers. At Hab-To Leather House, we're committed to sourcing only the highest quality, sustainable veg-tan hides. We believe that respect for the craft starts with respect for the material. If you want to dive deeper into the history of this art form, the German Leather Museum offers incredible insights into how these traditional tanning methods have shaped human culture for centuries.
Selecting the right weight is your next hurdle. For most beginner projects like coasters or small wallets, a weight of 5 to 7 ounces (about 2 to 2.8 mm) is the sweet spot. It's thick enough to take a deep, crisp impression without being so heavy that it's difficult to cut or fold. Choosing the right thickness ensures your leather tooling patterns for beginners look intentional and professional rather than shallow or messy.
Choosing the Right Hide for Tooling
Where you cut your project from the hide matters. I always suggest the shoulder for tooling. It's firm, has a consistent grain, and doesn't stretch much. Avoid the belly; it's often too spongy and won't hold fine detail. When you're just starting, I always recommend natural vegetable tanned leather. It's a clean slate. You'll see how the leather "burnishes" or darkens under the pressure of your tools. This natural reaction brings your pattern to life by creating beautiful, high-contrast shadows that dyed leathers often hide.
Preparing the Surface
Before the first cut, your leather needs to be clean. Use a damp cloth to remove any surface oils or dust from the grain side. You also need a rock-solid foundation. I cannot stress this enough: tool on a marble or granite slab. If your work surface has any "give," your stamps will lose their energy and look faint. For those wanting a unique start, Hab-To Leather House often recommends Pueblo leather. It has a slightly scuffed, rustic finish that accepts tooling beautifully and creates a look that's impossible to replicate with standard smooth hides. You can find everything you need to begin your journey in our collection of expert-selected materials.
Top 3 Leather Tooling Patterns for Beginners in 2026
Choosing your first design can feel like standing in front of a massive wall of stamps without a map. I've seen beginners get lured in by complex floral scrolls found on social media, only to end up with a piece of leather that looks more like a mess than a masterpiece. To avoid that frustration, I’ve narrowed down the best leather tooling patterns for beginners to three foundational styles that build your skills without breaking your spirit. These designs are selected because they focus on rhythm, alignment, and the essential marriage of carving and stamping.
- The Classic Basketweave: This is the ultimate test of rhythm. It teaches you how to master alignment and consistent striking force across a large area.
- The Simple Border: By using basic tools like camouflagers and veiners, you can create elegant edges that make even a plain belt or strap look professional.
- The Single-Flower Motif: This is your gentle introduction to the swivel knife. It allows you to practice beveling and decorative cuts on a small, manageable scale.
The Basketweave Pattern
This pattern is a staple in every workshop for a reason. You don't need a massive kit to get started; you only need a single basketweave stamp and a steady mallet. The secret to a beautiful weave isn't in the tool, it's in your preparation. You must establish a 'master line' across your leather using a ruler and a stylus before you ever pick up a mallet. This line acts as your North Star. If your first stamp is off by even a millimeter, the entire grid will slowly tilt as you progress.
One common mistake I see in the studio is 'ghosting.' This happens when the stamp bounces because you didn't hit it squarely, or perhaps your work surface isn't solid enough. Strike once, firmly and vertically. Don't over-strike, as hitting the tool multiple times can cause it to shift slightly, blurring the crisp edges of your pattern. Focus on the 'legs' of the stamp and ensure they lock into the previous impression like a puzzle piece.
The Celtic Knot
While it looks intricate, a Celtic knot is one of the most rewarding leather tooling patterns for beginners because it teaches excellent swivel knife control. You aren't just stamping a shape; you are carving paths. The magic happens when you use your bevelers. By beveling only one side of the carved line, you create the famous 'over-under' 3D illusion that makes the knot appear to weave through the leather. It's a satisfying way to learn how light and shadow work in leatherwork.
To finish a project with this style, you’ll want to choose the right leather hardware to match the aesthetic. A heavy brass buckle or a simple antique-finish snap complements the timeless look of a Celtic design perfectly. It’s these small details, the combination of a well-executed pattern and quality hardware, that turn a practice piece into a functional item you’ll be proud to wear.
How to Execute Your Pattern: The Casing and Transfer Process
You've selected your design and prepped your stone slab. Now comes the moment that separates an amateur effort from a professional finish. Execution is where most beginners falter, usually because they rush the moisture preparation. If the leather is too dry, your tools won't leave a mark. If it's too wet, you'll end up with a mushy, indistinct mess that loses its detail as it dries. Mastering the casing and transfer process is the essential bridge between a paper drawing and a professional carving. It's about patience and respecting the material's natural state.
Once your lines are transferred, your first cut with the swivel knife sets the stage. Hold the knife like a pencil, but place your index finger in the cradle of the yoke to apply downward pressure. Always cut toward yourself. Keep your wrist flexible to navigate the curves of your leather tooling patterns for beginners. After the cuts are made, use a beveler to compress the leather on one side of the line. This simple step creates the shadow and depth that makes a flat piece of hide look three-dimensional. To get the best results, you need tools that feel right in your hand. Explore our professional-grade leatherworking tools to find the perfect swivel knife for your first project.
The Secret of Casing Leather
Casing is the process of adding moisture to the leather fibers to make them pliable. I always follow the "Damp but not Wet" rule. Use a clean sponge rather than a spray bottle for your first few projects. A sponge allows for even distribution without soaking the core of the hide. Apply water to the grain side until the leather darkens significantly. Then, wait. As the surface begins to return to its natural color, it will feel cool to the touch. This is the sweet spot. Stamping at this exact moment ensures your impressions remain crisp and hold their shape for decades.
Transferring Patterns Without Damaging Grain
Don't draw directly on your leather with a pencil. You'll leave permanent marks or gouge the surface. Instead, use tracing film or parchment paper. Lay your design over the cased leather and secure the edges with low-tack painter's tape. Regular masking tape can leave a sticky residue that ruins your final finish. Use a stylus or a ballpoint pen that has run out of ink to trace the design. Apply just enough pressure to leave a "ghost line" on the damp surface. It should be visible enough to follow with your knife, but light enough that it doesn't distort the grain. This precision is what allows leather tooling patterns for beginners to look clean and intentional.
Sourcing Your Starter Kit: The Hab-To Leather House Mentor Approach
You have the knowledge and the technique. Now you need the steel and the skin. At Hab-To Leather House, we believe quality materials are a necessity for learning, not a luxury reserved for masters. If you start with inferior tools or synthetic substitutes, you're fighting the material instead of honing your craft. Our philosophy is simple: quality materials lead to quality skills. We want to be your mentor in this journey, providing the same professional-grade supplies used by seasoned artisans without the intimidation of large industrial requirements.
We've removed the barriers for the budding enthusiast. Hab-To Leather House offers no minimum orders because we know that a beginner doesn't always need a full hide. Sometimes, you just need enough for a single coaster or a keychain. This is why we highly recommend selecting one of our crafting bundles of veg-tan scraps for your initial practice. These pieces allow you to fail, experiment, and eventually succeed with leather tooling patterns for beginners without the fear of ruining an expensive project. It's a low-stakes way to build high-level confidence.
Based in Amsterdam, we're deeply rooted in a tradition of craftsmanship. We don't hide behind an anonymous storefront. Hab-To Leather House is here to offer personalized advice and connect you with the wider leatherworking community. Whether you're visiting us by appointment or reaching out online, you're getting direct access to decades of expertise. We treat every customer like a future master of the craft.
Essential Beginner Tool List
To execute leather tooling patterns for beginners effectively, you don't need a hundred stamps. You need the right ones. Your starter kit should focus on four pillars:
- Swivel Knife: Your primary carving tool. It must be sharp and fit comfortably in your hand.
- Basic Beveler: Used to create depth by compressing one side of your cut lines.
- Veiner: Adds texture and organic detail to borders and motifs.
- Backgrounder: Used to push down the "dead space" and make your design stand out.
I always advise using a poly mallet rather than a metal hammer. Metal-on-metal contact will mushroom the ends of your stamps and eventually ruin them. A poly mallet absorbs just enough shock to protect your tools while delivering a consistent, powerful strike. As you grow in your craft, you might look toward high-quality shell cordovan for advanced future projects, though it's important to remember that such dense leathers are for construction, not tooling.
Next Steps in Your Craft
Practice makes permanent. I encourage every beginner to develop a "scrap leather" ritual. Before you touch your main project, spend ten minutes stamping on a scrap piece. This warms up your arm and checks the moisture level of your leather. It's the most effective way to ensure your final piece looks professional and clean. Don't work in a vacuum. Share your progress with us at Hab-To Leather House. We love seeing the first successful strikes of a new artisan, and our experts are always ready to provide feedback on your technique.
The path from a curious beginner to a confident crafter is paved with the right materials. Don't settle for less than the best. Shop our beginner-friendly veg-tan selection today!
Master the Art of the Mallet and Swivel Knife
You've learned that success in leatherworking isn't just about the strength of your strike. It's about the harmony between your tools and the material. By choosing geometric leather tooling patterns for beginners and mastering the delicate art of casing, you've already bypassed the most common pitfalls that frustrate new artisans. Remember that your choice of canvas is non-negotiable. Vegetable tanned leather is the only surface that will truly respect your effort and hold your design for a lifetime.
At Hab-To Leather House, we don't just sell leather; we share a legacy of 160 years of family expertise. We've removed the barriers to entry with no minimum order requirements, allowing you to source exactly what you need from our selection of sustainably sourced European hides. Whether you're practicing on scraps or starting your first belt, we're here to support every cut and stamp. Your workbench is ready, and the material is waiting for your unique touch.
Start your journey with premium Veg-Tan leather from Hab-To Leather House. It's time to make your mark and turn your creative vision into a tangible, lasting reality. We can't wait to see what you create.
Frequently Asked Questions
Can I tool leather that has already been dyed or finished?
No, you cannot effectively tool leather that has already been dyed or finished. These coatings act as a barrier that prevents water from penetrating the fibers, which is essential for the casing process. If the leather can't absorb moisture, it won't hold the impression of your tools. Stick to natural vegetable tanned leather to ensure your designs remain crisp and permanent.
What is the best thickness (oz) of leather for beginner tooling?
The sweet spot for beginners is leather with a thickness of 5 to 7 oz (2.0 to 2.8 mm). This weight provides enough depth for deep, high-contrast stamping without being too difficult for a novice to cut with a swivel knife. It's the perfect canvas for practicing your first leather tooling patterns for beginners on items like coasters or small wallets.
Do I really need a marble slab, or can I use my wooden workbench?
You absolutely need a marble or granite slab. A wooden workbench has too much "give" and will absorb the energy of your mallet strikes, resulting in weak and shallow impressions. A stone slab provides a solid, non-resilient surface that reflects the energy back into the tool. This ensures every strike produces a clean, professional mark on your project.
How do I sharpen a swivel knife for a cleaner cut?
Sharpen your swivel knife using a leather strop and a fine honing compound like jeweler's rouge. Hold the blade at a consistent angle and pull it backward across the strop several times on each side. A sharp blade is crucial for clean cuts. If you feel the knife dragging or tugging at the leather fibers, it's time to hit the strop again.
Why does my leather turn dark and mushy when I try to stamp it?
Your leather is likely over-saturated with water. If you try to stamp while the leather is still mushy, the fibers won't have the structural integrity to hold a sharp edge, and the design will look blurred. This usually happens when you don't allow enough time for the leather to case properly after wetting it. Patience is key to a crisp finish.
How long should I wait after wetting the leather before I start tooling?
You should wait until the leather begins to return to its natural, lighter color. While the time varies based on your environment, it usually takes about 20 minutes. The surface should look dry to the eye but feel noticeably cool against your skin. This indicates that the moisture is locked inside the fibers where it belongs, making it ready for tooling.
Is it possible to fix a 'missed' stamp strike?
Fixing a missed strike is incredibly difficult because the compression of the fibers is permanent. You can sometimes minimize the appearance of a mistake by using a backgrounder tool to flatten the surrounding area or by slightly altering your design to incorporate the error. However, it's always better to practice your leather tooling patterns for beginners on scrap pieces first to build consistency.
Where can I find free printable leather tooling patterns?
Many artisan communities and heritage suppliers offer downloadable resources for new crafters. Look for reputable blogs or forums dedicated to traditional leatherwork. These sites often provide simple geometric designs that are perfect for building your foundational skills. Just ensure the patterns are scaled correctly for your specific project before you begin the transfer process.
