


Troubleshooting Leather Stitching Issues: The Artisan’s Guide to Flawless Seams
Have you ever spent hours carefully cutting and skiving a piece of premium vegetable tanned leather, only to have the final seam look like a jagged mountain range? It's a common frustration that can make even the most passionate maker want to set down their pricking irons. You've likely felt that sting of disappointment when a thread snaps mid-pull or those needle holes look "chewed up" rather than clean. I know exactly how it feels when your hands don't quite match the vision in your head, especially when you've invested so much heart into the material.
The good news is that you don't have to settle for messy results. This guide focuses on troubleshooting leather stitching issues by mastering the technical relationship between your tools, thread, and material. My promise is to help you eliminate tension errors and tool failures so you can approach every project with total confidence. We're going to break down the essential symphony of disciplined preparation, tool calibration, and physical rhythm that creates professional, crisp seams every time you sit at the bench.
Key Takeaways
- Learn why the secret to a straight seam starts with understanding your leather's temper and marking your lines with absolute precision.
- Discover how matching your needle size to your thread weight prevents "chewed up" holes and makes pulling every stitch effortless.
- Perfect your hand-sewing technique by troubleshooting leather stitching issues like uneven slants and inconsistent tension.
- Identify the root causes of machine sewing failures, from bird-nesting threads to unsightly presser foot marks on delicate surfaces like Pueblo or Cordovan.
- Master professional finishing touches like invisible backstitching and the proper way to hammer your seams for a flush, high-end look.
Preparation Pitfalls: Why Your Stitching Fails Before You Start
Great stitching isn't just about the needle and thread. It's about the discipline you bring to the bench before you even pick up a tool. Respect the material. Discipline is the foundation. Prep with care. At the heart of our philosophy is a deep respect for the leather itself. If you don't prepare the surface with absolute focus, your final seam will reflect that lack of intention. Most beginners rush to the sewing stage, but troubleshooting leather stitching issues almost always begins with looking at your prep work rather than your sewing technique.
To better understand this concept, watch this helpful video:
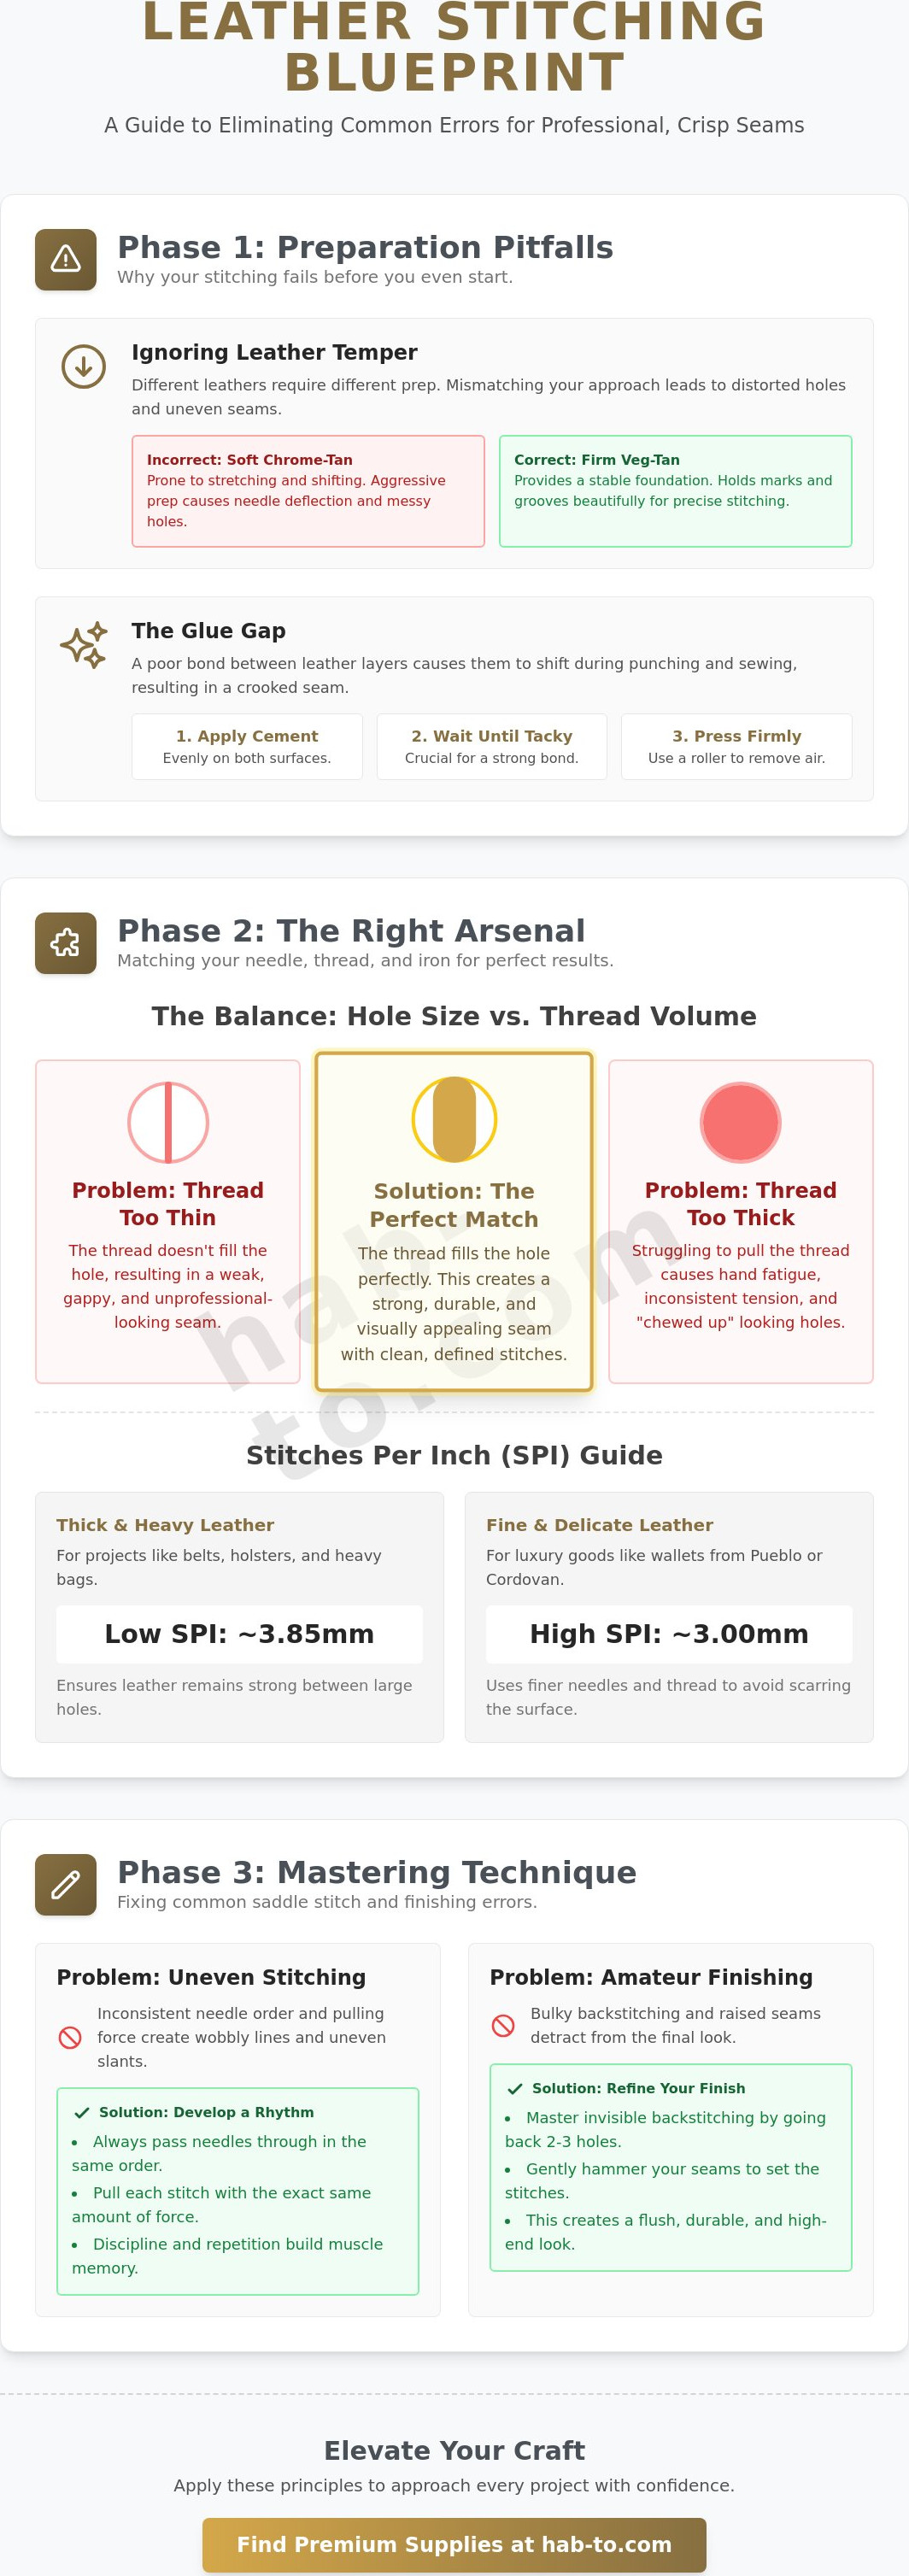
One of the most overlooked variables is leather temper. Firm vegetable tanned leather provides a stable foundation that holds a groove or a mark beautifully. However, soft chrome-tan is a different beast entirely. It's prone to stretching and shifting under the pressure of a pricking iron. If you treat soft leather with the same aggressive prep as a heavy saddle hide, you'll end up with distorted holes and uneven tension. This often leads to needle deflection, where the needle wanders between layers because they weren't bonded properly. Understanding this balance is key to ensuring your needles travel through the material exactly where you intended.
The Glue Gap: Ensuring a Permanent Bond
If your leather layers shift even a fraction of a millimeter, your stitching will look crooked. This is often caused by a poor bond. Contact cement is your best friend here, but only if you use it correctly. You must wait until the adhesive is completely tacky to the touch before joining the pieces. Once they are together, use a bone folder or a heavy roller to press out any air pockets. This prevents the layers from sliding when you strike your irons. Always clean away excess adhesive from the edges; if it gets on your thread, it causes friction that leads to fraying. To truly Master the Saddle Stitch, you need a solid, immovable foundation.
Marking and Grooving for Precision
Your stitching is only as straight as the line you follow. For thicker vegetable-tanned projects, a stitching groover is excellent because it recesses the thread, protecting it from wear. But be careful. Grooving too deep into thin leather weakens the grain and can cause the seam to tear over time. For lighter weights or more delicate finishes, a simple wing divider line is often better. It provides a guide without removing material. The goal is a visible mark that guides your pricking iron without compromising the structural integrity of the hide. Discipline in marking leads to perfection in execution.
Choosing Your Arsenal: Matching Needle, Thread, and Leather Weight
Your choice of tools and materials isn't just about aesthetics. It's about engineering. When troubleshooting leather stitching issues, many crafters overlook the critical relationship between the hole size and the thread volume. If your thread is too thin for the hole, the seam looks weak and unfinished. If it's too thick, you'll struggle to pull every stitch. This leads to hand fatigue and inconsistent tension. For high-quality vegetable tanned leather projects, we recommend matching the Stitches Per Inch (SPI) to the weight of the hide. Thicker projects, like belts or knife sheaths, generally require a lower SPI (around 3.0mm to 3.85mm). This ensures the leather remains strong between the holes. If you are new to the bench, checking a step-by-step sewing guide can help you visualize how these components interact before you start.
Dense materials require even more specific care. Shell Cordovan, for instance, has an incredibly tight grain. Using a thick needle on Cordovan can permanently scar the surface. I always suggest using the finest needle possible for these luxury hides. The goal is to let the thread fill the hole without forcing the leather to stretch or tear. If you're looking to upgrade your kit, you can explore our curated selection of leatherworking tools designed for precision work.
The Thread Weight Hierarchy
Thread thickness is measured in millimeters, and each size serves a purpose. A 0.6mm thread is perfect for small wallets, while 0.8mm is the standard for most mid-sized bags. Use 1.0mm only for heavy duty gear where a bold, chunky look is desired. Waxed thread is non-negotiable for hand sewing. The wax acts as a lubricant, reducing friction as the thread passes through the grain. Pay attention to the twist direction too. Z-twist thread is designed for sewing machines to prevent unravelling, while S-twist is the traditional choice for hand-stitching linen thread.
Needle Selection for Artisan Results
Ditch the sharp household needles. For leather, you need harness needles. These have blunt tips that won't pierce the leather fibers or your thread. Your needle should be just slightly thicker than your thread. This creates a path for the thread to follow without resistance. I recommend retiring your needles regularly. Even a tiny micro-burr on the metal can snag fibers and cause your thread to fray. If you feel any resistance that wasn't there before, it's time for a fresh pair. Small details like this make the difference between a hobbyist project and an artisan masterpiece.
Master the Saddle Stitch: Fixing Common Hand-Sewing Errors
The saddle stitch is the gold standard of the leather world. It's durable. It's beautiful. Unlike a machine lockstitch, it won't unravel if a single thread breaks. But achieving that iconic slanted look on both sides requires more than just practice; it requires a deep understanding of geometry. If your stitches look like a straight line on one side and a zig-zag on the other, you're likely facing a casting error. Troubleshooting leather stitching issues in hand-sewing usually comes down to how you loop, or "cast," your thread behind the needle. This simple movement determines the slant. Consistency is everything. Your hands must develop a rhythmic tension, feeling how the thread settles into the grain with every pull.
Correcting the "Back-Side" Slant
Many artisans struggle with a back-side that looks messy compared to the front. This often starts with your awl angle. Your awl must stay perfectly perpendicular to the leather. If it tilts even slightly, the exit hole will be misaligned, ruining the slant. Your seating position plays a massive role here. If your stitching pony is too low, you'll naturally tilt your entry angle downward. Adjust your pony so the work is at chest height. This allows your arms to move freely and keeps your awl strikes level. Always perform a visual check after the first three stitches. Ensure the thread crosses the same way in every single hole. If you change your casting direction mid-seam, the rhythm is lost.
Managing Tension and Thread "Biting"
Don't strangle the leather. Over-tightening is a common mistake that leads to puckering, especially on soft materials like goatskin or thin calf. You want the thread to sit flush, not to bury itself so deep it distorts the hide. I recommend the "two-finger" tension rule. Pull the thread until it's snug, using only the strength of your fingers rather than your whole arm. This ensures a consistent stitch depth across the entire project. If you notice the thread has already "bitten" too hard into the grain, don't panic. You can sometimes massage the leather around the stitch with a smooth bone folder to relax the fibers. However, the best cure is prevention through a steady, relaxed physical rhythm.
If you find that your tools are resisting the leather despite your best efforts, it might be time to look at your equipment. A dull awl or a poorly polished iron can cause significant frustration. You can check our professional-grade leatherworking tools to ensure your hardware is as sharp and disciplined as your technique.
Machine Sewing Meltdowns: Solving Tension and Feed Problems
Switching from hand-stitching to a sewing machine feels like gaining a superpower, but it introduces a whole new set of mechanical headaches. When troubleshooting leather stitching issues on a machine, you aren't just managing your own rhythm; you're managing the timing of a complex tool. Most beginners panic when they see "bird-nesting," that tangled cluster of thread on the underside of the leather. It looks like a bobbin disaster, but it's almost always a top-threading issue. If the upper thread isn't seated correctly in the tension disks, it won't pull the bobbin thread up, resulting in a chaotic mess. Check your path twice. Thread with the presser foot up to ensure the disks are open and ready to receive the thread.
Dense materials like shell cordovan present a unique challenge for domestic machines. These machines often lack the piercing power for such tight grains, leading to skipped stitches or motor strain. You might also notice unsightly presser foot marks on delicate surfaces like Pueblo. These "tracks" are often permanent. Don't listen to the old advice of stapling layers to prevent shifting; that's a recipe for ruining a beautiful hide. Instead, focus on adjusting your foot pressure. You need just enough to move the leather without crushing the fibers or leaving a trail of metal teeth marks behind.
Balancing Top and Bobbin Tension
The "Scrap Leather Test" is my golden rule. Never, under any circumstances, start sewing your final project without testing a scrap of the exact same leather stack first. Heavy-duty bonded nylon threads behave differently than standard garment thread. You'll likely need to tighten your bobbin case tension to match the resistance of the thicker top thread. If you see loops on the bottom, your top tension is too loose. If the bobbin thread is being pulled through to the top, your upper tension is too tight. It's a delicate dance that requires patience and a few test strips to get right.
Feed Dog and Presser Foot Harmony
Waxy or oily leathers often "stutter" under a standard metal presser foot. This causes inconsistent stitch lengths and frustration. Using a Teflon foot or a dedicated walking foot machine provides the smooth feed necessary for professional results. When you encounter "humps," such as seam transitions, the foot can tilt and cause the needle to skip. I recommend using a small scrap of leather as a "shim" behind the foot to keep it level as it climbs the transition. This simple trick keeps the timing perfect. If you're ready to move beyond basic setups, explore our professional leatherworking tools to find hardware that matches your ambition.
Elevating Your Craft: Professional Tips for Long-Lasting Seams
The finish line is often where the most critical mistakes happen. You've spent hours on the bench, and the temptation to rush the final few inches is strong. But a seam isn't truly finished until it's locked, set, and protected. When troubleshooting leather stitching issues, I often find that the most durable projects are those where the maker treated the final two stitches with as much respect as the first. The backstitch is your primary tool for security. By reversing your path for two or three holes, you create a mechanical lock that prevents the thread from ever pulling through. To keep it professional, taper your thread ends with a sharp blade before tucking them away. This ensures a flush finish that doesn't leave a bulky knot to irritate the skin or wear against the leather.
At Hab-To, we believe that every element of a piece should speak to its quality. Your stitching doesn't exist in a vacuum. It works in tandem with the physical components of your build. Using premium leather hardware is the best way to complement a flawless seam. A perfectly executed saddle stitch deserves a solid brass buckle or a hand-set rivet that matches its longevity. This holistic approach to the craft is what separates a simple item from a legacy piece that can be passed down through generations.
The Final Hammering and Burnishing
Once your needles are down, reach for your flat-faced hammer. This is a stitcher's best friend. Lightly tapping along the seam line does more than just look good. It closes the pricking holes and sets the thread deep into the grain. This "seating" process is vital for longevity. When the thread is recessed, it's protected from the daily abrasion of being pulled in and out of pockets. For a truly professional touch, apply a small amount of beeswax or edge finish over the exit points. This seals the fibers and prevents moisture from entering the stitch line, ensuring your hard work remains pristine for years.
Troubleshooting Snapped Threads Mid-Seam
Every artisan eventually faces the nightmare of a snapped thread in the middle of a long run. Don't pull the whole seam out. Troubleshooting leather stitching issues like this requires the "Invisible Join" technique. Unpick three or four stitches back from the break. Insert your new thread and overlap those existing holes, following the exact same path and tension. By backstitching over the old line and continuing forward, you create a join that's virtually impossible to spot. Inspect your thread path for sharp metal edges or micro-burrs on your needles to prevent future snaps. A little bit of maintenance on your tools goes a long way in preventing mid-project meltdowns.
Master Your Craft One Stitch at a Time
Flawless seams are the hallmark of a dedicated artisan. By now, you understand that success starts long before the first stitch. It begins with disciplined preparation, the right needle-to-thread ratio, and a consistent physical rhythm. Troubleshooting leather stitching issues is more than just fixing a mistake; it's about refining your relationship with the material and your tools. Every project is an opportunity to practice the patience and precision that this beautiful craft demands. Mastery doesn't happen overnight, but with the right approach, every seam you pull will be better than the last.
At Hab-To, we're proud to share over 160 years of family expertise with makers around the globe. Based in Amsterdam, we offer global shipping on premium Shell Cordovan and vegetable tanned leathers with no minimum order requirements for small-scale artisans. We're here to provide the mentor-like support and high-quality materials you need to elevate your work. Browse our collection of premium leathers and professional tools at Hab-To Leather House to find exactly what you need for your next masterpiece. Keep your needles sharp and your focus steady. The world needs more things made with heart.
Common Leather Stitching Questions
Why is my leather stitching slanted on one side but straight on the other?
This is a classic casting issue that occurs when the thread isn't looped consistently behind the needle. When you don't "cast" the thread, the back-side stitch loses its diagonal orientation and follows a straight path between holes. To fix this, ensure you always pass the second needle under the first and loop the thread over the needle in the same direction for every single stitch.
How do I stop my sewing machine from skipping stitches on thick leather?
Skipping stitches usually happens when the needle deflects or the machine's timing is off for heavy stacks. Ensure you're using a dedicated leather needle, typically size 110/18 or larger, and a walking foot to manage the layers. If the machine still struggles, you might be exceeding its torque limit, especially with dense vegetable tanned hides that require more piercing power.
What is the best thread for hand-stitching vegetable-tanned leather?
Waxed poly-braided thread is the modern favorite for its incredible strength and rot-resistance. Traditionalists often prefer waxed linen thread for its natural aesthetic and the way it "locks" into the leather grain over time. Both are excellent choices as long as the thread weight is matched to your pricking iron SPI to ensure the holes are properly filled.
Why does my thread keep fraying or snapping while I am sewing?
Your needle eye might be too small, which causes the thread to rub against the metal with every pull. Another common culprit is a micro-burr on your pricking iron or awl that creates tiny tears in the thread fibers as you work. Always inspect your tools for smooth finishes and ensure your thread is well-waxed to reduce friction during the sewing process.
Can I use a regular sewing machine for leather projects?
You can use a domestic machine for very thin garment leathers, but it isn't recommended for artisan projects. Standard machines usually lack the internal metal gears and high-clearance presser feet needed to punch through multiple layers of heavy leather without stalling. For thick veg-tan or belts, an industrial machine or traditional hand-stitching is a much safer bet for your project.
How do I prevent the presser foot from leaving marks on my leather?
Decrease the presser foot tension on your machine until it's just heavy enough to move the material. If the metal teeth still leave tracks, try switching to a Teflon foot or applying a small piece of masking tape to the bottom of your existing foot. This provides a smoother glide over delicate surfaces like Cordovan or Pueblo without scarring the grain.
What should I do if my needle holes are too large for my thread?
If the holes look like "gaping wounds," your thread is likely too thin for the pricking iron you used. You can try to mitigate this by lightly hammering the seam with a flat-faced hammer to compress the leather fibers around the thread. For your next project, always test your thread-to-iron ratio on a scrap piece to ensure a snug, professional fit.
How do I fix a mistake in my stitching without ruining the leather?
Carefully unpick the stitches one by one using a blunt needle rather than a sharp seam ripper. This prevents accidental cuts to the leather grain or the surrounding fibers. Once the thread is removed, you can re-stitch through the original holes. Troubleshooting leather stitching issues is much easier when you use the existing holes to maintain your alignment and keep the project looking clean.
