


How to Transfer a Pattern to Leather: A Professional Crafter’s Guide (2026)
A masterpiece isn't born during the carving or the stitching; it's won or lost in the first ten minutes of your project. You've likely felt that sinking feeling when a paper template shifts or ink bleeds into the grain of an expensive hide. Learning how to transfer a pattern with absolute precision is the boundary between a hobbyist's effort and a professional's legacy. We believe every piece of leather deserves respect. That respect begins with a blueprint that doesn't smudge, shift, or fade.
You probably agree that there's nothing more frustrating than struggling to see your lines on dark, textured surfaces or accidentally scarring the grain with the wrong tool. It's time to move past the guesswork. This guide promises to help you master expert leathercraft techniques, from using specialized tracing film to selecting the perfect stylus for the job. We'll walk through a repeatable workflow that guarantees crisp, accurate lines without damaging your material. You'll gain the confidence to treat every transfer as a professional blueprint for your best work yet.
Key Takeaways
- Understand why the unique, "active" nature of vegetable-tanned leather requires a pressure-sensitive transfer method rather than standard tracing.
- Master the professional workflow of how to transfer a pattern using tracing film to achieve zero shifting and perfect accuracy.
- Learn the critical step of "casing" your leather to ensure it records every detail of your stylus work without surface damage.
- Identify the specific tools, like silver marking pens, that allow for visible lines on dark hides without leaving permanent ink stains.
- Discover how the quality and selection of your base leather hide directly impact the clarity and longevity of your transferred designs.
Why Leather Requires a Specific Pattern Transfer Approach
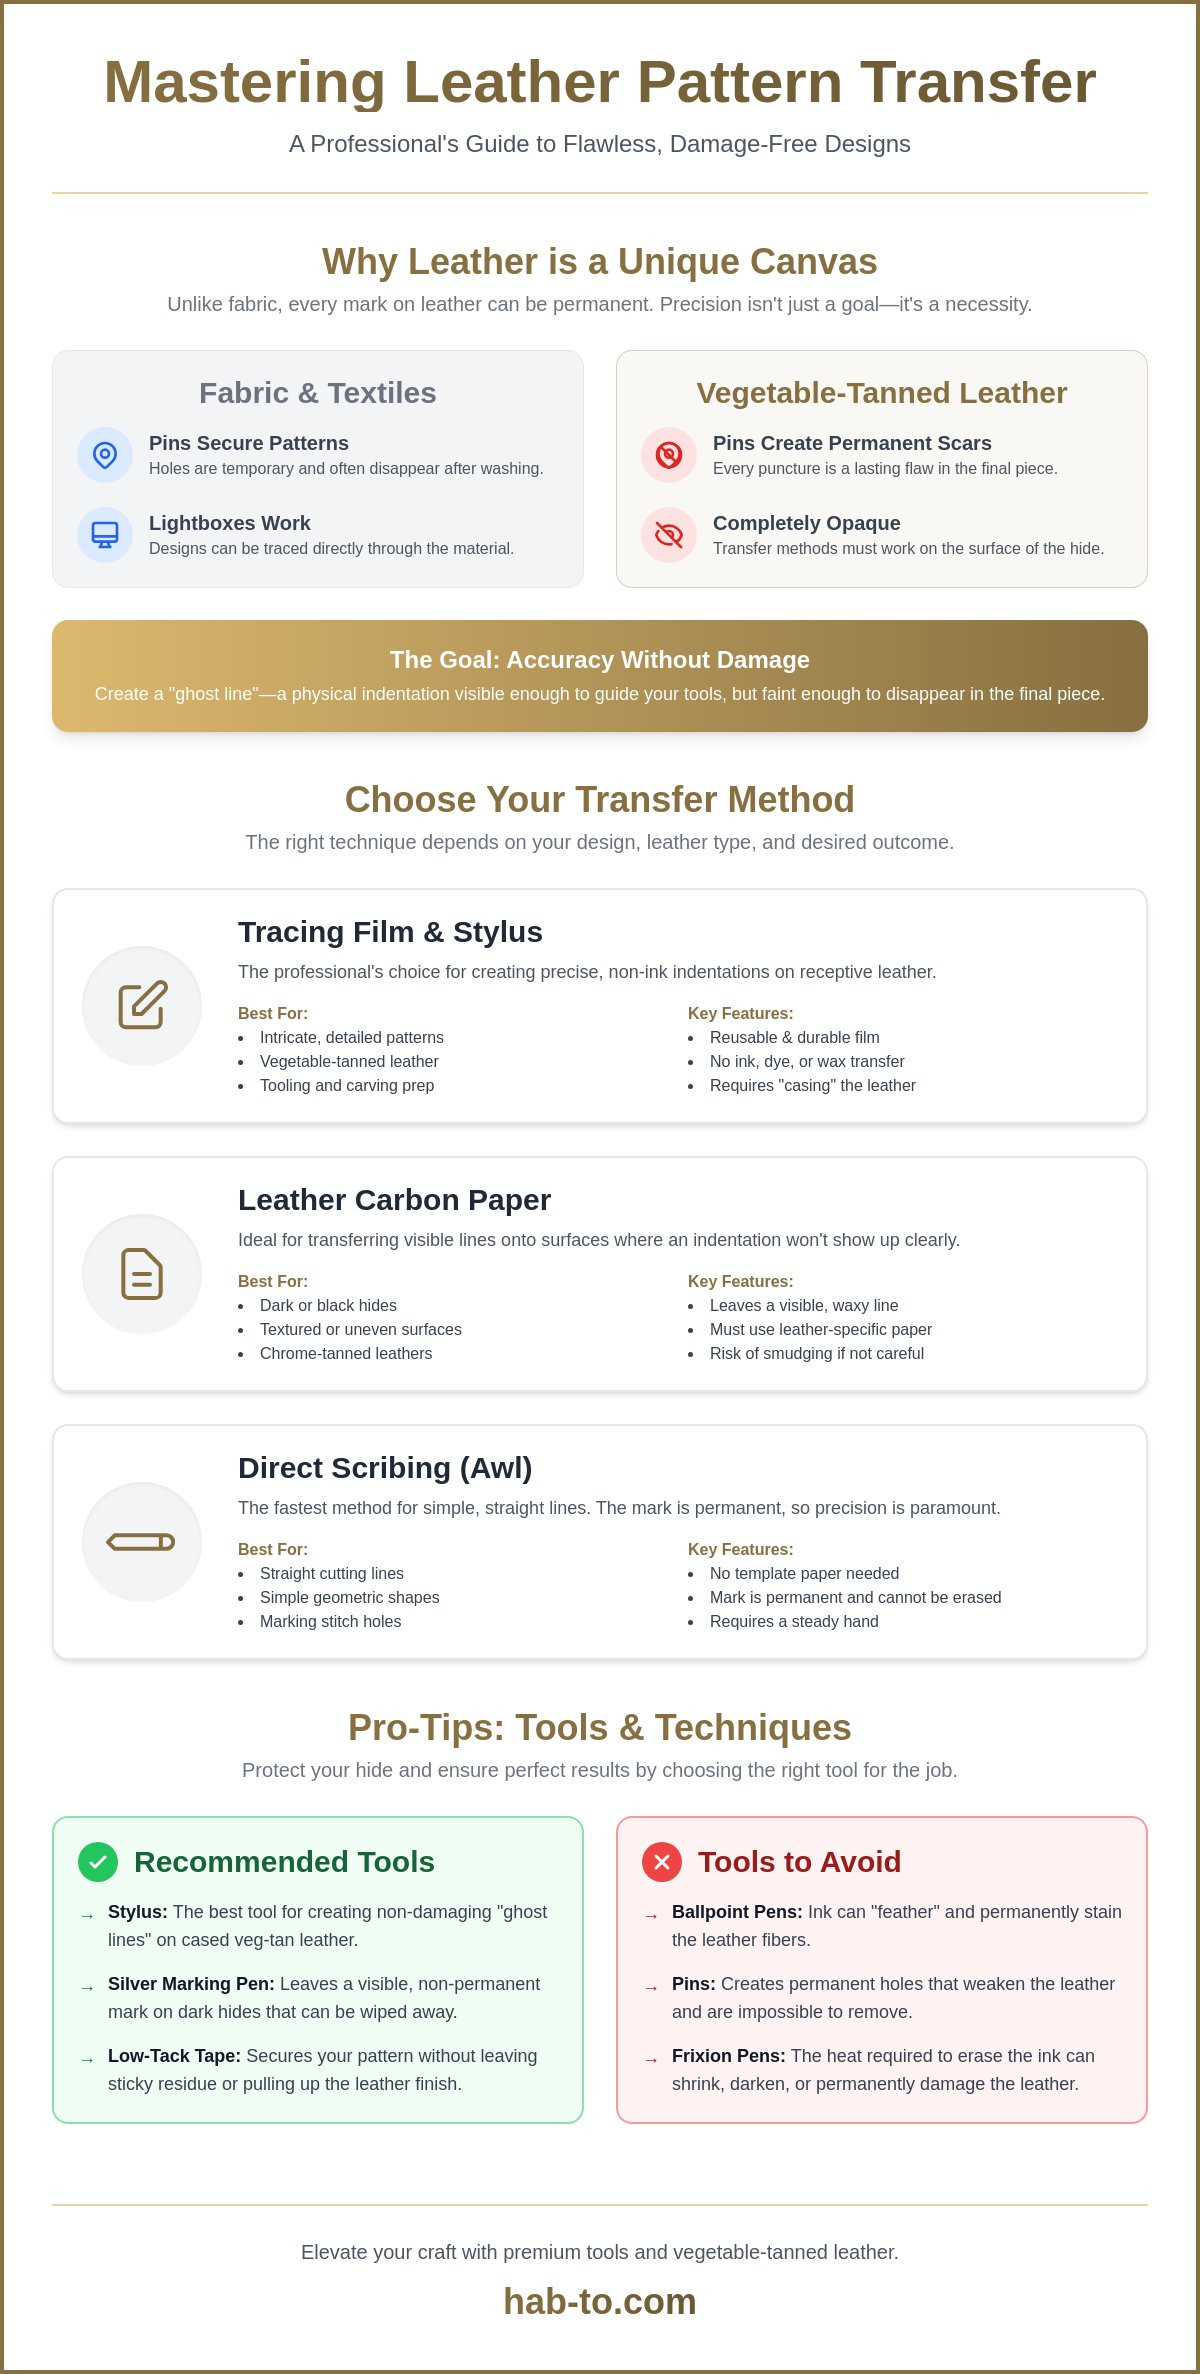
Leather is a living material. It doesn't behave like a sheet of cotton or a piece of synthetic fabric. When you're learning how to transfer a pattern, you have to realize that leather is completely opaque. You can't just put it on a lightbox and trace through it. Every mark you make on the surface is potentially permanent. This is especially true for vegetable tanned leather, which is "active." It records pressure and moisture with incredible sensitivity. If you press too hard with a stylus, that line stays there forever.
Chemical reactions are another factor many beginners overlook. Standard ballpoint inks often contain oils or dyes that react with the natural tannins in the hide. This can cause "feathering," where the ink spreads through the fibers like a stain that won't come out. Grain direction is equally critical. Leather has a natural "stretch" depending on which part of the hide you use. If you layout your pattern against the grain, your finished project might warp or lose its shape over time. Precision at this stage ensures your design remains structurally sound for decades.
To better understand the physical mechanics of this process, watch this helpful demonstration on the fundamentals of the transfer technique:
The Difference Between Fabric and Leather Transfers
In fabric work, pins are your best friends. In leathercraft, pins are your worst enemies. A pinhole in leather is a permanent scar that cannot be "healed" by washing or ironing. You also have to manage surface oils. These natural fats can prevent cheap ink from sticking or, worse, cause it to smudge across your workspace. Avoid using "Frixion" pens on premium hides. While they disappear with heat on fabric, the high heat required to erase them can shrink or darken the leather fibers, ruining your material before you even start cutting.
The Goal: Accuracy Without Permanent Damage
Your objective is to create a "ghost line." It should be visible enough for you to follow with your tools but faint enough to disappear during the final finishing process. This foundation is essential for mastering various Leather carving techniques, where the depth of your initial scribe determines the flow of your knife. By using a stylus to "scribe" the design, you're creating a physical indentation rather than a visual ink mark. Mastering how to transfer a pattern this way protects the grain. For the most professional results, always start with high-quality vegetable tanned leather. It takes a crisp impression and holds the intricate detail of your design far better than chrome-tanned alternatives.
Choosing Your Method: Tracing, Carbon, or Direct Scribing
Selecting the right technique depends on your design's complexity and the specific hide on your bench. For intricate floral work, professional crafters reach for tracing film. It's durable, reusable, and allows for the most precise pressure-based transfer. If you're working with dark or highly textured hides, leather carbon paper is your best ally. Unlike standard office carbon, leather-specific versions use a wax-based pigment that won't smudge or ruin the grain. This distinction is vital for maintaining a clean workspace.
Minimalists often prefer the scratch awl. It's the most direct way to work. This tool is perfect for straight lines and simple geometric shapes where you don't need a full template. You simply scribe directly onto the surface using a metal point. Just remember that once the tip touches the hide, the mark is there to stay. There is no erasing a scribe line, so steady your hand before you begin.
Securing your pattern is just as vital as the tool you choose. Direct taping with low-tack masking tape can hold your templates in place without leaving sticky residue. However, always test a small piece of tape on a scrap first. Some finishes are more sensitive to adhesives than others. If you want to ensure your layout is perfect before committing, mastering how to transfer a pattern begins with choosing the method that respects the leather's surface.
When to Use Tracing Film vs. Paper
Standard paper is fine for one-off projects or simple templates. But if you're repeating a design, matte acetate tracing film is superior. It doesn't tear or stretch under the heavy pressure of a stylus. This durability is a cornerstone of the official Leatherwork guide, which emphasizes pattern layout as a foundational skill for all crafters. To keep everything steady, use specialized leather weights. They provide enough downward force to prevent shifting without the risk of piercing the hide with pins or needles.
Material Matters: Pueblo vs. Shell Cordovan
The "temper" or stiffness of your leather dictates how much force you need. Softer, buffed leathers like Pueblo take impressions easily with very light pressure. On the other hand, dense materials like shell cordovan are much more stubborn. This dense, non-porous material requires a sharper scribe or even specialized silver pens to make the lines visible. You'll need to develop a "feel" for each material. Start with light strokes and gradually increase pressure until the line is crisp. If you're looking for the right gear to handle these varied surfaces, explore our curated leatherworking tools designed for professional precision.
Mastering how to transfer a pattern requires matching your method to your material. A heavy hand on a soft shoulder will create a deep trench you can't hide. A light touch on a dense cordovan butt will leave you squinting at invisible lines. Experience will teach you the balance; starting with the right method saves you from expensive mistakes on premium hides.
Step-by-Step: How to Transfer Your Pattern Using a Stylus
Moving from theory to the workbench requires a disciplined sequence. While some suggest using pencils or chalk, these often require aggressive sanding to remove later. The professional standard for how to transfer a pattern involves a stylus and a process called casing. This "no-ink" approach relies on physical impressions rather than surface pigments, preserving the natural beauty of the grain. It's a clean, repeatable workflow that separates master crafters from beginners.
First, prepare your workspace. Ensure your leather is free of dust or oils from your hands. If you're working with vegetable-tanned hides, you must case the material. Once the leather begins to return to its natural color but still feels cool to the touch, it's ready for the pattern. Position your template carefully. Since we never use pins, heavy leather weights are essential. These cast-iron or brass tools provide enough downward force to prevent shifting without leaving a mark. For complex curves, you might use small pieces of low-tack tape on the edges. Just be sure to test it on a scrap first to avoid pulling the grain.
Now, begin the tracing phase. Use a ball-tip stylus to follow your design lines. A single stylus usually costs between $8.99 and $18.80, though a set of three with six different tip sizes is often a better value at around $7.99. The variety allows you to switch between broad outlines and intricate details. Keep a steady hand and apply firm, even pressure. Before you fully remove the pattern, lift one corner. Check that the impression is deep enough to see clearly. If it's too faint, re-dampen the leather slightly and go over the lines again. Finally, once the pattern is removed, you can refine your guides using a scratch awl or wing dividers for absolute precision.
Tools You Will Need for a Professional Transfer
A successful transfer depends on having the right kit. You don't need a massive workshop, but these three items are non-negotiable for a professional result:
- Ball-tip stylus: These tools have rounded ends that glide over tracing film without tearing it.
- Heavy leather weights: These keep your template anchored. Precision is impossible if your pattern moves even a millimeter.
- Matte tracing film: Unlike paper, this film is waterproof and won't buckle when it touches dampened leather.
The Secret to Clean Lines: Pressure Control
Casing is the process of lightly dampening leather to accept impressions. Without this moisture, the fibers are too rigid to record the path of your tool. Maintain a consistent angle with your stylus to prevent the tip from digging in too sharply or skipping across the surface. Once your lines are transferred, you'll have the perfect roadmap for your leather stamping tools. These guides ensure every stamp sits exactly where it belongs, resulting in a balanced finish that honors the tradition of the craft.
Pro Tips for Transferring Patterns Without Damaging Your Hide
Every mark on a hide is a commitment. When you are refining your technique for how to transfer a pattern, the goal is to avoid any permanent accidents. Standard ballpoint pens are a common trap for beginners. The natural oils in the leather act like a wick, causing the ink to "feather" or bleed deep into the fibers. This migration can even reach the edges where you plan to burnish; it leaves a dark, messy stain that ruins the clean aesthetic of your piece.
If you are working with dark hides where a standard stylus impression is invisible, reach for a silver leather marking pen. These are designed specifically for the craft. The ink sits on the surface and wipes away easily with a specialized eraser or a damp cloth. Always test your tools first. Even low-tack masking tape can lift the finish of a delicate hide. Apply a small piece of tape to a scrap from the same hide to check for finish lifting before you anchor your main pattern.
For projects requiring long, straight lines, the "Prick and Connect" method is often more accurate than tracing the whole length. Use a fine stylus or awl to prick the corners of your design through the paper. Once the pattern is removed, connect these points using a steel ruler and a scratch awl. This prevents the slight wobbles that can happen when tracing against a flexible paper edge. It's a simple trick that ensures your structural lines are perfectly true.
Dealing with Dark or Textured Leathers
Black chrome-tanned leathers or deep-dyed veg-tans present a visibility challenge. White carbon paper is a reliable solution here. It leaves a bright, chalky line that stands out against the dark background. For extremely thick patterns, some crafters use the "Cut-Through" method. You lightly score the leather with a scalpel directly through the paper template. This creates a hair-thin guide that is perfect for precise cutting. On pebbled or heavily grained textures, a scratch awl is your best friend. It reaches into the valleys of the grain where a pen might skip or blot.
Pattern Maintenance and Reusability
If you find yourself using the same design repeatedly, your paper pattern will eventually degrade. Reinforce high-wear areas, especially corners and tight curves, with clear packing tape. This prevents the stylus from tearing through the paper. Store your templates flat in a portfolio. Creases in a paper pattern will distort how to transfer a pattern the next time you use it, leading to asymmetrical results. When a design becomes a staple of your production, it is time to upgrade to acrylic or brass templates.
Ready to elevate your workflow with professional-grade gear? You can find high-quality leatherworking tools and premium hides to ensure every project starts with a perfect transfer.
Elevating Your Craft with Premium Tools and Materials
The precision of your work is only as good as the surface you choose. You've mastered how to transfer a pattern using the right pressure and tools, but the material itself dictates the final result. A low-quality hide with inconsistent grain will fight your stylus at every turn. We believe that every artisan deserves a canvas that honors their effort. Hab-To Leather House brings 160 years of expertise to your workbench, ensuring that the leather you scribe today becomes a legacy piece tomorrow.
Choosing between different hides changes the transfer experience entirely. Shell Cordovan offers a dense, glass-like surface that requires a steady, sharp scribe. In contrast, Pueblo leather has a unique, buffed texture that accepts impressions with a soft, inviting ease. We specialize in sourcing these world-class materials, providing you with the same premium hides used by global luxury fashion houses. Our focus remains strictly on sustainable, vegetable-tanned leather. This traditional tanning process ensures the leather is "active" and responsive to your tools, making it the ideal choice for professional pattern work.
The Hab-To Difference: Expert Advice for Every Crafter
We see ourselves as more than just a wholesaler. We're your partners in this craft. Whether you're a seasoned professional or a hobbyist picking up a stylus for the first time, you deserve access to the best materials without the barrier of large industrial orders. We offer professional-grade quality with no minimum order requirements. This means you can experiment with the finest vegetable-tanned shoulders or sides, knowing you have the support of a family-run business with deep roots in the trade. If you have questions about which temper suits your specific project, we're here to offer the personal guidance you won't find at an anonymous warehouse.
Get Started with the Right Supplies
A perfect transfer is the foundation, but the finishing touches define the project. Once your lines are set and your carving is complete, explore our curated selection of leather hardware to give your work a professional edge. We invite you to join our growing community of artisans in Amsterdam and across the globe. Our mission is to keep the traditions of leathercraft alive through education and superior supplies. Sign up for our newsletter to receive deep dives into traditional techniques, or reach out to us directly for advice on how to transfer a pattern to your next specific hide. Let's build something beautiful together.
Mastering the First Impression
Mastering how to transfer a pattern is the definitive line between a hobbyist project and a professional masterpiece. You now have the technical foundation to choose the right medium, manage pressure on varied tempers, and protect your grain from ink damage. By treating your transfer as a sacred blueprint rather than a rough sketch, you respect the natural beauty of the hide. Every crisp impression you make today ensures your carving and stitching will flow with absolute intent.
At Hab-To Leather House, we bring over 160 years of family experience to your workbench. From our headquarters in Amsterdam, we ship world-class Shell Cordovan and Pueblo leathers to artisans across the globe. We believe that professional results start with the highest quality vegetable-tanned hides and tools that never compromise. Don't let inferior materials hold back your creativity. Explore our premium leather collection and start your next project with Hab-To Leather House. Your next legacy piece is waiting to be traced. We're honored to be part of your crafting journey.
Frequently Asked Questions
How do I transfer a pattern to leather without leaving permanent marks?
You can avoid permanent marks by using a stylus on cased leather to create a physical impression. This method is the professional standard for how to transfer a pattern because it doesn't rely on ink or dyes. The moisture in the leather allows the fibers to accept a "ghost line" that serves as your guide. Once you finish your carving or cutting, the mark remains part of the design's natural texture.
Can I use regular carbon paper on leather?
Avoid using regular office carbon paper because its oil-based ink can bleed into the leather fibers. Professional crafters use wax-based leather carbon paper instead. These specialized sheets leave a clear line that stays on the surface without migrating into the grain. If you're working on very dark hides, white or yellow carbon paper provides the contrast you need without the risk of permanent staining.
What is the best pen for marking on dark leather hides?
Silver leather marking pens are the professional choice for dark or black hides. The ink is specifically formulated to sit on the surface of the leather rather than soaking in. Once you've completed your cuts or stitching, the marks can be easily wiped away with a damp cloth or a specialized rubber eraser. This ensures your final product looks clean and free of construction guides.
How do I stop my pattern from sliding while I trace it?
Heavy leather weights or brass blocks are the most reliable tools for keeping a template in place. Since you cannot use pins or needles without leaving permanent holes, downward pressure is your only option. For larger projects, place a weight on each corner to prevent the paper from bowing or shifting. This stability is essential for achieving a professional, symmetrical result on every project.
Will a pencil ruin my vegetable-tanned leather?
Pencils can leave graphite stains that are nearly impossible to remove from the porous surface of vegetable-tanned leather. If you must use a pencil, keep your marks strictly within the areas that will be hidden by seams. For any visible parts of your design, a stylus or scratch awl is a far better choice. These tools create impressions that look natural and professional once the piece is finished.
How do I transfer complex floral designs for leather carving?
Using matte tracing film and a ball-tip stylus is the best method for intricate floral work. This setup allows you to see exactly where you've been while protecting the leather surface. Learning how to transfer a pattern this way ensures every petal and leaf is recorded as a crisp impression. This gives you a perfect roadmap for your swivel knife and stamping tools.
Can I use masking tape on premium leather finishes?
Low-tack masking tape is generally safe, but you should always perform a test on a scrap piece of the same hide first. Some premium finishes or delicate suedes can lift or discolor when the adhesive is removed. If the tape leaves a residue or pulls the grain, switch to leather weights to secure your pattern. Protecting the integrity of the finish is always the top priority.
What tool should I use to transfer straight lines for stitching?
A wing divider or a scratch awl paired with a steel ruler is the most accurate way to transfer straight lines. These tools create a physical scribe that won't fade or smudge as you work. For stitching lines, the wing divider is particularly useful. It allows you to maintain a consistent distance from the edge, ensuring your seams are straight and professional every time.
