


DIY vs. Professional Leather Tools: Is the Artisan Upgrade Worth It?
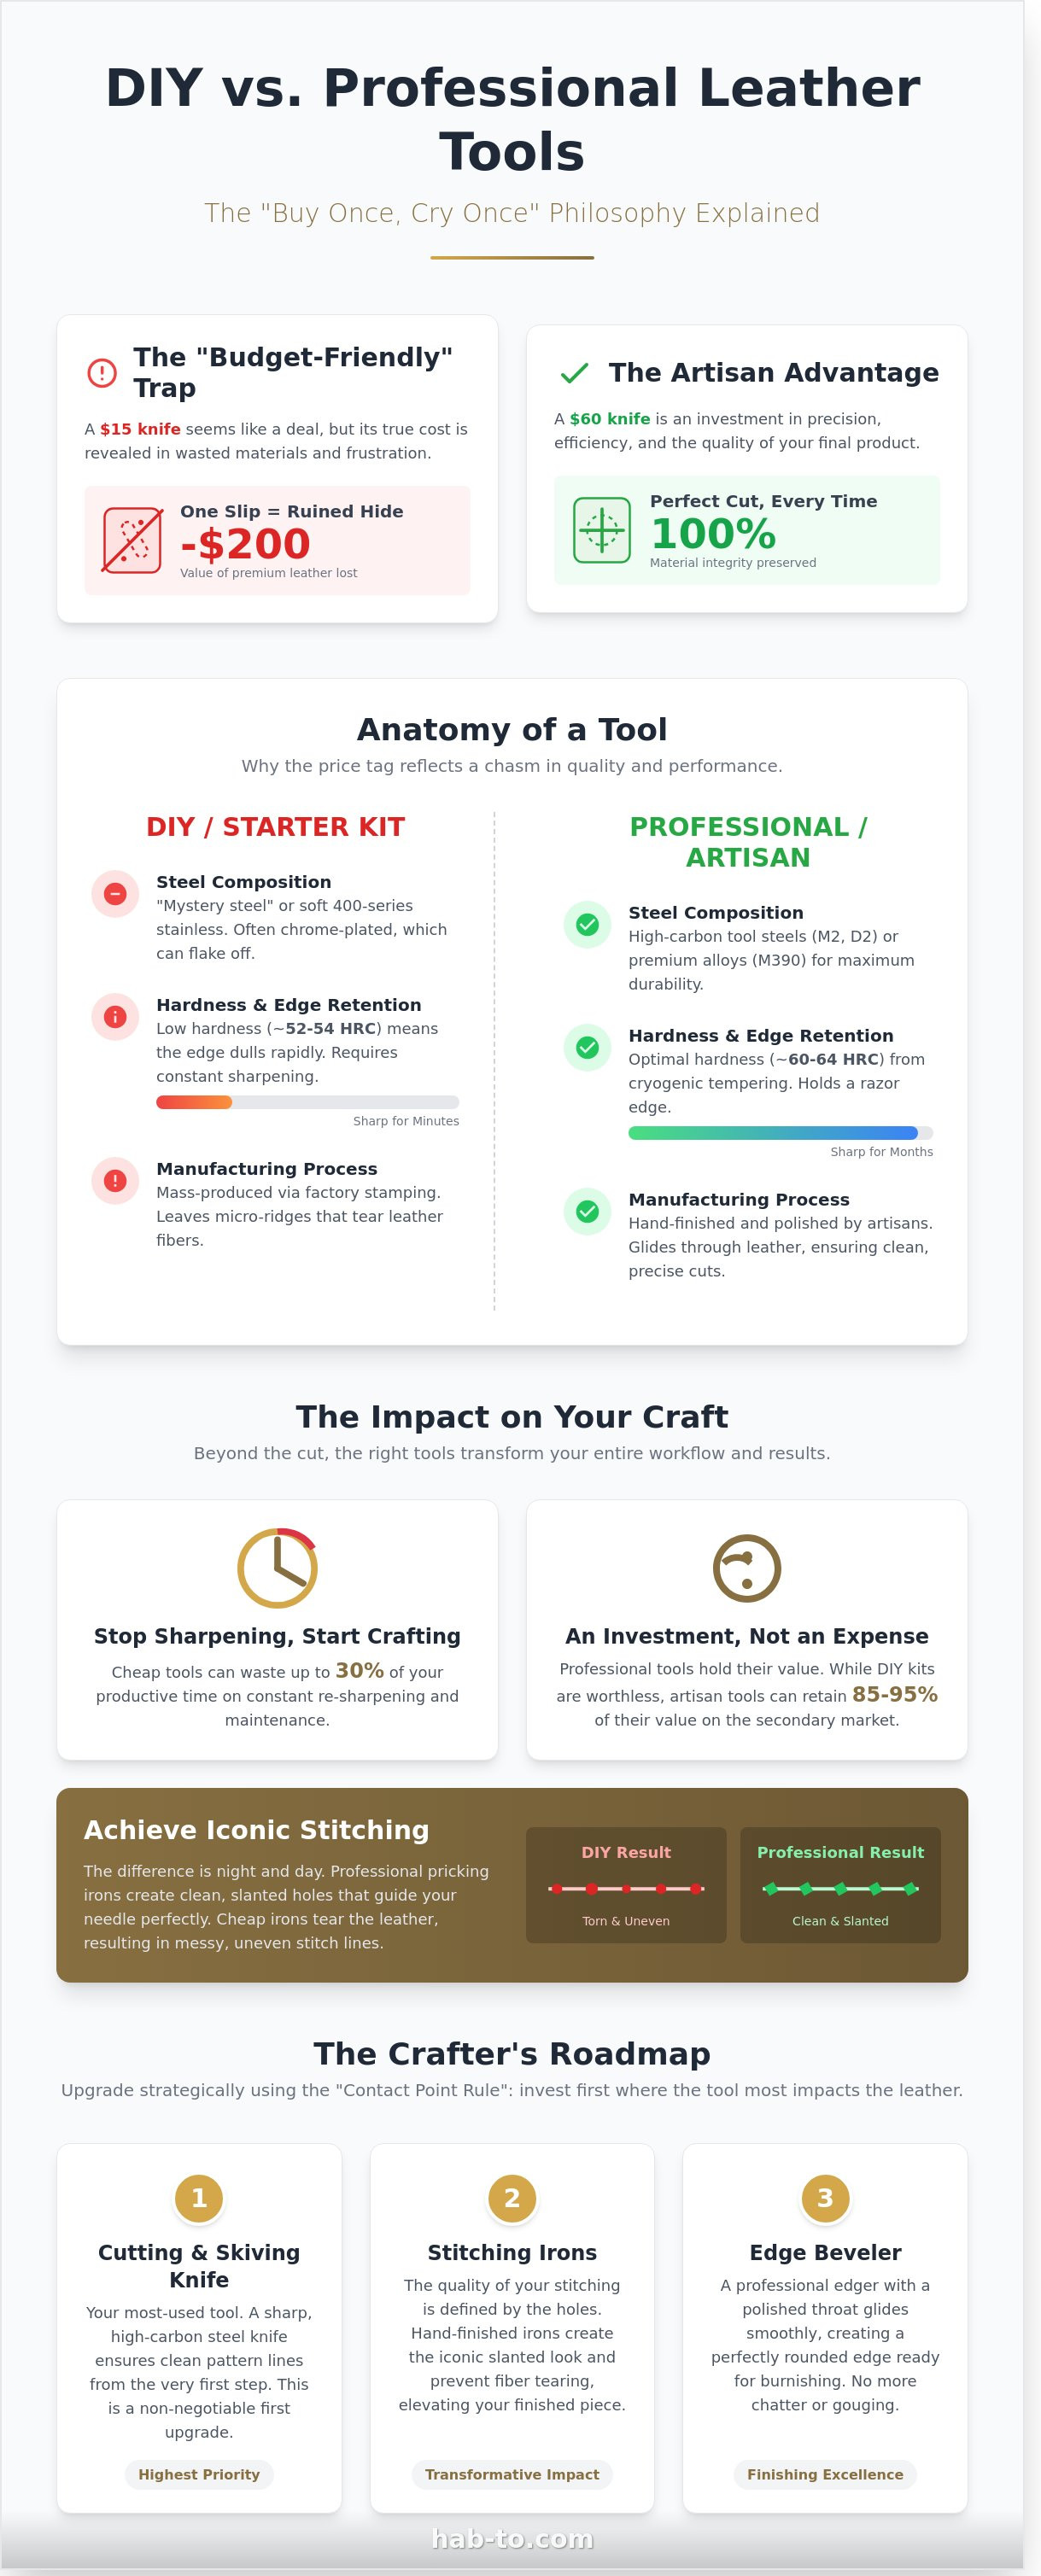
What if the "budget-friendly" starter kit you bought is actually the most expensive mistake in your workshop? Most makers start with mass-produced kits because they seem like a safe entry point. However, after 160 years of family experience in the leather trade, I've seen how a $15 knife can ruin a $200 hide in seconds. When comparing DIY vs professional leather tools, the real cost isn't the price tag; it's the wasted material and the physical strain on your hands.
You likely feel the frustration of stitching irons that bend after ten holes or bevelers that tear fibers instead of slicing them. Hi, I'm Mike! I believe craftsmanship should be about joy, not a struggle against poor equipment. This article explores the technical differences in steel hardening and edge geometry to help you decide when to invest. You'll get a clear priority list of which tools deserve the artisan upgrade so you can achieve better results with half the effort. No synthetics. No compromises. Just the facts you need to level up your craft.
Key Takeaways
- Understand the "buy once, cry once" philosophy and why high-carbon steel tools outperform mass-produced, chrome-plated alternatives.
- Learn how professional heat treatment and hand-finished geometry keep your edges razor-sharp for months rather than minutes.
- Compare the technical results of DIY vs professional leather tools to achieve that iconic, high-end slanted stitching look.
- Master the "Contact Point Rule" to strategically decide which tools to upgrade first based on your specific leatherworking niche.
- Discover how artisan-grade tools respect the integrity of premium hides, ensuring your craftsmanship matches the quality of your leather.
DIY vs. Professional Leather Tools: The "Buy Once, Cry Once" Philosophy
Choosing your first set of tools is a defining moment for any maker. You face a choice between a $30 all-in-one kit or spending $60 on a single, high-quality skiving knife. The "Buy Once, Cry Once" philosophy argues that the initial sting of a premium price is far better than the recurring frustration of tool failure. When comparing DIY vs professional leather tools, the difference starts with the metal itself. DIY tools are typically mass-produced from "mystery steel" with chrome plating that can flake off into your project. Professional tools utilize high-carbon steel or M390 alloys, hand-finished to a mirror polish so they're ready to work the moment they arrive.
To see the difference high-quality gear makes in a real workshop, watch this breakdown of professional-grade essentials:
The hidden cost of cheap tools often exceeds the price of an artisan upgrade. A dull beveler that skips can ruin a $200 vegetable-tanned hide in a split second. Beyond material waste, poor tool geometry causes repetitive strain. If you're fighting the material rather than gliding through it, you're likely over-pressing to compensate for a lack of sharpness. This creates bad habits that hinder your progress in mastering essential leather crafting techniques.
The "Starter Kit" Trap
Most all-in-one kits found on large marketplaces contain roughly 50% filler tools you'll never actually use. These kits prioritize quantity over utility. The steel used in these sets often lacks the proper heat treatment, meaning it won't hold an edge for more than 10 minutes of work. This forces you into a cycle of constant re-sharpening, which eats up 30% of your productive crafting time. Cheap tools don't just slow you down; they lower the quality of your finished edges and stitching lines.
The Artisan Advantage
Upgrading to professional tools changes your relationship with the craft. High-end tools from makers like Palosanto or Chartermade are designed with ergonomics that reduce hand fatigue by approximately 25% during long stitching sessions. There's also a significant financial upside. While DIY tools have zero resale value, professional artisan tools are highly sought after. On secondary markets, premium leather tools frequently retain 85% to 95% of their original retail value. It's an investment in your craft that holds its worth. Using a tool that feels like a natural extension of your hand provides a psychological boost, allowing you to focus on design rather than struggling with your equipment. If your progress has stalled, it's possible your skill ceiling is actually a tool ceiling in disguise.
The Anatomy of a Professional Tool: Why the Price Tag Matters
Professional tools aren't just about status; they're about the physics of the cut. When weighing DIY vs professional leather tools, the difference starts at the molecular level. A budget edger might look identical to a boutique version from a distance. Once you hit the workbench, the gap becomes a chasm. Professional tools utilize high-carbon tool steels like M2 or D2, which are engineered to withstand high heat and abrasion. Cheap alternatives often rely on soft 400-series stainless steel. It's easy to sharpen, but it loses its bite after three feet of vegetable-tanned leather.
The secret lies in the heat treatment. Master toolmakers use precise cryogenic tempering to reach specific hardness levels. This ensures the tool doesn't chip under pressure or dull prematurely. It's the difference between a tool that works for you and a tool you have to work for every ten minutes.
Steel and Edge Retention
Understanding Rockwell Hardness (HRC) is vital for any serious maker. Most professional leather knives sit between 60 and 64 HRC. In contrast, mass-produced "starter" tools often linger around 52 to 54 HRC. While stainless steel sounds appealing because it resists rust, it frequently lacks the carbon structure needed to hold a "razor" edge. High-carbon steel allows for a finer grain structure. This makes it possible to create a microscopic "burr" during sharpening that is both sharp and durable. If you want to spend more time crafting and less time at the sharpening stone, choosing premium tools is the only logical path.
Hand-Finishing vs. Factory Stamping
Factory tools are typically stamped out of sheet metal, leaving jagged micro-ridges along the cutting edge. This leads to the "Barry King" effect. Artisan makers like King hand-file the teeth of their pricking irons and polish the throats of their edgers. This manual labor ensures that the tool glides through the grain rather than tearing it. When a tool is hand-finished, it eliminates the "chatter" or stuttering effect often seen with budget edgers on soft chrome-tanned hides.
The technical advantage is measurable. Hand-polishing the contact surfaces of a leather tool reduces friction by up to 40% compared to standard factory-ground finishes. This reduction in resistance means you apply less force, which protects your wrists during long sessions. It also results in a cleaner, professional-grade stitch transition that DIY vs professional leather tools simply can't replicate. Quality tools provide balance. Whether it's an ebony handle or a weighted brass bolster, the ergonomics ensure the tool becomes an extension of your hand, not a source of fatigue.
Direct Comparison: Where Quality Impacts Your Finished Product
The gap between DIY vs professional leather tools becomes obvious the moment steel meets hide. While budget kits help you learn the basic mechanics, they often fight against the material. High-end tools work with the leather's natural fibers. When you upgrade the "Big Three"—your knife, stitching irons, and edgers—you aren't just buying brand names; you're investing in the physical integrity of your work. Professional tools allow for a level of refinement that cheap stamped steel simply cannot replicate.
Stitching Irons: The Visual Difference
Factory-made irons from starter kits often have rough, unpolished teeth. These teeth tear through vegetable tanned leather, leaving "fuzzy" or jagged holes that swallow up your thread. In contrast, artisan pricking irons are hand-polished to a mirror finish. They pierce the leather cleanly, creating a distinct 45-degree slanted hole. This specific geometry is what creates the iconic "leaning" look of a high-end saddle stitch.
- Hole Cleanliness: Polished tines prevent the leather from sticking to the tool, ensuring the grain doesn't puckers as you pull the iron out.
- Consistent Tension: Professional spacing is often machined to 0.01mm tolerances. This precision prevents the leather from bunching or wrinkling between stitches.
- Thread Longevity: A smooth hole reduces friction on the thread. This prevents the wax coating from stripping off, which keeps your seams tight for years.
Cutting and Skiving: Safety and Precision
Many beginners assume a dull knife is safer because it's less "scary." The opposite is true. A cheap DIY knife requires three times the downward pressure to make a cut. That extra force is exactly how slips and deep gouges happen. Professional Japanese skiving knives or French edgers arrive with a surgical edge that glides through the densest parts of the hide with minimal effort.
Precision is vital when working with luxury materials like Shell Cordovan. To create a slim wallet, you need a "zero-taper" skive. This means thinning the leather edge down to a consistent 0.4mm so it can be folded without adding bulk. A professional blade holds its angle perfectly, whereas a flexible budget blade might chatter or dig too deep. The balance of a professional handle also shifts the weight toward the blade, giving you better control over long, straight cuts.
Burnishing and Edge Work
Edge finishing is where most hobbyists lose steam. A budget edger often leaves a "stepped" or uneven corner that requires 20 minutes of sanding to fix. A professional edger removes a single, continuous ribbon of leather, leaving a perfectly rounded radius. This clean cut reduces your sanding time by roughly 75%. When you start with a clean edge, your burnishing happens faster and the resulting shine lasts longer because the fibers weren't crushed during the trimming process.
The Crafter’s Roadmap: When and What to Upgrade First
Stop buying pre-packaged kits. Most beginners waste 40% of their initial budget on tools they'll replace within six months. To navigate the shift from DIY vs professional leather tools, you need a sequence that prioritizes the finish of your product over the size of your tool rack. The "Contact Point" Rule is your best guide. If a tool makes direct, sustained contact with the hide, it deserves your investment. A cheap mallet still hits things, but a cheap knife ruins a premium side of vegetable-tanned leather in one slip.
Before you buy more gear, identify your niche. A wallet maker needs 3.0mm pricking irons for fine detail, while a bag maker requires heavy-duty skiving knives for thick gussets. Regardless of your niche, invest in sharpening supplies before buying a single "pro" tool. Even a high-end knife performs like a budget blade if you can't maintain it. A 1000/6000 grit whetstone and a leather strop should be your first purchases. This allows you to find the "Sweet Spot" with brands like Palosanto or Kevin Lee, which offer 90% of the performance of boutique custom tools at a fraction of the cost.
Priority #1: The Cutting Edge
Your first major upgrade should be a high-quality skiving knife or a fixed-blade Japanese utility knife. Disposable snap-off blades work for cutting patterns, but they lack the rigidity needed for precise thinning. A "lifetime" blade made of high-carbon steel holds its edge through 50 or 60 cuts before needing a strop. This level of precision is vital when prepping for leather hardware installation. Clean, consistent skiving ensures your rivets and snaps sit flush against the leather, preventing the bulky, amateur look that often defines the DIY vs professional leather tools divide.
Priority #2: Stitching and Edging
When you're ready for the "artisan" look, move from diamond chisels to pricking irons. Pricking irons mark the spacing and angle without punching through, allowing you to use a diamond awl for a cleaner hole. This creates the classic slanted stitch pattern seen in high-end European leather goods. Next, get a professional edge beveler. While a budget tool often "chews" the leather fibers, a pro-grade beveler removes a single, clean ribbon. This makes burnishing twice as fast. Leave the expensive brass hammers for last. A basic poly mallet provides the same force without the "collector" price tag.
If you're unsure which tool will solve your specific bottleneck, I'm here to help. Explore our curated selection of professional tools and find the right fit for your workshop.
Hab-To’s Selection: Tools for Real Craftsmanship
At Hab-To Leather House, we live by a simple rule: "No Synthetics. No Compromises." This philosophy guides how we source our vegetable-tanned hides and how we select the tools to work them. We believe your equipment should match the integrity of the material. When you're working with premium leathers like Pueblo or Buttero, the tool's precision determines whether you enhance the hide or damage it. A cheap, dull blade can crush the fibers of a dense 2.0mm Buttero shoulder, whereas a hand-selected skiving knife glides through it with minimal resistance. I've spent years testing these edges to ensure they meet the standards of our 160 year family legacy in the leather trade.
The debate between DIY vs professional leather tools often comes down to the finish. Professional tools are engineered to maintain their edge through thousands of strikes and cuts. Our curation process focuses on durability and ergonomics. We select tools that allow for the micro-adjustments needed when working with the unique textures of Italian leathers. For instance, the slightly rough surface of Pueblo leather requires a specific beveling angle to achieve that glass-like burnished edge. Our tools provide the consistency required to reach that level of artisan finish every single time.
The Mentor’s Choice
I often see makers fall into the "Starter Kit Trap" where they buy 20 mediocre tools and only use three. To help you avoid this waste, I recommend my "Essential 5" for any serious workshop: a high-carbon steel skiving knife, a set of polished pricking irons, a diamond awl, a precision edge beveler, and John James needles. These five items form the backbone of professional work. If you're unsure where to start, I offer personal consultations to help you pick the right gear for your specific projects. We also dive deep into these choices on "The Leather Hour" podcast, where we share insights from the workshop to help the community grow.
Your Next Step in the Craft
Moving from hobbyist to artisan is a shift in mindset. It's about choosing materials and tools that last a lifetime. High-quality tools are a fundamental part of sustainability in our craft. Instead of replacing a snapped zinc tool every six months, a professional steel tool stays in your kit forever. This reduces waste and ensures your technique remains consistent year after year. Whether you're ready to upgrade your workshop or you're just starting your journey with premium vegetable-tanned leather, I'm here to help. You can book a consultation online or visit our Amsterdam showroom by appointment to feel the weight and balance of these tools yourself. Let's make something that lasts.
Elevate Your Craft With Tools That Last a Lifetime
Stepping up from basic hobby gear to professional equipment marks a significant milestone in any maker's journey. When you weigh the benefits of DIY vs professional leather tools, the difference shows in the precision of every cut and the consistency of every stitch. High-quality tools reduce physical strain and prevent the frustration of ruined hides. You're not just buying a knife or a pricking iron; you're investing in a legacy. Hab-To brings 160+ years of family expertise to your workbench. Mike hand-selects every item in our shop to ensure it meets the standards of real craftsmanship. No synthetics. No compromises.
Whether you're refining your edges or upgrading your stitching kit, the right gear turns a difficult task into a meditative process. We believe every artisan deserves access to the best materials, so we provide premium leathers with no minimum order requirements. It's time to stop fighting your tools and start letting them work for you. Browse our curated collection of professional leatherworking tools and feel the difference that quality makes in your next project. Happy crafting!
Frequently Asked Questions
Do I really need expensive tools to start leatherworking?
You don't need a massive investment to begin your journey. Most beginners start successfully with a basic 5-piece kit including a utility knife, a wing divider, and a few harness needles. While professional tools offer better ergonomics, 90% of your initial skill comes from practice rather than the price tag of your mallet. Focus on mastering the basics before spending hundreds on boutique brands.
What is the difference between a stitching chisel and a pricking iron?
A stitching chisel is designed to punch all the way through the leather, while a pricking iron only marks the spacing and angle. Professional leatherworkers use pricking irons to create a 45-degree guide mark and then finish the hole with a diamond awl. This two-step process, common in 19th-century French saddlery, ensures the back of the stitch looks as clean as the front. It's the hallmark of high-end traditional craft.
Which leather tool should I upgrade first?
Your cutting tool is the most impactful upgrade when comparing DIY vs professional leather tools. A high-quality Japanese skiving knife or a custom-made round knife holds an edge 3 times longer than a standard utility blade. This precision reduces hand fatigue and prevents ruined hides. After the knife, prioritize a professional edge beveler to achieve that smooth, glass-like finish on your edges that cheaper alternatives can't replicate.
How do I know if my leather tools are actually high-carbon steel?
Check the manufacturer specifications for a Rockwell Hardness (HRC) rating between 60 and 64. High-carbon steels like M2, DC53, or Blue Paper Steel are industry standards for professional gear. If a tool doesn't list its specific steel type, it's likely a softer alloy. These softer metals require sharpening after every 10 to 15 cuts, while high-carbon steel stays sharp through hours of intensive work.
Why do professional leather tools come unsharpened sometimes?
Many artisan toolmakers ship blades with a factory edge because they expect the craftsman to hone the final angle. Every maker has a preferred sharpening routine using specific 1000 to 6000-grit whetstones. By leaving the final polish to you, the maker ensures the tool fits your specific hand pressure and cutting style. It's a tradition that respects the user's individual technique and deep knowledge of their own craft.
Can I make professional-grade goods with DIY tools?
You can definitely produce high-end items, but the gap between DIY vs professional leather tools usually shows in the time spent on finishing. Budget tools often require 40% more manual sanding and stropping to reach the same result. A master can build a masterpiece with a simple blade, but professional tools are designed to make that excellence repeatable and significantly faster for daily production tasks.
How do I maintain professional leather tools to make them last a lifetime?
Strop your blades every 20 minutes of active use to maintain the microscopic edge. Apply a thin coat of camellia oil once a month to prevent oxidation, especially if your workshop has over 50% humidity. Store your tools in a wooden rack or a leather roll rather than a loose drawer. This simple habit prevents the delicate teeth of irons from chipping against each other and keeps them pristine.
Is it better to buy a tool set or individual professional tools?
Buying individual tools is almost always the smarter choice for long-term quality. Most pre-packaged sets include 2 or 3 filler items that you'll never actually use in your workshop. Instead, invest your budget into 4 essential professional-grade tools: a knife, a beveler, a set of irons, and a quality maul. This approach ensures every cent goes toward gear that won't need replacing after 6 months of use.
