


How to Use a Stitching Groover: The Artisan’s Guide to Professional Leatherwork
The most beautiful hand-stitch in the world is essentially a ticking time bomb if it sits exposed on the leather surface. Without a recessed channel, every time a wallet slides into a pocket, the thread grinds against the fabric until it eventually snaps. Learning how to use a stitching groover is the defining moment when a hobbyist becomes an artisan. It is the secret to creating pieces that do not just look professional, but actually last for generations.
I understand the hesitation you feel before making that first cut. It is nerve-wracking to take a sharp blade to a pristine piece of vegetable tanned leather, fearing a slip might gouge the surface or leave you with a wandering, uneven line. I am here to show you that it doesn't have to be a gamble. This guide will help you master the art of the groover to create recessed, protected, and perfectly straight stitch lines. We will cover everything from tool calibration to the specific techniques required for clean channels, giving you the confidence to build leather projects of true heirloom quality.
Key Takeaways
- Understand the structural necessity of recessed channels to protect your hand-stitched seams from friction and premature fraying.
- Learn the precise steps for calibrating your tool's guide arm to ensure your stitch lines perfectly complement your edge work.
- Master the 90-degree grip and steady motion required when learning how to use a stitching groover to prevent slips and uneven gouges.
- Troubleshoot common issues like blade skipping on oily leathers and discover how to salvage a project if you cut too deep.
- Extend the life of your equipment with professional maintenance tips for sharpening and protecting the delicate groover blade.
What is a Stitching Groover and Why is it Essential?
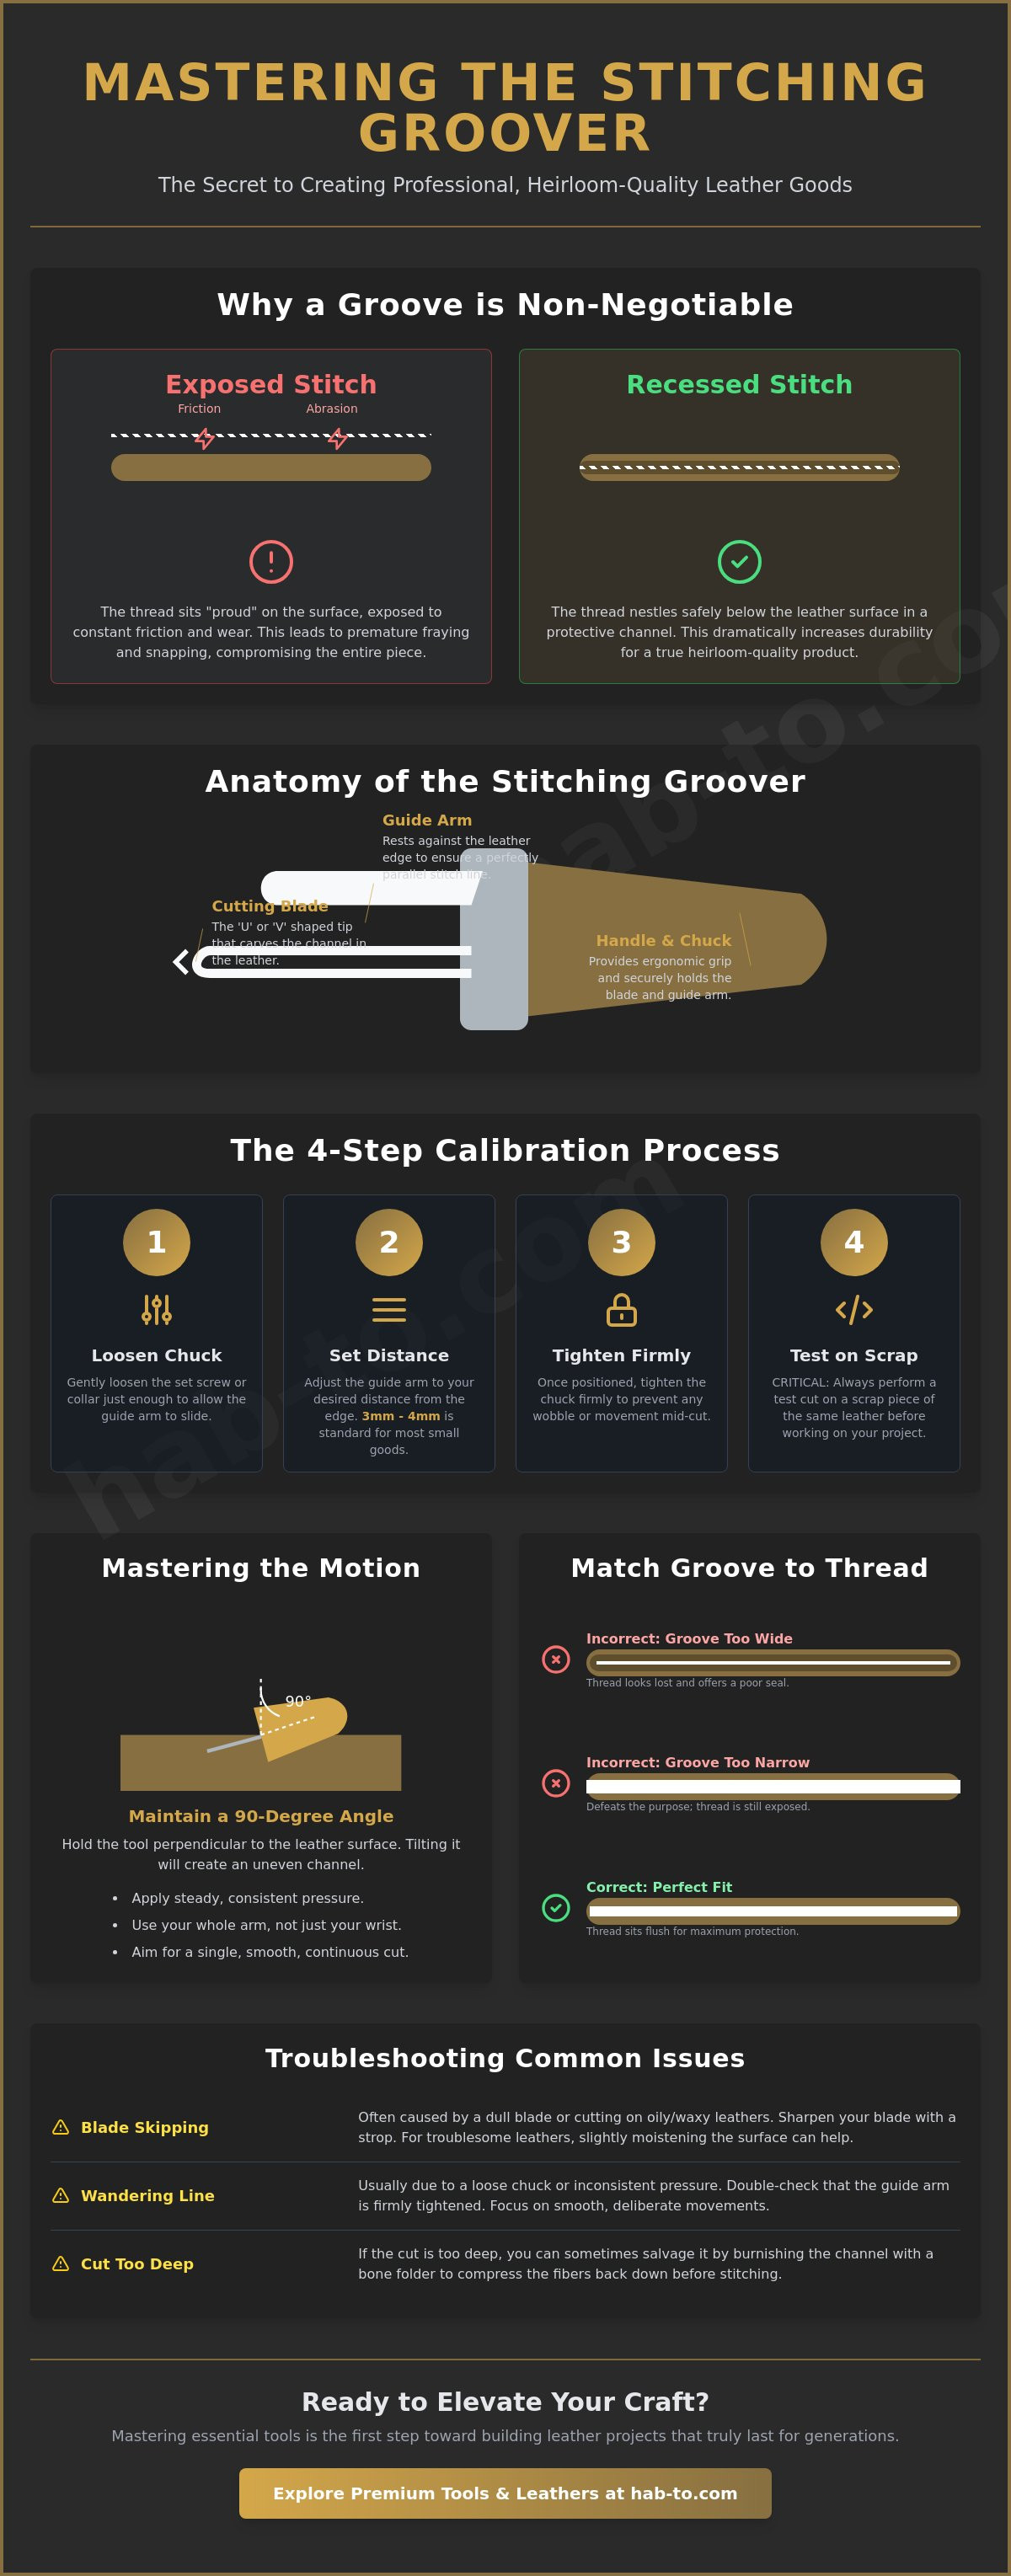
A stitching groover is a precision instrument designed to remove a thin, uniform sliver of leather from the surface of your project. Unlike a simple scratch or a pressed line, this tool creates a dedicated, hollowed-out channel. This channel allows your thread to nestle safely below the grain surface. If you want to master how to use a stitching groover, you must first understand its structural role. It isn't just about aesthetics; it's about engineering a seam that survives years of friction and daily use.
I believe that high-quality materials, like the premium vegetable tanned leather we select so carefully, deserve construction techniques that honor their durability. This is the heart of the "Hab-To" philosophy. We don't make concessions on the steps that ensure longevity. Without a groove, your thread sits "proud" on the leather surface. It catches on pockets, rubs against clothing, and grinds against every surface it touches. Eventually, that friction wins and the thread snaps. A grooved seam protects the heart of your work, ensuring your stitches remain intact for decades.
The Anatomy of the Tool
Understanding your tools is the first step toward expertise. A standard adjustable groover consists of three main components:
- The guide arm: This adjustable metal bar rests against the edge of your leather. It maintains a perfectly parallel distance, ensuring your stitch line doesn't wander.
- The cutting blade: This is a tiny, hollowed-out tip, usually 'U' or 'V' shaped. It does the heavy lifting by lifting a thread-like curl of leather out of the grain.
- The handle and chuck: A solid, ergonomic grip is vital. The chuck holds the blade and guide arm in place; if it isn't tightened properly, your line will wobble and ruin the piece.
Grooving vs. Marking: When to Use Each
In the long tradition of Leather crafting, choosing the right marking method is a sign of a seasoned maker. For heavy-use items like belts, dog leathers, or wallets, a groover is non-negotiable. The recessed channel ensures the saddle stitch sits flush with the surface, creating a smooth profile that won't snag.
You might opt for a wing divider or a creaser when working with very thin leathers or when you want a purely decorative line. These tools compress the fibers rather than removing them. However, for a professional finish on thicker vegetable tanned projects, knowing how to use a stitching groover correctly is the only way to achieve that "sunken" stitch look. It provides the necessary depth to hide the thread without compromising the structural integrity of the leather. The result is a clean, intentional line that screams quality.
Calibrating Your Tool: Setting the Width and Depth
Calibration is the bridge between a good idea and a flawless execution. Before you ever touch your project, you must set the tool to match the specific geometry of your piece. Most adjustable groovers feature a threaded chuck or a small set screw near the base of the handle. Loosen this collar just enough so the guide arm slides with minimal resistance. If you force it while it's tight, you risk bending the arm and losing your parallel alignment forever.
Position the blade by measuring the distance from the edge. For most wallets or small leather goods, a distance of 3mm to 4mm is standard. If you have already beveled your edges, ensure the blade sits slightly inward from where the bevel ends. You want the stitch line to sit on the flat grain, not on the slope of the edge. Once the arm is positioned, tighten the chuck firmly. A loose blade will wander mid-cut, creating a wavy line that is impossible to fix.
Never, under any circumstances, take your tool to your main project first. I always keep a "test strip" of the exact same vegetable tanned leather I am using for the project. Perform a scrap test to check the alignment. You are looking for a smooth, unbroken ribbon of leather curling out of the blade. If the tool is tearing the grain or skipping, your blade is likely dull or your angle is off. Mastering how to use a stitching groover starts with this disciplined preparation.
Matching Groove Width to Thread Weight
A common mistake is ignoring the relationship between the groove and the thread. If you are using a fine 0.6mm braided polyester thread, a wide, aggressive groove will make the stitches look lost or "swimming" in the channel. Conversely, a thick 1.0mm thread forced into a narrow groove will sit too high, defeating the purpose of the tool. Having a variety of leatherworking tools with different blade widths allows you to match the channel to the thread diameter. A snug fit creates a more waterproof seal and a much cleaner aesthetic.
Setting the Depth for Different Hides
The "one-third rule" is your best safeguard. You should never cut deeper than one-third of the leather's total thickness. For a 2.0mm thick piece of vegetable tanned leather, your groove should be roughly 0.6mm deep. If you go deeper, you compromise the structural integrity of the seam. Firm tempers require a steady, heavy hand to maintain depth, while softer leathers need a lighter touch to avoid slicing right through. Correct depth allows the leather fibers to slightly "close" over the thread after you've finished stitching and burnishing, which locks the seam in place and creates that coveted heirloom look. This level of detail is essential when learning how to use a stitching groover for professional results.
Mastering the Motion: A Step-by-Step Guide
Execution is where your preparation finally meets the hide. I've seen many beautiful projects falter because the maker rushed this stage. Before you begin the actual cut, your edges must be absolutely squared and sanded. If your edge has "waves" or uneven thickness, the guide arm will follow those imperfections, telegraphing every mistake into your stitch line. Think of your edge as a rail; the smoother the rail, the smoother the ride for your groover.
Your grip determines the consistency of the channel depth. Hold the handle firmly but avoid a "death grip" that causes hand fatigue. The most critical rule is maintaining a consistent 90-degree angle to the leather surface. If you tilt the tool forward or backward, the blade will either dive too deep or skip across the grain. When you start the pull, engage your shoulder and elbow rather than flicking your wrist. Long, continuous movements produce the cleanest results. By using your larger muscle groups, you maintain a steady pressure that a trembling wrist simply cannot match.
As the blade moves, it will lift a thin "noodle" or sliver of leather. Let it curl away naturally. Once you reach the end of your line, clear the channel with a soft brush or your fingertip. This allows you to inspect the cut for any inconsistencies before you move on to punching your holes. Learning how to use a stitching groover is as much about disciplined observation as it is about physical action.
The Secret to Straight Lines
Experienced artisans often use their index finger as a secondary guide. Place your finger against the edge of the leather, just ahead of the guide arm. This creates a "human fence" that provides instant tactile feedback. If the tool starts to drift, your finger will catch it before the blade ruins the grain. Maintain a constant speed. If you pause mid-pull, you'll leave a "stutter" mark or a deeper divot where the blade rested. If you do lose your grip, stop immediately. Place the blade back into the existing channel a few millimeters behind where you stopped, realign your guide arm, and resume the motion with a gentle, overlapping pull.
Handling Curves and Internal Grooves
Corners require a delicate pivot. As you approach a rounded corner, slow down and rotate the piece of leather rather than the tool itself. Keep the guide arm flush against the edge throughout the entire turn. For internal decorative lines or pockets where no edge exists to guide you, an adjustable tool won't work. This is where a freehand groover becomes essential. It lacks a guide arm, allowing you to follow a hand-drawn line or a template. When using a freehand version, the 90-degree rule is even more vital because you don't have the mechanical stability of a guide arm to prevent the blade from wandering. Mastering how to use a stitching groover in these tight spaces is what separates a standard project from an artisan piece.
Troubleshooting: Common Mistakes and Material Specifics
Even with a steady hand and a calibrated tool, the leather itself can sometimes be unpredictable. The most frequent headache makers face is the "skipping" problem. This tool hop usually occurs when the blade is dull or when you're working with leathers that are heavily stuffed with oils and waxes. These substances clog the tiny cutting tip, causing it to glide over the grain instead of biting in. If you're struggling with how to use a stitching groover on oily hides, try cleaning the blade with a scrap piece of dry veg-tan every few inches to clear the buildup and restore its "bite."
What if you cut too deep? It happens to the best of us. If you've breached more than a third of the leather's thickness, you've created a structural weak point. For minor over-cuts, you can sometimes "fill" the groove with a bit of burnishing gum or wax before stitching to provide extra support for the thread. However, prevention is always better. I often hear makers worry that grooving thin 2oz leathers will ruin the project. They aren't entirely wrong. On very light hides, the risk of slicing through is high. In those cases, a wing divider might be safer. For anything 3.5oz and above, vegetable tanned leather remains the ideal canvas. Its tight, predictable fibers allow for the cleanest "noodle" removal and a crisp, professional channel.
Grooving Shell Cordovan and Pueblo
Working with shell cordovan requires a different level of respect. Because the fibers are so incredibly dense, a dull blade will simply bounce off the surface. You need a surgical edge to achieve a consistent depth on this "king of leathers." Pueblo leather presents a unique challenge; its scuffed texture can actually help hide minor depth inconsistencies, but the tool can snag on the nap if you don't maintain a consistent 90-degree angle. When you are learning how to use a stitching groover on these premium materials, slow your pace down by half to maintain total control.
Correcting a Slipped Line
A minor slip doesn't always mean the project is destined for the scrap bin. If the slip is shallow, you can often use a bone folder to "massage" the grain back into place. By applying firm pressure and rubbing the mistake, you compress the fibers and close the accidental cut. If the slip is too deep to hide, consider pivoting your design. Sometimes adding a decorative second line or a wider border can turn a mistake into a unique feature. If you're tired of tools that wander, browse our collection of leatherworking tools designed for professional precision.
Tool Maintenance and Finishing Touches
A dull blade is an artisan's greatest enemy. When the cutting edge loses its bite, you are forced to apply more downward pressure to compensate. This extra force is exactly what leads to the slips and gouges we discussed in the troubleshooting section. Respecting the craft means respecting your equipment. I believe a sharp tool is a sign of a sharp mind; it allows you to work with finesse rather than frustration. Learning how to use a stitching groover effectively is impossible if you are fighting against a blunt instrument.
Protection is just as vital as sharpening. Never store your groover loose in a drawer where it can clatter against metal punches or awls. A single microscopic nick on that 'U' shaped blade will cause the tool to tear the leather rather than slice it. I recommend keeping the original plastic cap or crafting a small leather sheath for the tip. If you treat your tools with care, they will return the favor by providing decades of reliable service.
Once your channel is cut, don't rush straight to the stitching pony. Take a moment to prep the channel. You can lightly dampen the groove with a tiny amount of water or a specialized grooving solution to soften the fibers. This makes the leather more receptive to the thread and helps the stitches sit even deeper. Remember, leatherworking is a journey of 1,000 stitches. Every project is an opportunity to refine your touch and deepen your understanding of the material.
Stropping the Groover Blade
Sharpening the inside of a tiny groover blade requires a specialized approach. You cannot use a flat whetstone here. Instead, take a thick piece of cotton thread and coat it heavily with a polishing compound or jeweler's rouge. Secure one end of the thread to your workbench and pull it taut. Slide the hollow part of the blade along the thread in a pulling motion. This polishes the internal "U" shape where the cutting actually happens. For the outer edge, use a piece of fine-grit sandpaper (1000 grit or higher) or a leather strop. Hold the tool at a consistent angle to maintain the factory bevel. To perform the "paper test," try to slice a thin piece of printer paper; it should cut through with zero resistance and no tearing.
Integrating the Groove into the Final Design
The groove is a design element in its own right. For a high-contrast "pinstripe" look, you can apply a darker dye specifically inside the channel using a fine-tipped applicator before you begin stitching. This highlights the precision of your work and adds visual depth. When selecting your leather hardware, consider how the placement of rivets or buckles will interact with your stitch lines. A well-placed groove should guide the eye toward these focal points. After you've finished your saddle stitch, use a bone folder or a smooth burnisher to rub the seam. This final step closes the leather grain slightly over the thread, locking the stitches into their protective home and creating a truly seamless, professional finish. This is the ultimate goal when mastering how to use a stitching groover.
Elevate Your Craft with Precision Lines
Mastering the recessed channel is about more than just aesthetics. It is a commitment to the durability and structural integrity of every piece you create. By matching your groove depth to your thread weight and maintaining that steady, 90-degree pull, you ensure your hand-stitched seams are protected from the rigors of daily use. Learning how to use a stitching groover with precision allows you to move beyond basic assembly into the world of true heirloom quality.
At Hab-To, we bring 160 years of family expertise to your workbench. We believe every artisan deserves access to materials and equipment sourced from the world's finest tanneries. Whether you are working on a single project or building a collection, we offer professional-grade supplies with no minimum order requirements. We are here to support your growth as a maker and a guardian of this traditional craft.
Ready to transform your next project? Shop our curated collection of professional leatherworking tools and start creating pieces that will be cherished for generations. The path to mastery is built one precise cut at a time. Keep practicing, keep refining, and enjoy every step of the journey.
Frequently Asked Questions
Do I really need a stitching groover for every leather project?
No, you don't need a groove for every project, but it is essential for items facing high friction. For wallets, belts, and bags, the groove protects the thread from rubbing against pockets or clothing. Decorative items or very thin leathers under 2oz may not require one. In those cases, a simple mark from a wing divider is often sufficient to guide your stitching.
Can I use a stitching groover on chrome-tanned or soft leathers?
It is generally not recommended for chrome-tanned or very soft, oily leathers. These materials tend to stretch or bunch up under the blade rather than yielding a clean cut. Vegetable tanned leather is the standard because its firm fibers allow the tool to remove a crisp sliver without distorting the grain. If you must use it on softer hides, ensure your blade is surgically sharp.
How do I know if my groover blade is dull?
Your blade is dull if it skips across the leather or leaves a jagged, torn edge instead of a smooth channel. You should see a continuous, thin curl of leather lifting out as you pull. If you find yourself applying excessive downward pressure to make a mark, it's time to strop the blade. A sharp tool should feel like it's gliding through the grain.
What is the difference between a stitching groover and a wing divider?
A stitching groover removes a small amount of material to create a recessed channel, while a wing divider simply leaves a shallow scratch or impression. Groovers are used for structural protection to keep the thread below the surface. Wing dividers are better suited for marking hole placement or creating decorative lines on thinner leathers where removing material would be risky.
How deep should the groove be for a standard wallet?
Aim for a depth of approximately 0.5mm to 0.6mm for a standard wallet made from 3oz to 4oz leather. Following the one-third rule ensures you never cut deeper than 33% of the total thickness. This depth is sufficient to nestle 0.6mm thread while maintaining the structural integrity of the hide. This balance is a key part of learning how to use a stitching groover for professional results.
Should I groove the leather before or after dyeing it?
You should groove the leather before dyeing it to ensure the dye penetrates the newly exposed fibers inside the channel. This creates a uniform color across the entire piece. If you dye first and then groove, the bottom of the channel will show the natural, undyed color of the leather core. This contrast looks unfinished unless you are specifically aiming for a two-tone aesthetic.
What happens if I accidentally cut all the way through the leather?
Cutting all the way through usually means the leather is too thin for the tool or you applied too much pressure. Unfortunately, a full puncture cannot be invisibly repaired and usually requires you to cut a new piece. This is why testing your depth on a scrap strip is the most important part of learning how to use a stitching groover safely before touching your project.
Is there a way to use a groover without a guide arm for internal designs?
Yes, you can use a freehand groover which lacks the adjustable guide arm for internal work. This tool allows you to follow hand-drawn curves or templates in the center of a project where an edge guide cannot reach. When using this version, you must maintain a steady 90-degree angle to prevent the blade from wandering or diving too deep into the grain.
