


How to Measure Leather: A Crafter's Guide to Area, Thickness, and Yield
You've spent hours sketching a new tote bag, only to realize the hide you ordered is half the size you expected and far too thin for your design. It's a frustrating, expensive mistake that stalls your creativity before the first cut. Buying the wrong amount of material is a rite of passage for many crafters, but it doesn't have to be yours. We believe that respect for the craft begins with respect for the material.
We understand the confusion. Staring at an irregular hide or trying to convert ounces to millimeters while your project sits unfinished is overwhelming. Learning how to measure leather is about more than just numbers; it's about understanding the natural geometry of the animal. You deserve to shop with confidence, knowing your chosen vegetable tanned leather will yield exactly what your pattern requires.
This guide will help you master the language of leather measurement to buy the right amount of material for every project without costly waste. We will walk through estimating hide area, choosing the perfect thickness for your tools, and navigating the differences between international standards. You'll gain the expertise needed to turn a raw hide into a finished piece with precision and pride.
Key Takeaways
- Stop treating leather like fabric; learn why the irregular geometry of a hide requires a different approach to surface area than standard textiles.
- Master the conversion between ounces and millimeters to ensure you choose the correct thickness for everything from delicate wallets to sturdy belts.
- Discover how to measure leather using the "Golden Rule of Yield" to account for natural variations and avoid running out of material mid-project.
- Transition from "net area" to "buying area" with confidence by calculating the essential 20-30% buffer needed for professional results.
- Gain peace of mind by understanding the standards of transparency used by expert leather houses to guarantee you receive the exact footage you pay for.
The Unique Geometry of Leather: Why It Isn't Sold by the Yard
Leather is an organic material. Unlike a roll of denim or linen, it doesn't come in a predictable rectangle with straight edges. It follows the natural contours of the animal it came from. This is why the "fabric mentality" of buying by the linear meter or yard leads to costly mistakes in the workshop. When you buy fabric, you assume a consistent width. With leather, you must account for legs, necks, and varying widths across a single piece. Understanding how to measure leather starts with accepting its irregular geometry.
You aren't just buying a length of material; you are buying a specific surface area combined with a specific thickness. These two metrics are independent. A hide can be massive in size but paper-thin, or small and incredibly thick. To ensure accuracy, tanneries use sophisticated tools like laser scanners or traditional pin-wheel machines to calculate every square inch. These machines track the exact perimeter of the hide, providing a total area that includes every curve and indentation. For a deeper look at the standards used globally, you can explore various leather measurement units that define the industry.
To better understand this concept, watch this helpful video showing the measurement process in action:
Understanding Hide Shapes and Sections
The animal's anatomy dictates the shape of the leather on your workbench. A full hide includes the entire surface, while a "side" is simply a full hide cut down the spine. If you need consistent thickness and less stretch, you might look at a double shoulder or a bend. The "butt" section is the densest and most valuable part of the hide. It offers the most stable measurements because the fibers are tightly packed. In contrast, the belly is stretchy and thin. Choosing the right section is just as vital as knowing how to measure leather for your specific pattern.
The Impact of Natural Markings on Measurement
Scars, brands, and insect bites are part of the material's history. They prove the authenticity of the vegetable tanned leather you use. However, these markings affect your "usable area." While the tannery includes these spots in the total square footage, they may not be suitable for the face of a high-end bag. You must distinguish between the total area you pay for and the actual cutting area available for your project. Most hides include some "waste" edges or thin sections near the flanks. We recommend inspecting the hide's character before laying out your patterns to avoid including a deep scar in the middle of a clean panel.
Measuring Surface Area: Square Feet, Metres, and Decimetres
The square foot remains the undisputed king of the leather world. Even in countries that embraced the metric system decades ago, tanneries often stick to imperial measurements due to the historical influence of the US and UK markets. When you browse a catalog, you'll find most hides listed by the square foot. This legacy unit provides a manageable scale for everything from small clutches to large upholstery projects. However, as you source materials from different regions, mastering how to measure leather across different systems becomes a vital skill for any serious crafter.
European tanneries, particularly those in Italy and France, often prefer the square metre or the square decimetre. A square metre is a large area, often too broad for individual hides, which is why the decimetre is so popular. It offers a level of precision that the square foot sometimes lacks. One square decimetre is a 10cm by 10cm square. Because it's smaller, it allows tanners to give a more exact figure for the hide's total area. If you're looking for hides with clear, honest measurements that respect the material, explore our collection of vegetable tanned leather.
Area Conversion Cheat Sheet
Precision is key when learning how to measure leather for high-end goods. If you're buying from a European supplier, you'll likely need to convert their metric figures to calculate your project yield. One square metre equals approximately 10.76 square feet. For smaller increments, many tanneries use the "Rule of 10," where 100 square decimetres make up one square metre. One square decimetre is exactly 0.1076 square feet, meaning you divide the decimetre count by 9.29 to find the imperial equivalent.
- To convert square metres to square feet: Multiply by 10.76.
- To convert square decimetres to square feet: Divide by 9.29.
- To convert square feet to square decimetres: Multiply by 9.29.
Reading the Tannery Stamp
Most hides arrive with a stamp or handwritten number on the suede side. This is the tannery's official measurement. Italian tanneries often use a small "m" or "dm" symbol next to the number. French tanneries might use a specific stamp that looks like a grid. If the number is written in chalk, it's usually the square footage. If you find a hide with no visible stamp, it may have been trimmed or finished in a way that obscured the mark. In these cases, you'll need to use a measuring tape and a "block" method to estimate the area, though this will never be as precise as the tannery's original laser scan.
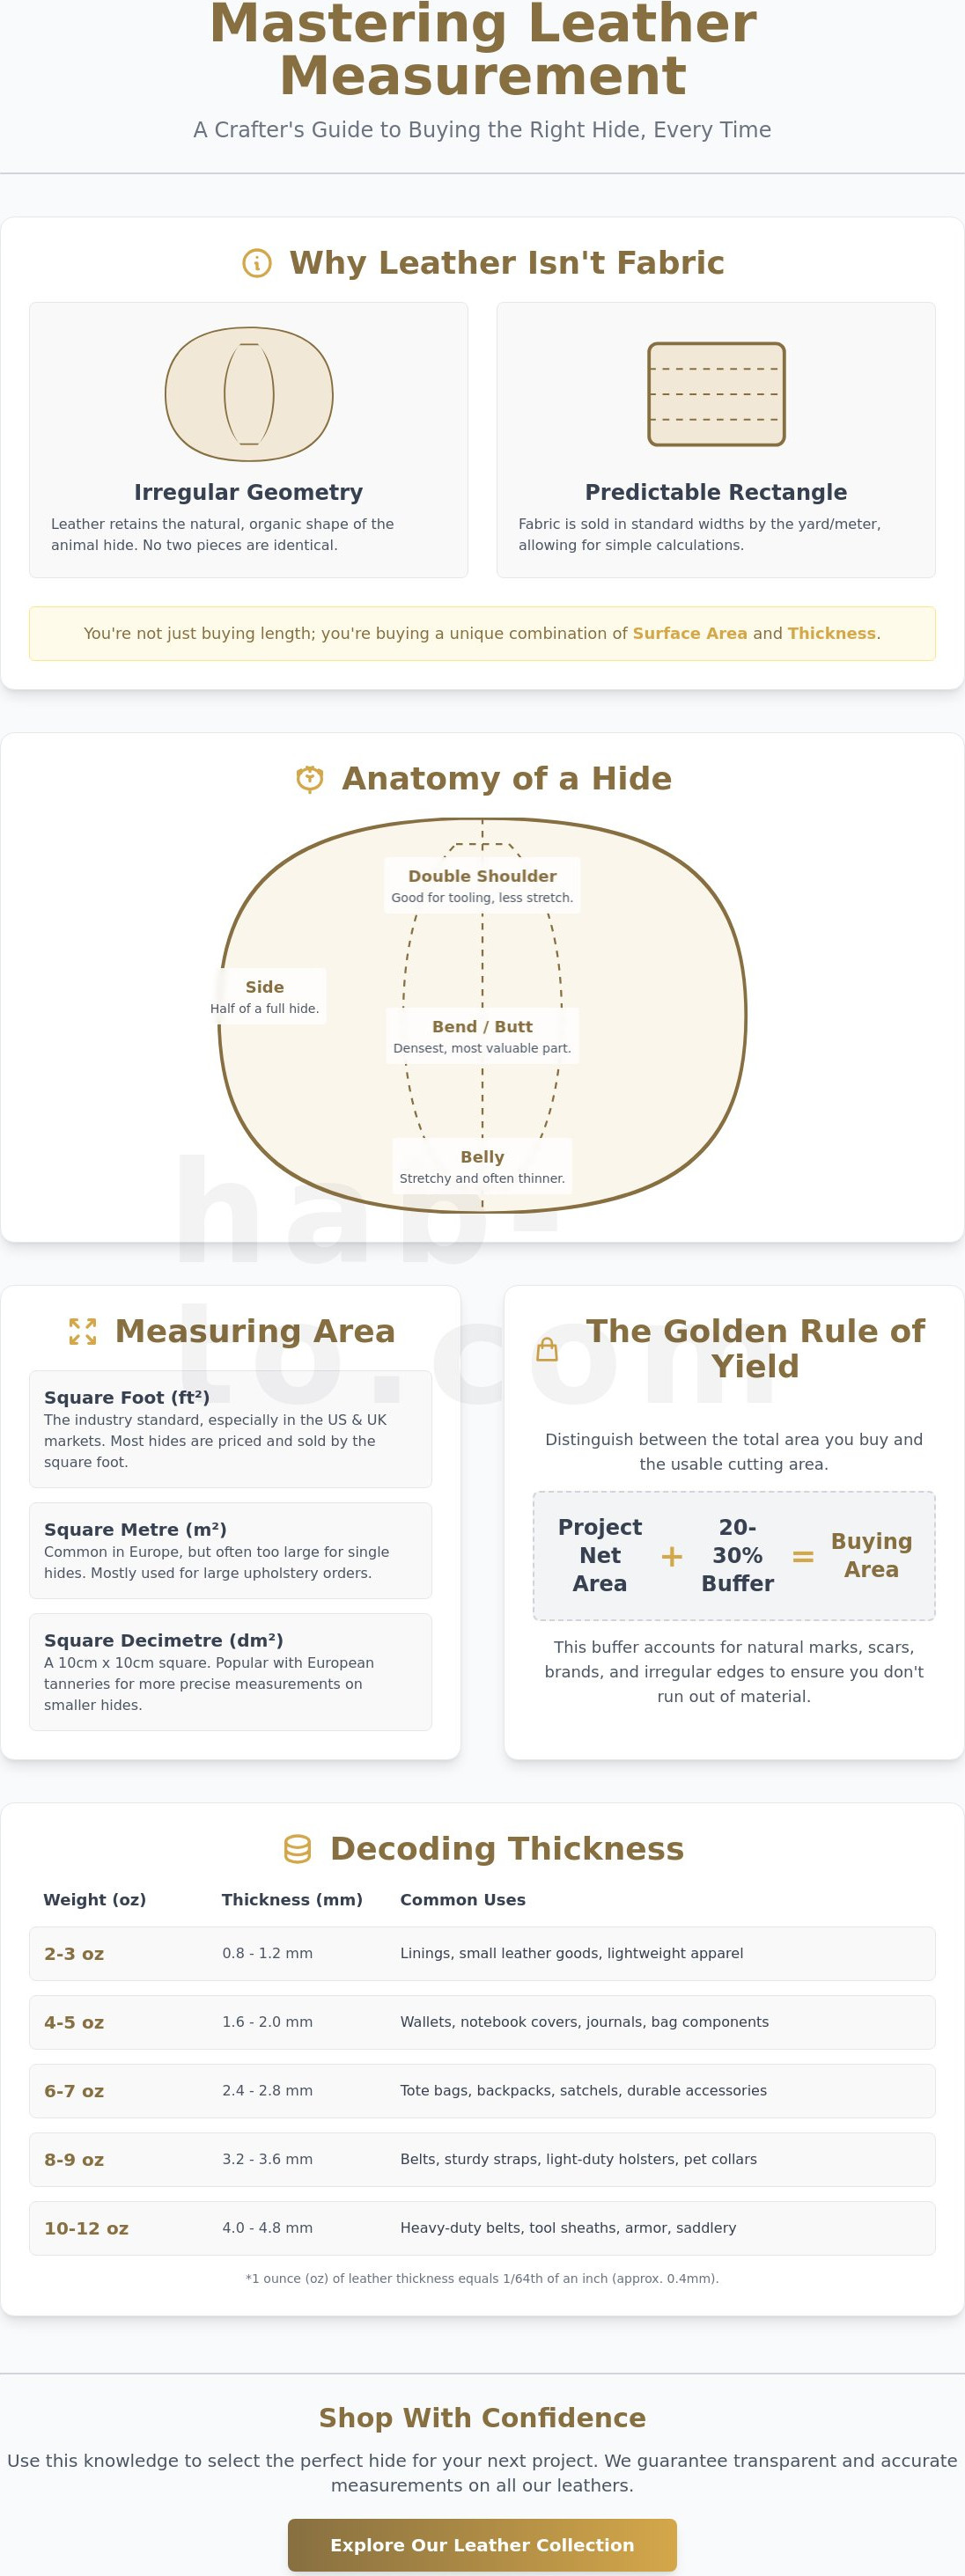
Decoding Thickness: Ounces, Millimetres, and Irons
Thickness in the leather world is often called "weight." It's a confusing holdover from traditional trade where a square foot of leather was literally weighed on a scale. If that square foot weighed four ounces, the leather was called "4 ounce leather." Today, we use this term to describe thickness regardless of the actual weight. Understanding how to measure leather thickness is essential because even a fraction of a millimetre can change how your needle moves through the grain or how a fold sits in a wallet.
For most modern crafters, the conversion is simple: one ounce is roughly 0.4 millimetres. If you're looking at a 5 oz hide, you're dealing with approximately 2.0mm of material. While most of the world uses millimetres for precision, the US and UK often stick to ounces or "irons." An iron is a specialized unit used primarily in shoemaking for heavy sole leather. One iron equals 1/48th of an inch. It's rare to see irons used for bags or wallets, but knowing the term helps you navigate professional supply lists without confusion.
Don't expect a hide to be perfectly uniform. Since leather is a natural skin, it's naturally thinner near the belly and flanks and thicker across the back and butt. Tanneries usually provide a range, such as 4-5 oz, to account for these natural fluctuations. This variation is part of the material's charm, but it requires you to be strategic when laying out your patterns.
How to Measure Thickness at Home
Precision tools are your best friends here. A pair of digital calipers provides an instant millimetre reading, while a traditional analogue dial gauge is often more durable for workshop life. If you prefer the ounce system, a slotted leather gauge is a quick, portable way to check thickness by sliding the leather into the appropriate notch. When you're learning how to measure leather, always take readings from several spots. Don't just measure the very edge. Move a few inches into the shoulder or the center of the hide to get a true average of the usable area.
Choosing Thickness for Your Project
Selecting the right weight defines the structure and durability of your finished piece. Using leather that's too thick makes a project bulky, while leather that's too thin won't hold its shape.
- 1-3 oz (0.4-1.2mm): These lightweight leathers are perfect for linings, card pockets, and delicate accessories.
- 4-6 oz (1.6-2.4mm): This is the versatile "sweet spot." It's sturdy enough for unlined bags, light straps, and journal covers.
- 8 oz+ (3.2mm+): Use these heavy-duty weights for belts, knife sheaths, and tool rolls.
For a deep dive into which weights suit specific tanning methods, check out our guide on vegetable tanned leather. It'll help you match the right thickness to your specific project goals and aesthetic preferences.
Estimating Material for Your Project: Yield and Waste
Buying a 10-square-foot hide for a project that totals exactly 10 square feet is a recipe for heartbreak. In the workshop, we follow the Golden Rule of Yield: always purchase 20-30% more leather than your pattern area requires. This isn't about upselling; it's about the reality of natural materials. Between the curved edges of the flank and the irregular shape of the neck, you'll always encounter "dead space" that can't fit a pattern piece. Mastering how to measure leather yield ensures you have enough material to finish your work without compromise.
Start by calculating the "net area" of your project. Lay out all your pattern pieces on a table and measure the total surface they cover. If you're making a bag with two 12x12 inch panels and a long gusset, your net area is roughly 3 square feet. However, because that gusset is long and thin, it might require a much larger hide to find a clear, straight run. Always prioritize your largest pieces during layout. Nesting smaller items like card slots or tabs into the gaps between larger panels is the best way to minimize waste and respect the hide.
Grain direction also dictates your yield. Leather stretches more significantly across the width of the animal than it does along the spine. If you're cutting straps for a heavy tote, you must align them parallel to the spine for strength. This requirement often forces you to leave perfectly good leather on the table, further reinforcing why that 30% buffer is non-negotiable. If you're ready to start your next project with the right materials, browse our professional leatherworking tools and bundles to get organized.
The Paper Pattern Method
Before you commit to a purchase, create paper mock-ups of every piece in your design. Arrange these on a floor or large table within a "bounding box" that mimics the dimensions of a standard side or shoulder. This visual exercise is the most accurate way to understand how to measure leather needs for irregular designs. Don't forget to account for gussets and rolled handles; these long, narrow components often dictate the size of the hide more than the main panels do.
Managing Natural Defects
Every hide tells a story through its markings. Insect bites, fat wrinkles, and healed scars are common in high-quality vegetable tanned leather. While some crafters treat these as "no-go zones," others embrace them as character marks for rustic designs. However, certain defects like loose grain or deep brands can compromise structural integrity. Buying specialized materials like shell cordovan requires even stricter yield calculations. Because cordovan comes in small, oval-shaped "shells" rather than large hides, your pattern placement must be incredibly precise to avoid wasting the most expensive leather in the world.
Expert Guidance at Hab-To Leather House
Choosing the right material is a deeply personal part of the craft. At Hab-To Leather House, we bring 160 years of family expertise to your workbench. We don't just sell hides; we share a tradition of quality and respect for the material. When you learn how to measure leather through our guidance, you're tapping into generations of knowledge. Understanding how to measure leather is a fundamental skill we help every customer master. We believe in total transparency. Every hide is measured with precision, ensuring you receive the exact footage you pay for. No guesswork. No hidden costs.
We've removed the barriers for hobbyists and professionals alike. We offer no minimum orders. This means you can source premium vegetable tanned leather for a single wallet or a full collection without the pressure of industrial quantities. Our commitment to sustainability is reflected in our accuracy. Measuring correctly is an eco-friendly practice. It reduces waste and ensures that every part of the hide finds its purpose in a beautiful, lasting object. We're here to help you make every cut count.
Personalized Selection Service
Our team in Amsterdam is ready to assist you in matching a hide to your specific project needs. Whether you're unsure about the required square footage or the specific temper needed for a structured tote, we provide personalized advice. We consult on thickness and grain characteristics to ensure your vision comes to life. To complete your project kit, we also offer a curated selection of leather hardware that matches the quality of our hides.
Crafting Your Legacy
A great project requires more than just the right leather; it requires the right tools and a supportive community. Using high-quality leather stamping tools on correctly measured leather allows you to leave a mark that lasts for generations. At Hab-To, we support your journey from curious hobbyist to professional artisan. We invite you to join our community and experience the difference that expert selection makes. Ready to start? Browse our premium leather collection and find the perfect hide for your next masterpiece.
Master Your Material and Elevate Your Craft
Mastering the language of hide measurement is the bridge between a good idea and a professional finished product. You now understand that leather isn't just a flat surface; it's a natural geometry that requires a 20-30% buffer for a successful yield. By decoding the relationship between ounces and millimeters, you can ensure every fold and stitch has the structural integrity it deserves. Learning how to measure leather accurately saves you from the frustration of wasted material and the expense of avoidable errors.
Our Amsterdam-based team carries a 160-year family heritage in the leather trade. We've removed the hurdles for independent makers by offering no minimum order quantities on our premium stocks. If you're feeling stuck on a specific project, you can even book an expert consultation via appointment to find the exact hide that fits your pattern. We believe that when you start with the right measurements, the rest of the craft falls into place.
Explore our collection of hand-selected hides at Hab-To Leather House and start your next project with total confidence. Your craft is a legacy in the making. Make every square inch count.
Frequently Asked Questions
How many square feet are in a yard of leather?
One linear yard of 54 inch wide fabric is roughly equivalent to 18 square feet of leather. This is the standard conversion used in the upholstery industry to account for the irregular shape of animal hides. Since leather doesn't come in a roll with a consistent width, you must calculate your needs based on this square footage ratio rather than a simple linear measurement.
What is the best way to measure leather thickness without a gauge?
You can use a stack of standard credit cards or common coins to estimate thickness if you don't have a professional gauge. A single credit card is approximately 0.76mm thick, which is slightly less than 2 oz leather. By stacking cards next to the edge of your hide, you can get a rough idea of its weight. However, for precise work, digital calipers are always the better choice.
Why is my leather hide thinner at the edges?
Leather is a natural skin and it is naturally thinner and more pliable at the belly and flanks of the animal. The densest and most uniform part of any hide is the butt or the area along the spine. These thinner edges are often called the offal. While they're included in the total tannery measurement, they're better suited for small, non structural parts of your project.
How much extra leather should I buy for waste?
You should always purchase 20% to 30% more leather than your pattern's actual surface area requires. This buffer accounts for the irregular perimeter of the hide and natural marks like scars or holes that you may want to avoid. If you're working with specialized materials like shell cordovan, your waste calculations might be even higher because of the small, specific oval shape of the shells.
What does '1.2/1.4mm' mean on a leather description?
This range indicates the minimum and maximum thickness of the hide across its entire surface. Because leather is an organic material, tanneries can't guarantee a perfectly uniform thickness from the neck to the belly. A 1.2/1.4mm range translates to roughly 3 to 3.5 ounces. Understanding these ranges helps you determine how to measure leather suitability for projects like wallets or light accessories.
Can I buy half a hide if I only need a small amount?
Yes, many suppliers sell sides, which are full hides cut in half along the spine. At Hab-To Leather House, we support makers of all levels by offering no minimum order quantities on our vegetable tanned leathers. This allows you to purchase exactly what you need for a single project without the burden of large industrial orders that don't fit your current workshop scale.
How do I convert square decimetres to square feet?
Divide the number of square decimetres by 9.29 to find the equivalent square footage for your hide. This is a vital calculation for crafters who source premium materials from Italian or French tanneries that use the metric system. If a hide is marked as 100 dm, it's approximately 10.76 square feet. Mastering these conversions is a key part of learning how to measure leather for international projects.
What is the difference between weight and thickness in leather?
In the leather world, the terms weight and thickness are often used interchangeably, though weight technically refers to ounces per square foot. A 4 oz leather means one square foot of that material weighs four ounces, which results in a thickness of roughly 1.6mm. While the rest of the world uses millimeters for direct measurement, traditional trades in the US and UK still rely on this weight based system.
